background image

6.  MANUTENZIONE
6.1. RIPULITURA E CURA DELL'APPARECCHIO

La brocca, i cestelli di cottura, i separatori, la lama, i coperchi e le pinze possono essere lavati con acqua insaponata e 
una spugnetta o in lavastoviglie.
Per pulire la base dell'apparecchio, utilizzare un panno inumidito.

Importante:

· Pulire l'apparecchio dopo ogni uso.
· Scollegare sempre l'apparecchio dalla presa di corrente e attendere che si raffreddi prima di procedere alla sua 
ripulitura.
· Non immergere mai la base in acqua.
· Le lame sono molto affilate: manipolarle con cautela.
· Non utilizzare prodotti abrasivi. Non versare mai nell'apparecchio candeggina o altri prodotti chimici.
· Dopo aver ripulito la lama, fare attenzione a installarla nuovamente nel modo corretto.

6.2. ELIMINAZIONE DEI DEPOSITI DI CALCARE

Con il tempo, a seconda della qualità dell'acqua utilizzata, potrebbero formarsi depositi di calcare sul fondo del 
serbatoio dell'acqua. Per eliminare questi depositi si deve fare quanto segue:
1. Versare nel serbatoio una miscela di 100 ml di acqua calda e di 100 ml di aceto bianco.
2. Lasciare agire questa miscela per circa 3 minuti prima di svuotare il serbatoio e tergerlo con un panno umido.
3. Riempire il serbatoio con 200 ml di acqua e collocarlo nella posizione di vapore per 20 minuti. Svuotare e pulire la 
brocca prima di cucinare altri alimenti.

Importante: Non utilizzare detergenti.

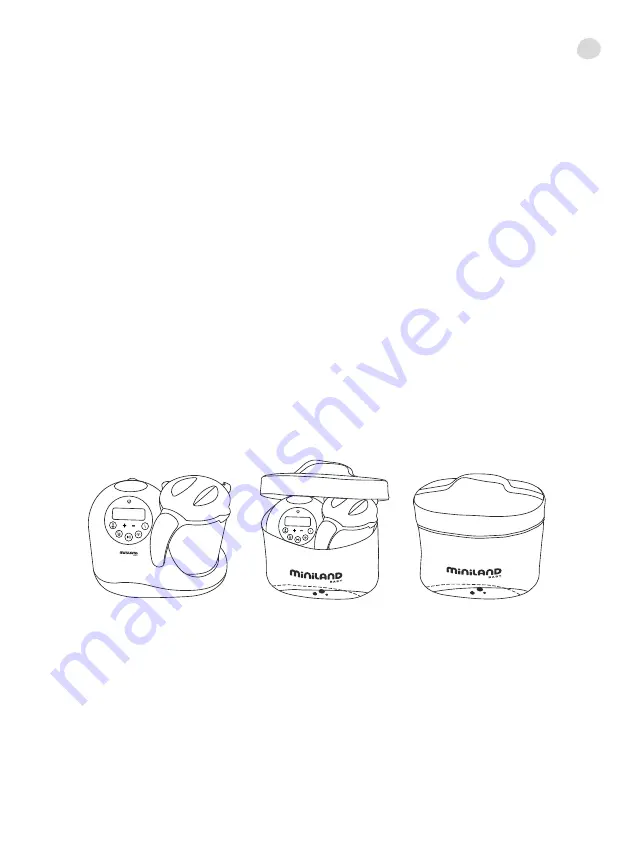
6.3. CONSERVAZIONE

Quando si prevede di non utilizzare il robot multifunzione per un periodo di tempo prolungato, o quando ci si trova 
nella necessità di trasportarlo, seguire i passi seguenti:
1. Aprire la borsa.
2. Collocare gli accessori nella brocca del frullatore e collocare la brocca sulla base come mostrato in figura.
3. Introdurre l'apparecchio nella borsa.
4. Chiudere la borsa con la zip.

Importante: Svuotare il serbatoio dell'acqua prima di riporre il apparecchio.

7.  SPECIFICHE TECNICHE


Capacità massima del serbatoio dell'acqua: 350 ml
Capacità massima della brocca: 1l
Capacità massima del cestello di cottura al vapore A: 750ml
Capacità massima del cestello di cottura al vapore B: 350ml
Capacità massima del cestello di cottura al vapore C: 150ml
Protezione: Sistema di riscaldamento con controllo di temperatura e blocco di sicurezza.
Potenza: 700 W (Motore: 200 W)
Tensione: 240 V / 50 Hz

8.  INFORMAZIONI DI SMALTIMENTO PRODOTTO

È necessario disfarsi del prodotto in modo responsabile. 
I prodotti contrassegnati con il simbolo di bidone dei rifiuti barrato non devono essere smaltiti con i rifiuti domestici 
indifferenziati. 
Una volta giunti al termine della loro vita utile, questi prodotti devono essere smaltiti portandoli a un centro di raccolta e 
trattamento designato dalle autorità locali, oppure rivolgendosi al rivenditore dal quale il prodotto è stato acquistato.

it

Summary of Contents for Chefy 5

Page 1: ...chefy 5 3 12 23 32 Castellano English Português Français 41 50 59 68 Deutsch Italiano Polski Русский www minilandbaby com ...

Page 2: ......

Page 3: ... toda la información del proceso Cajón inferior extraíble para guardar los accesorios de cocina Dispone de un cómodo recoge cables y todos los accesorios se guardan en el interior de la jarra principal ocupando el mínimo espacio cuando no está e uso Bolsa para almacenaje y transporte incluida Libre de bisfenol A 2 CONTENIDO 1 Procesador de alimentos 1 Jarra 1 Tapa de la jarra 3 Cestas para la sepa...

Page 4: ...so en hogares 20 No incline o vuelque el aparato ni intente vaciarlo o rellenarlo mientras esté en funcionamiento 21 Vacíe el depósito de agua antes de guardar el aparato 22 No intente abrir ninguna parte del aparato 23 No sumerja nunca el aparato en agua 24 No ponga en funcionamiento ningún aparato eléctrico si el cable o el enchufe estuvieran dañados si no funcionara correctamente o si hubiera s...

Page 5: ...VIII Depósito de agua vacío 1 6 8 5 4 3 2 7 I V II III IV VI VII VIII 00 min 5 INSTRUCCIONES DE USO 5 1 ANTES DEL USO 5 1 1 LLENADO DEL DEPÓSITO DE AGUA 1 Retire la tapa decorativa del depósito de agua A tirando cuidadosamente de ella hacia arriba 2 Abra el depósito de agua girando la tapa B en el sentido contrario a las agujas del reloj 3 Llene el depósito C con la cantidad de agua necesaria 4 Ci...

Page 6: ... debe quedar totalmente insertado en el agujero de la base destinado a acogerlo Para retirar el vaso de batidora gírelo en el sentido de las agujas del reloj Agujero de la base Muescas de la base Lenguetas de la jarra Gancho de la tapa 5 1 3 COLOCACIÓN DE LA CESTA DE COCCIÓN AL VAPOR EN LA JARRA BATIDORA 1 Alinee la marca en forma de punta de flecha de la cesta de cocción al vapor A con el pico ve...

Page 7: ...aña de la parte inferior de la cesta de cocción al vapor C con la muesca de la parte superior de la cesta de cocción al vapor B Coloque la tapa de aislamiento térmico H encima de la cesta de cocción al vapor C Muesca de la cesta de cocción al vapor A Pestaña de la cesta de cocción al vapor B Pestaña de la cesta de cocción al vapor C Muesca de la cesta de cocción al vapor B es ...

Page 8: ...que la cuchilla esté bien fijada 5 2 COCCIÓN AL VAPOR 1 Llene el depósito con agua 2 Coloque los alimentos en la cesta grande L 3 Haga la cesta de cocción al vapor más grande si fuera necesario 4 Si desea separar distintos tipos de alimentos para cocinarlos por separado siga las indicaciones de la sección 5 1 5 5 Coloque la s cesta s en el bol de cocción jarra e instale la tapa G o H de manera que...

Page 9: ... al vapor determinado puede variar en función de la temperatura ambiente la dureza del agua o la temperatura de la misma El nivel máximo del depósito permite cocciones de entorno a 20 minutos Para realizar cocciones al vapor más largas cuando el agua del depósito se agote deberá esperar cinco minutos abrir el depósito de agua rellenar con agua suficiente para terminar la cocción pulsar el botón 4 ...

Page 10: ...tar o descongelar biberones grandes u otros contenedores de alimentos 4 Coloque la s cesta s en el bol de cocción jarra e instale la tapa del bol G o H de manera que quede bien ajustada Compruebe que no quede demasiado holgada 5 Pulse el botón de calentamiento 2 y a continuación el botón de funcionamiento 4 para iniciar el calentamiento el recalentamiento o la descongelación Si desea detener tempo...

Page 11: ... antes de cocinar de nuevo alimentos Importante No utilice detergentes 6 3 ALMACENAMIENTO Cuando no vaya a utilizar el procesador de alimentos durante un período de tiempo prolongado o si tuviera que transportarlo siga los pasos que se indican a continuación 1 Abra la bolsa 2 Coloque los accesorios en el vaso de batidora y coloque el vaso en la base tal como se muestra en la figura 3 Introduzca el...

Page 12: ...fety disconnection when the level of water is too low and when idle Visual and sound alerts Intuitive backlit display with multiple options and all the process information Extractable lower drawer to store kitchen accessories It has a convenient cable storage space and all the components can be stored inside the jug occupying minimal space when not in use Storage and travel bag Bisphenol A free 2 ...

Page 13: ...is appliance is intended for household use only 21 Empty the water tank before storing the appliance 22 Donottiltortiptheunitorattempttoemptyorfillitwhileitisoperating 23 Do not attempt to open any part of the food processor 24 Never immerse the appliance in water 25 Never use the appliance with a damaged cord or plug or after the appliance has malfunctioned or been damaged in any way 26 Never atte...

Page 14: ... 3 Remove the jug lid G and unscrew the heat insulation cover H from the inside of the jug lid G 4 Unpack and wash parts G H I J K L M and U carefully Part U can be found in the drawer on the processor base Lid hook 1 2 3 4 G H I J K L M 4 2 CONTROL PANEL 1 ON OFF 2 Warmer function 3 Sterilizer function 4 Start Pause 5 Steaming function 6 Blending function 7 Increase time 8 Decrease time 4 3 DISPL...

Page 15: ...water tank C turning the cap B anticlockwise 3 Fill the tank C with water required using the blender jug 4 Close the water tank turning the cap B clockwise 5 Fit the lid A on to the tank C matching the tank nozzle relief with the lid notch and carefully press the lid down 1 2 3 4 5 Water A A B B C C C en ...

Page 16: ...ticlockwise until you hear a click The hole on the side of the blender jug must line up exactly with the steam outlet on the food processor Whenthelidisfittedontotheblenderjug thehookofthelidmustbefullyinsertedinthebasehole Turn the blender jug clockwise if you want to remove it 5 1 4 PLACING THE STEAMING BASKET IN THE BLENDER JUG 1 Line up the arrowhead mark on the large steaming basket L with the...

Page 17: ...over over the small steaming basket I Mid size Steaming basket K tab Large steaming basket L notch Small steaming basket I tab Mid size steaming basket K notch 5 1 5 SETTING UP A LARGE COMBINED STEAMING BASKET 1 Place the mid size steaming basket K over the large steaming basket L by matching the tab on the bottom of the mid size steaming basket K with the notch on the top of the large steaming ba...

Page 18: ...blade is properly screwed in 5 2 STEAM COOKING 1 Fill the water tank C 2 Place the food into the large basket L 3 Set up the larger combined steaming basket if necessary 4 If you wish to separate types of food in order to cook them separately follow the process in section 5 1 6 5 Placethebasket s intheblenderjug M andfiteitherthejuglid G orheatinsulationcover H tightly Checkthat there is no play 6 ...

Page 19: ...II 5 3 BLENDING 1 Place the cooked or fresh food from the basket s directly into the blender jug M 2 Put the blending lid U on and close the jug lid G 3 Place the bowl on the base and lock into place 4 Plug in and turn on the appliance 1 5 Press the blend button 6 and press the start button 4 to start blending for approximately 13 seconds on and 2 off during 5 cycles If you want to pause the funct...

Page 20: ...s the increase button 7 and decrease button 8 to choose the time you prefer 6 When sterilizing is completed the appliance beeps 5 5 WARMER REHEATING DEFROSTING 1 Fill the water tank 2 Put the bottle or food into the large steaming basket L 3 Set up the larger combined steaming basket if you wish to warm reheat or defrost big feeding bottles or different food 4 Placethebasket s intheblenderjug M an...

Page 21: ...sket I IMPORTANT Ensure the notch on the mid size steaming basket K matches up with the tab on the small steaming basket I failure to do so will prevent the lid being attached 2 Place the jug lid G over the blender jug M and turn the lid anticlockwise until you hear a click Turn the lid clockwise if you want to remove it 3 Place the blender jug M on the processor base as shown Fold the blending li...

Page 22: ...hot water 100ml white vinegar into the water tank 2 Leave for approximately 3 minutes before emptying the tank and wiping it with a damp cloth 3 Fill the tank with 200ml water and set the appliance to the steam position for 20 minutes leaving the bowl empty before using it again to cook food Important do not use detergents 8 TECHNICAL SPECIFICATION Maximum capacity of water tank 350ml Maximum capa...

Page 23: ... múltiplas opções e todas as informações do processo Gaveta inferior amovível para guardar os acessórios de cozinha Dispõe de um cómodo recolhe cabos e todos os acessórios são guardados no interior da jarra principal ocupando o mínimo espaço quando não está em uso Saco para armazenamento e transporte incluído Livre de bisfenol A 2 CONTEÚDO 1 Processador de alimentos 1 Jarra de batedeira 1 Tampa da...

Page 24: ...20 Não incline nem vire o aparelho nem tente esvaziá lo ou enchê lo enquanto ele estiver em funcionamento 21 Esvaziar o depósito de água antes de guardar o aparelho 22 Não tente abrir nenhuma parte do aparelho 23 Nunca submirja o aparelho em água 24 Não ponha em funcionamento nenhum aparelho eléctrico se o cabo ou a ficha estiverem danificados se não funcionar correctamente ou se tiver sofrido qua...

Page 25: ...Depósito de água vazio 1 6 8 5 4 3 2 7 I V II III IV VI VII VIII 00 min 5 INSTRUÇÕES DE UTILIZAÇÃO 5 1 ANTES DO USO 5 1 1 ENCHIMENTO DO DEPÓSITO DE ÁGUA Retire a tampa decorativa do depósito de água A puxando a cuidadosamente para cima Abra o depósito de água rodando a tampa B no sentido contrário ao dos ponteiros do relógio Encha o depósito C com a quantidade de água necessária Feche o depósito d...

Page 26: ... da tampa deve ficar totalmente inserido no furo da base destinado a acolhê lo Para retirar o copo de batedeira rode o no sentido dos ponteiros do relógio Furo da base Entalhes da base Linguetas da jarra Gancho da tampa 5 1 3 COLOCAÇÃO DO CESTO DE COZEDURA NO VAPOR NA JARRA BATEDEIRA 1 Alinhe a marca em forma de ponta de seta do cesto de cozedura no vapor A com o bico vertedor dianteiro da jarra 2...

Page 27: ... lingueta da parte inferior do cesto de cozedura no vapor C com o entalhe da parte superior do cesto de cozedura no vapor B Coloque a tampa de isolamento térmico H em cima do cesto de cozedura no vapor C Entalhe do cesto de cozedura no vapor A Lingueta do cesto de cozedura no vapor B Lingueta do cesto de cozedura no vapor C Entalhe do cesto de cozedura no vapor B pt ...

Page 28: ...depósito com água 2 Coloque os alimentos no cesto grande L 3 Torne maior o cesto de cozedura no vapor se for necessário 4 Se desejar separar tipos de alimentos para os cozinhar em separado siga as indicações da secção 5 1 5 5 Coloque o s cesto s na tigela de cozedura jarra e instale a tampa G ou H de forma que fique bem ajustada Comprove que não fica demasiado folgada 6 Coloque a jarra sobre a bas...

Page 29: ...cessária para encher o depósito tendo em vista conseguir um determinado tempo de cozedura a vapor pode variar em função da temperatura ambiente da dureza da água ou da temperatura da mesma O nível máximo do depósito permite cozeduras de cerca de 20 minutos Para efectuar cozeduras a vapor mais longas quando a água do depósito se esgotar deverá aguardar 5 minutos abrir o depósito de água encher com ...

Page 30: ... biberão ou os alimentos no cesto grande L 3 Torne maior o cesto de cozedura no vapor se desejar aquecer reaquecer ou descongelar biberões grandes ou outros contentores de alimentos 4 Coloque o s cesto s na tigela de cozedura jarra e instale a tampa da tigela G ou H de forma que fique bem ajustada Verifique se fica demasiado folgada 5 Pressione o botão de aquecimento 2 e em seguida o botão de func...

Page 31: ... Esvazie a jarra e limpe a antes de cozinhar novamente alimentos Importante Não utilize detergentes 6 3 ARMAZENAMENTO Quando não tencionar utilizar o processador de alimentos durante um longo período de tempo ou se tiver que o transportar dê os passos indicados em seguida 1 Abra o saco 2 Coloque os acessórios no copo de batedeira e coloque o copo na base da forma apresentada na figura 3 Introduza ...

Page 32: ...e Déconnexion automatique de sécurité par manque d eau et au repos Affichage rétroéclairé très intuitif avec multiples options et toutes les informations du processus Tiroir inférieur extractible pour ranger les accessoires de cuisine Dispose d un range cordon pratique tous les accessoires sont conservés à l intérieur de la carafe principale occupant ainsi le minimum d espace lorsque l appareil n ...

Page 33: ... appareil est conçu uniquement pour une utilisation au foyer 20 Ne pas incliner ou renverser l appareil ni essayer de le vider ou de le remplir alors qu il fonctionne 21 Videz le réservoir d eau avant de ranger l appareil 22 Ne pas essayer ouvrir des parties de l appareil 23 Ne plongez jamais l appareil dans l eau 24 Ne faites fonctionner aucun appareil électrique lorsque le cordon d alimentation ...

Page 34: ...VI VII VIII 00 min 5 INSTRUCTIONS D UTILISATION 5 1 AVANT L UTILISATION 5 1 1 REMPLISSAGE DU RESERVOIR D EAU 1 Retirez le couvercle décoratif du réservoir d eau A en le relevant doucement vers le haut 2 Ouvrez le réservoir d eau en faisant tourner le couvercle B dans le sens contraire des aiguilles d une montre 3 Remplissez le réservoir C avec la quantité d eau nécessaire 4 Fermez le réservoir d e...

Page 35: ...e Lorsque la carafe est fermée le crochet du couvercle doit être totalement inséré dans l orifice de la base destiné à le recevoir Pour retirer la carafe du mixeur faites la tourner dans le sens des aiguilles d une montre Orifice de la base Encoches de la base Languettes de la carafe Crochet du covercle 5 1 3 MISE EN PLACE DU PANIER DE CUISSON VAPEUR DANS LA CARAFE DU MIXEUR 1 Alignez la marque en...

Page 36: ...a languette de la partie inférieure du panier de cuisson vapeur C avec l encoche de la partie supérieure du panier de cuisson vapeur B Placez le couvercle d isolation thermique H au dessus du panier de cuisson vapeur C Encoche du panier de cuisson vapeur A Languette du panier de cuisson vapeur B Languette du panier de cuisson vapeur C Encoche du panier de cuisson vapeur B fr ...

Page 37: ...ien fixée 5 2 CUISSON A LA VAPEUR 1 Remplissez d eau le réservoir 2 Placez les aliments dans le grand panier L 3 Utilisez si nécessaire le panier de cuisson vapeur le plus grand 4 Si vous souhaitez séparer des types d aliments pour les cuire séparément suivez les indications de la section 5 1 5 5 Placez le s panier s dans le bol de cuisson carafe et installez le couvercle G ou H de manière à ce qu...

Page 38: ...é peut varier en fonction de la température ambiante de la dureté de l eau ou de la température de cette dernière Le niveau maximal du réservoir permet des cuissons d environ 20 minutes Pour effectuer des cuissons à la vapeur plus longues lorsque l eau du réservoir s épuisera vous devrez attendre 5 minutes ouvrir le réservoir d eau remplir avec de l eau suffisante pour terminer la cuisson appuyer ...

Page 39: ... cuisson vapeur le plus grand si vous souhaitez chauffer réchauffer ou décongeler de grands biberons ou autres récipients à aliments 4 Placez le s panier s dans le bol de cuisson carafe et installez le couvercle G ou H de manière à ce qu il soit bien ajusté Vérifiez qu il n y ait pas trop de jeu 5 Appuyez sur le bouton de chauffage 2 puis sur le bouton de fonctionnement 4 pour lancer le chauffage ...

Page 40: ...ettoyez la carafe avant de cuire de nouveaux aliments Important N utilisez pas de détergents 6 3 RANGEMENT Lorsque vous n utiliserez pas le robot ménager durant une période prolongée ou lorsque vous devrez le transporter suivez les étapes qui sont indiquées ci après 1 Ouvrez le sac 2 Placez les accessoires dans la carafe du mixeur et placez la carafe sur la base comme on le montre sur la photo 3 I...

Page 41: ... Behälter die Körbe und der Messersatz sowie sämtliches Zubehör sind spülmaschinenfest Automatische Sicherheitsabschaltung bei Mangel an Wasser und in der Ruhestellung Hoch intuitives Display mit Hintergrundbeleuchtung und mehreren Optionen Liefert alle notwendigen Informationen über den Betrieb des Gerätes Herausnehmbare untere Schublade zur Aufbewahrung des Zubehörs Bequemer Kabeleinroller Das Z...

Page 42: ...s Gerät nicht für einen anderen Zweck als den vorgesehenen 19 Dieses Gerät ist nur für den Einsatz in Haushalten vorgesehen 20 Das Gerät nicht kippen entleeren oder füllen während es in Betrieb ist 21 Entleeren Sie den Wassertank vor dem Speichern des Gerätes 22 Öffnen Sie niemals irgendwelche Teile des Gerätes 23 Tauchen Sie das Gerät unter keinen Umständen in Wasser 24 Betreiben Sie kein elektri...

Page 43: ...8 5 4 3 2 7 I V II III IV VI VII VIII 00 min 5 GEBRAUCHSANWEISUNG 5 1 VOR DER INBETRIEBNAHME 5 1 1 AUFFÜLLEN DES WASSERTANKS 1 Entfernen Sie die dekorative Abdeckung des Wassertanks A indem Sie diese vorsichtig nach oben ziehen 2 Öffnen Sie den Wassertank durch Drehen des Deckels B im Gegenuhrzeigersinn 3 Füllen Sie den Wassertank C mit der benötigten Menge Wasser 4 Schliessen Sie den Wassertank d...

Page 44: ...en Wenn das Glas korrekt geschlossen ist muss der Haken der Abdeckung vollständig im dafür vorgesehenen Loch in der Halterung einrasten Um den Mixbecher zu entfernen drehen Sie ihn im Uhrzeigersinn Loch in der Halterung Kerben an der Halterung Zungen am Mixbecher Haken der Abdeckung 5 1 3 PLATZIERUNG DES DAMPFKOCHKORBES IM MIXBECHER 1 Richten Sie die Markierung in Form einer Pfeilspitze am Dampfko...

Page 45: ... Dampfkochkorb B K indem Sie die Zunge am unteren Teil des Korbes C mit der Kerbe am oberen Teil des Korbes B in Übereinstimmung bringen Legen Sie den thermisch isolierten Deckel H auf den Dampfkochkorb C Kerbe am Dampfkochkorb A Zunge am Dampfkochkorb B Zunge am Dampfkochkorb C Kerbe am Dampfkochkorb B de ...

Page 46: ... KOCHEN MIT DAMPF 1 Füllen Sie den Tank mit Wasser 2 Legen Sie die Lebensmittel in den grossen Korb L 3 Falls erforderlich erweitern Sie die Grösse des Dampfkochkorbes 4 Falls Sie verschiedene Arten von Lebensmitteln getrennt kochen möchten folgen Sie bitte den Anweisungen in Abschnitt 5 1 5 5 Stellen Sie den Korb die Körbe in den Kochbehälter Schale und platzieren Sie den Deckel G oder H bis er k...

Page 47: ...ine bestimmte Kochzeit gefüllt werden muss kann je nach der herrschenden Raumtemperatur sowie der Härte oder der Temperatur des Wassers verschieden sein Ist der Behälter bis zum höchsten Füllstand gefüllt so reicht die Wassermenge für eine Kochzeit von etwa 20 Minuten Soll eine längere Kochzeit ermöglicht werden so ist Folgendes zu tun nachdem das Wasser im Behälter aufgebraucht ist 5 Minuten wart...

Page 48: ...llen Sie den Tank mit Wasser 2 Stellen Sie die Babyflasche oder die Lebensmittel in den grossen Korb L 3 Erweitern Sie die Grösse des Dampfkochkorbes wenn Sie grössere Babyflaschen oder Nahrungsmittelbehälter erwärmen aufwärmen oder auftauen möchten 4 Stellen Sie den Korb die Körbe in den Kochbehälter Schale und platzieren Sie den Deckel G oder H so dass er korrekt sitzt d h er sollte nicht zu vie...

Page 49: ...uten ein Entleeren und reinigen Sie den Kochbehälter bevor Sie einen neuen Kochvorgang starten Wichtiger Hinweis Verwenden Sie keine Reinigungsmittel 6 3 AUFBEWAHRUNG DES GERÄTES Falls Sie dieses Gerät für einen längeren Zeitraum nicht benutzen sollten oder wenn Sie es transportieren müssen beachten Sie bitte folgendes 1 Öffnen Sie die Tasche 2 Legen Sie das Zubehör in den Mixbecher und stellen Si...

Page 50: ...ica di sicurezza per mancanza d acqua e in stand by Display retro illuminato molto intuitivo con diverse opzioni che visualizza tutte le informazioni relative al processo in corso Cassetto inferiore estraibile per riporre gli accessori da cucina Dispone di un comodo raccogli cavi e tutti gli accessori si ripongono all interno della brocca principale occupando il minimo spazio quando l apparecchio ...

Page 51: ... tolto il coperchio 18 Non utilizzare l apparecchio a fini diversi da quelli per i quali è stato progettato 19 Questo apparecchio è destinato esclusivamente a uso domestico 20 Non inclinare l apparecchio né tentare di svuotarlo o riempirlo mentre è in funzionamento 21 Svuotare il serbatoio dell acqua prima di riporre il apparecchio 22 Non tentare di aprire alcuna parte dell apparecchio 23 Non imme...

Page 52: ...toio dell acqua vuoto 1 6 8 5 4 3 2 7 I V II III IV VI VII VIII 00 min 5 ISTRUZIONI PER L USO 5 1 PRIMA DELL USO 5 1 1 RIEMPIMENTO DEL SERBATOIO DELL ACQUA 1 Togliere il coperchio decorativo del serbatoio d acqua A tirandolo con cautela verso l alto 2 Aprire il serbatoio dell acqua girando il coperchio B in senso antiorario 3 Riempire il serbatoio C con la quantità di acqua necessaria 4 Chiudere i...

Page 53: ...re totalmente inserito nel forno della base destinato ad accoglierlo Per rimuovere la brocca girarla in senso orario Forno della base Tacche della base Linguette della brocca Gancho del coperchio 5 1 3 COLLOCAZIONE DEL CESTELLO DI COTTURA AL VAPORE NELLA BROCCA FRULLATORE 1 Allineare il contrassegno a forma di punta di freccia del cestello di cottura a vapore A con il beccuccio anteriore della bro...

Page 54: ...tta della parte inferiore del cestello di cottura a vapore C con la tacca della parte superiore del cestello di cottura a vapore B Collocare il coperchio di isolamento termico H al di sopra del cestello di cottura a vapore C Tacca del cestello di cottura a vapore A Linguetta del cestello di cottura a vapore B Linguetta del cestello di cottura a vapore C Tacca del cestello di cottura a vapore B it ...

Page 55: ...A AL VAPORE 1 Riempire il serbatoio d acqua 2 Collocare gli alimenti nel cestello grande L 3 Comporre un cestello di cottura a vapore più grande se necessario 4 Se si desidera separare vari tipi di alimenti per cuocerli a parte seguire le indicazioni della sezione 5 1 5 5 Collocare il i cestello i nella brocca di cottura e mettere il coperchio G o H in modo che rimanga ben saldo Controllare che no...

Page 56: ...piccole dimensioni di meno di 2 3 cm Velocità di cottura al vapore 2 L acqua necessaria per riempire il serbatoio al fine di ottenere un tempo di cottura a vapore determinato può variare in funzione della temperatura ambiente della durezza dell acqua o della temperatura della stessa Il livello massimo del serbatoio permette durate di cottura di circa 20 minuti Per effettuare cotture a vapore di du...

Page 57: ...ura a vapore più grande se si desidera riscaldare o scongelare biberon grandi o altri contenitori di alimenti 4 Collocare il i cestello i nella brocca di cottura e mettere il coperchio G o H in modo che sia ben fermo Controllare che non abbia gioco 5 Premere il pulsante di riscaldamento 2 successivamente quello di funzionamento 4 per dare inizio al riscaldamento o allo scongelamento Se si desidera...

Page 58: ...re e pulire la brocca prima di cucinare altri alimenti Importante Non utilizzare detergenti 6 3 CONSERVAZIONE Quando si prevede di non utilizzare il robot multifunzione per un periodo di tempo prolungato o quando ci si trova nella necessità di trasportarlo seguire i passi seguenti 1 Aprire la borsa 2 Collocare gli accessori nella brocca del frullatore e collocare la brocca sulla base come mostrato...

Page 59: ...anie w razie braku wody oraz w czasie przerwy w eksploatacji urządzenia Intuicyjny panel sterowania z wyświetlaczem LED z licznymi funkcjami informujący o szczegółach procesu Możliwości schowania akcesoriów kuchennych w wysuwanej dolnej szufladzie Wygodne zwijanie kabla Oszczędność miejsca dzięki możliwości przechowywania akcesoriów w dzbanku W zestawie pokrowiec do przechowywania i transportu urz...

Page 60: ...wyłącznie do użytku domowego 20 Nie przechylać nie opróżniać ani nie napełniać urządzenia podczas pracy 21 Opróżnić zbiornik wody przed przechowywaniem urządzenia 22 Nie rozmontowywać żadnego z elementów urządzenia 23 Nie zanurzać urządzenia w wodzie 24 Nie włączać urządzeń elektrycznych w przypadku uszkodzenia kabla lub wtyczki ich niepoprawnego działania lub stwierdzenia innego rodzaju usterek 2...

Page 61: ...acz VIII Pusty zbiornik na wodę 1 6 8 5 4 3 2 7 I V II III IV VI VII VIII 00 min 5 SPOSÓB OBSŁUGI 5 1 PRZED UŻYCIEM 5 1 1 NAPEŁNIANIE ZBIORNIKA WODY 1 Zdjąć pokrywkę maskującą zbiornika wody A ostrożnie pociągając ja do góry 2 Otworzyć zbiornik na wodę przekręcając pokrywkę B w kierunku przeciwnym do ruchu wskazówek zegara 3 Napełnić zbiornik C pożądaną ilością wody 4 Zamknąć zbiornik przekręcając...

Page 62: ...ek jest przykryty występ pokrywki powinien w całości znajdować się w specjalnie zaprojektowanym otworze bazy W celu zdjęcia dzbanka z bazy należy przekręcić go przeciwnie do ruchu wskazówek zegara Otworze bazy Wcięcie bazy Występ dzbanka Występ pokrywki 5 1 3 MONTAŻ POJEMNIKA DO GOTOWANIA NA PARZE NA DZBANKU MALAKSERA 1 Dopasować pojemnik do gotowania na parze do dzbanka w taki sposób aby dzióbek ...

Page 63: ...by występ w dolnej części pojemnika C spotkała się z wcięciem w górnej części pojemnika B Umieścić pokrywę izolacji termicznej H na pojemniku do gotowania na parze C Górne wcięcie naczynia do gotowania na parze A Dolny występ naczynia do gotowania na parze B Występ pojemnika do gotowania na parze C Wcięcie pojemnika do gotowania na parze B pl ...

Page 64: ...e zostało poprawnie zamontowane 5 2 GOTOWANIE NA PARZE 1 Napełnić zbiornik wodą 2 Umieścić produkty w dużym pojemniku L 3 W razie potrzeby zwiększyć pojemność pojemnika do gotowania na parze 4 Aby oddzielić produkty które chcemy ugotować w tym samym czasie postępować zgodnie ze wskazówkami zawartymi w punkcie 5 1 5 5 Umieścić pojemniki w misie do gotowania dzbanku i zamocować pokrywkę G lub H dokł...

Page 65: ...ę w celu uzyskania pożądanego czasu gotowania na parze może różnić się w zależności od temperatury otoczenia twardości wody lub jej temperatury Przy maksymalnym napełnieniu zbiornika czas gotowania na parze to około 20 minut Aby wydłużyć czas gotowania należy odczekać 5 minut otworzyć zbiornik na wodę napełnić odpowiednią ilością wody wystarczająca do dokończenia procesu gotowania nacisnąć przycis...

Page 66: ...użym pojemniku L 3 Zwiększyć objętość pojemnika do gotowania na parze w przypadku podgrzewania rozmrażania dużych butelek lub pojemników na żywność 4 Umieścić pojemniki w misie do gotowania dzbanku i założyć pokrywkę G lub H tak aby szczelnie przykrywała pojemnik Upewnić się że pokrywka ściśle przylega do naczynia 5 Nacisnąć przycisk podgrzewania 2 a następnie przycisk pauza start aby rozpocząć pr...

Page 67: ...ze na czas 20 minut Opróżnić i wyczyścić dzbanek przed powtórnym użyciem Uwaga Nie używać detergentów 6 3 PRZECHOWYWANIE W przypadku gdy planowana jest dłuższa przerwa w eksploatacji urządzenia lub należy zapakować je do transportu należy 1 Otworzyć pokrowiec 2 Umieścić akcesoria w misie miksera i umieścić ją na bazie w sposób przedstawiony na ilustracji 3 Umieścić urządzenie w pokrowcu 4 Zamknąć ...

Page 68: ...уаров может осуществляться в посудомоечной машине автоматическое предохранительное отключение при отсутствии воды а также в состоянии покоя очень чувствительный дисплей с задней подсветкой с многочисленными опциями и предоставлением детальной информации о процессе выдвижной внутренний ящик для хранения кухонных аксессуаров удобное отделение для кабеля возможность хранения аксессуаров в чаше занима...

Page 69: ...ания в домашнем хозяйстве 20 Запрещается наклонять или переворачивать прибор а также пытаться его опорожнить или наполнить во время работы 21 Слейте воду из бака перед хранением прибора 22 Запрещается пытаться открыть какую либо часть прибора 23 Запрещается погружать прибор в воду 24 Запрещается эксплуатация электрических приборов при поврежденном шнуре или штепсельной розетке при некорректной раб...

Page 70: ...н VIII Резервуар для воды пустой 1 6 8 5 4 3 2 7 I V II III IV VI VII VIII 00 min 5 ИНСТРУКЦИИ ПО ЭКСПЛУАТАЦИИ 5 1 ПЕРЕД ИСПОЛЬЗОВАНИЕМ 5 1 1 НАПОЛНЕНИЕ РЕЗЕРВУАРА ДЛЯ ВОДЫ 1 Снимите декоративную крышку резервуара для воды А аккуратно потянув ее вверх 2 Откройте резервуар для воды повернув крышку В против часовой стрелки 3 Наполните резервуар С необходимым количеством воды 4 Закройте резервуар для...

Page 71: ...аченное отверстие на основании Для снятия чаши с миксера поверните ее по часовой стрелке отверстие Паз базы Выступ чаши крюк крышки 5 1 3 УСТАНОВКА КОНТЕЙНЕРА ДЛЯ ПРИГОТОВЛЕНИЯ НА ПАРУ В ЧАШЕ БЛЕНДЕРА 1 Сопоставьте отметку в виде стрелочки на контейнере приготовления на пару A с острием выступа спереди чаши 2 Вставьте контейнер в чашу 2 5 1 4 ФОРМИРОВАНИЕ КОНТЕЙНЕРА ПРИГОТОВЛЕНИЯ НА ПАРУ БОЛЬШЕГО ...

Page 72: ...чтобы выступ на нижней части контейнера для приготовления на пару C совпал с пазом в верхней части контейнера для приготовления на пару B Поместите крышку термоизоляции H поверх контейнера для приготовления на пару C Паз контейнера для приготовления на пару А Выступ контейнера для приготовления на пару В Выступ контейнера для приготовления на пару C Паз контейнера для приготовления на пару B ru ...

Page 73: ... форме цветка 5 2 ПРИГОТОВЛЕНИЕ НА ПАРУ 1 Наполните резервуар водой 2 Поместите продукты в большой контейнер L 3 При необходимости увеличьте размеры контейнера 4 При желании разделить продукты для их приготовления по отдельности следуйте инструкциям раздела 5 1 5 5 Поместите резервуары в посуду для варки чашу и поместите крышку G или H таким образом чтобы она плотно прилегала Убедитесь в отсутстви...

Page 74: ...рьировать в зависимости от температуры окружающей среды жесткости воды или ее температуры Максимальный уровень воды в резервуаре позволяет варку около 20 минут Для осуществления более длительной варки на пару когда вода в резервуаре закончится надо будет сделать следующее подождать 5 минут открыть резервуар для воды заполнить его достаточным количеством воды для окончания варки нажать на кнопку 4 ...

Page 75: ...еть подогреть или разморозить рожки больших размеров или другие контейнеры с продуктами 4 Поместите контейнер ы на чашу приготовления и установите крышку G или H таким образом чтобы она плотно прилегала Убедитесь в отсутствии зазора 5 Нажмите на кнопку нагрева 2 а затем на кнопку старта 4 для начала нагрева подогрева или размораживания При необходимости временно прекратить операцию еще раз нажмите...

Page 76: ...упить к приготовлению пищи Важно запрещено использовать моющие средства 6 3 ХРАНЕНИЕ Если вы не собираетесь использовать кухонный комбайн в течение длительного времени а также при необходимости его транспортировки выполните следующие действия 1 Откройте сумку 2 Поместите аксессуары в резервуар миксера и поместите резервуар на основании как показано на рисунке 3 Поместите прибор в сумку 4 Закройте ...

Page 77: ...61000 3 2 A2 2009 Electromagnetic compatibility EMC Part 3 2 Limits Limits for harmonic current emissions equipment input current 16 A per phase EN 61000 3 3 2008 Electromagnetic compatibility EMC Part 3 3 Limits Limitation of voltage changes voltage fluctuations and flicker in public low voltage supply systems for equipment with rated current 16 A per phase and not subject to conditional connecti...

Page 78: ......

Page 79: ......

Page 80: ...Raccolta differenziata Rispetta l ambiente Recolha selectiva Conserve o Meio Ambiente Chroń środowisko Segreguj śmieci Раздельный сбор мусора Берегите окружающую среду Fabricado en China Conservar los datos Made in China Keep this information Fabricado em China Conservar dados Fabbricato in China Conservare i dati Fabriqué en China Conserver ces informations Hergestellt in China Bewahren Sie diese...

Reviews: