background image

49 


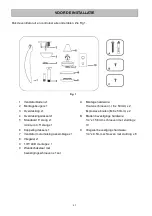
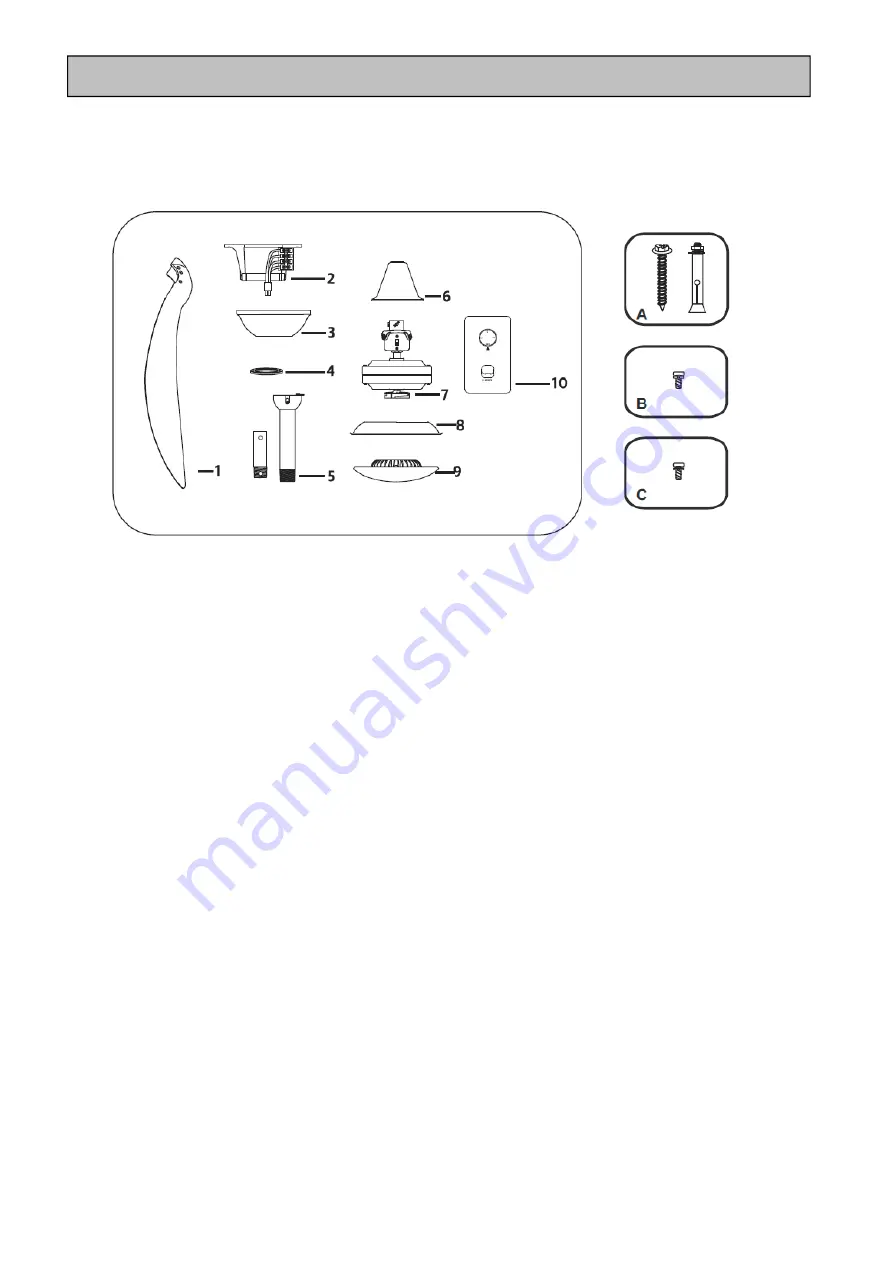
Pak de ventilator uit en controleer alle onderdelen. Zie Fig 1. 


Ventilatorbladen x1 

Montage hardware: 

Montagebeugel x1 


Houten schroeven (

φ

6 x 50mm) x 2 

Overdekking x1 


Explosieve bouten (M6 x 50mm) x 2 

Overdekkingsdeksel x1 

Bladen bevestigings hardware: 

Standaard 6” stang x1 

minimum 4.5” stang x1 


1/4” x 15.8mm schroeven met sluitring x 

10 

Koppeling deksel x1 

Vliegwiel bevestigings hardware: 

Ventilator motorhuising assemblage x1 


1/4” x 9.5mm schroeven met sluitring x 6 

Vliegwiel x1 


17W LED montage x 1 


Wandschakelaar met 

bevestigingsschroeven x1 set 


VOOR DE INSTALLATIE 

Fig. 1 

Summary of Contents for Light wave F844

Page 1: ...V1 0...

Page 2: ...lation instruction manual 3 D Installationsanleitung 12 F Guide d installation 21 E Manual de instrucciones de instalaci n 30 I Manuale delle istruzioni di installazione 39 NL Installatiehandleiding 4...

Page 3: ...they can use the appliance safely 3 Children should be supervised to ensure that they do not play with the appliance 4 An all pole disconnection switch must be incorporated into the fixed wiring in ac...

Page 4: ...50mm x 2 4 Canopy cover x 1 B Blade attachment hardware 5 Standard 6 down rod assembly x 1 Minimum 4 5 down rod x 1 1 4 x 15 8mm screws with lock washers x 10 6 Coupling cover x 1 C Flywheel attachmen...

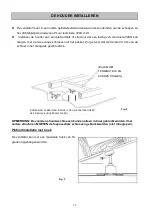
Page 5: ...le of carrying a load of at least 30kg with the two long screws provided Ensure at least 30mm of the screw is threaded into the support NOTE The bracket screws provided are for use with wooden structu...

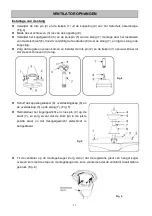
Page 6: ...s and reinstall the rock pin 2 and hitch pin 1 Finally re tighten the set screws 3 Slide the coupling cover 8 canopy cap 6 and canopy 5 onto the downrod 7 Fig 5 Reinstall the ball joint and cross pin...

Page 7: ...e remaining two blades Fig 7 Align the holes on the flywheel 4 and the fan motor 1 and secure with the flywheel screws provided Fig 8 While holding the LED light kit assembly under your fan firmly con...

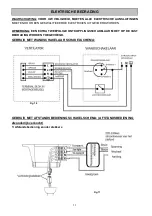
Page 8: ...KEN BY A LICENSED ELECTRICIAN NOTE AN ADDITIONAL ALL POLE DISCONNECTION SWITCH MUST BE INCLUDED IN THE FIXED WIRING USE WITH WALL SWITCH WIRING DIAGRAM USE WITH REMOTE WIRING DIAGRAM REMOTE sold separ...

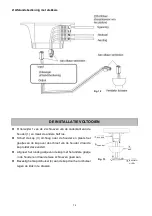
Page 9: ...place the key hole on the canopy over the screw on the hanger bracket and turn the canopy until it locks in place at the narrow section of the key holes Align the circular hole on the canopy with the...

Page 10: ...an can operate either in fan mode or reverse fan mode SUMMER Mode The reverse switch shall be in down SUMMER position to make the fan rotate in the anticlockwise direction The airflow will be directed...

Page 11: ...manufacturer s warranty covers actual faults that may develop and NOT minor complaints such as hearing the motor run All electric motors are audible to some extent CARE AND CLEANING Periodic cleaning...

Page 12: ...orschriften f r elektrische Installationen integriert werden 4 Entsorgen Sie elektrische Ger te niemals im regul ren Hausm ll sondern geben Sie das Ger t stets ordnungsgem bei einer Sammelstelle f r e...

Page 13: ...l gelbefestigungszubeh r 5 Standard 6 Zoll H ngestangenhalterung x 1 Kurze 4 5 Zoll H ngestange x 1 1 4 x 15 8mm Schrauben mit Sicherungsscheiben x 10 6 Verbindungsabdeckung x1 C Schwungrad Befestigun...

Page 14: ...e dazu die zwei mitgelieferten Schrauben Stellen Sie sicher dass die Schraubengewinde mindestens 30mm in den Untergrund eingedreht werden HINWEIS Die f r die Halterung mitgelieferten Schrauben sind nu...

Page 15: ...en Sicherungsstift 1 wieder ein Ziehen Sie abschlie end die Klemmschrauben 3 wieder fest Schieben Sie die Verbindungsabdeckung 8 die Deckenschirmabdeckung 6 und die Abdeckung 5 auf die H ngestange 7 A...

Page 16: ...Weise aus Abb 7 Richten Sie die Bohrungen des Schwungrades 4 und des Ventilatormotors 1 aufeinander aus und sichern Sie das Schwungrad mittels der mitgelieferten Schrauben 5 Abb 8 Verbinden Sie den Ka...

Page 17: ...EIS EIN ZUS TZLICHER ALLPOLIGER TRENNSCHATER MUSS IN DER INSTALLATION DER WANDVERKABELUNG ENTHALTEN SEIN DER EINSATZ MIT FEST INSTALLIERTEM WANDSCHALTER SCHALTDIAGRAMM DER EINSATZ MIT FERNBEDIENUNG SC...

Page 18: ...n Sie die se an der Abdeckung ber der Schraube an der Deckenhalterung drehen Sie nun den Schirm bis dieser im verj ngten Ende der se einrastet Richten Sie die runde ffnung an der Abdeckung auf die and...

Page 19: ...w rtsrichtung zur K hlung im Sommer WINTER Modus Wenn sich der Umkehrschalter in der oberen Einstellung WINTER befindet dann dreht sich der Ventilator im Uhrzeigersinn Der Luftstrom bewegt sich in Auf...

Page 20: ...NG UND PFLEGE Die regelm ige Reinigung des Ventilators ist die einzige Wartungsma nahme die Ihr Ventilator ben tigt Verwenden Sie eine weiche B rste oder ein flusenfreies Tuch um Kratzer auf den Oberf...

Page 21: ...es enfants doivent tre surveill s pour qu ils vitent de jouer avec les appareils 3 Il faut incorporer une d connexion tout pole au fils fix en suivant les r gles de c blage r guli re 4 Ne disposez pas...

Page 22: ...B Boulonnerie de fixation des lames 5 Tige inf rieure standard de 6 pouces x 1 Tige inf rieure minimum de 4 5 pouces x 1 Vis de 1 4 x 15 8 mm avec rondelles de blocage x 10 6 Couvercle de l accoupleme...

Page 23: ...ure qui sont capable de porter un poids de 30KG avec deux vis longues Assurez qu un moins 30mm de vis a t attach au support NOTE Les vis de support sont destin es juste aux structures en bois Pour les...

Page 24: ...oupille 2 et l axe d attelage 1 Remettre les vis 3 en place Faire coulisser le couvercle 8 de l accouplement le capuchon 6 de la monture et la monture 5 sur la tige inf rieure 7 Fig 5 R installer le j...

Page 25: ...ux lames restantes Fig 7 Aligner les trous sur le volant moteur 4 et le moteur 1 du ventilateur et s curiser avec les vis 5 du volant moteur fournies Fig 8 Maintenir le kit d clairage DEL sous le vent...

Page 26: ...UNE suppl mentaires Toutes POLE DECONNEXION interrupteur doit tre incluse dans le c blage fixe UTILISER AVEC LE SCH MA DE C BLAGE DE COMMUTATION UTILISER AVEC LE SCH MA DE C BLAGE DISTANCE DISPOSITIF...

Page 27: ...e la serrure sur la verri re au dessus de la vis sur le support de suspension tournez couvert jusqu ce qu il se verrouille en place la section troite des trous de serrure Alignez le trou circulaire su...

Page 28: ...issement en temps de chaleur Mode HIVER L interrupteur d inversion doit tre la position haut HIVER pour faire tourner le ventilateur dans le sens normal Le d bit d air sera alors dirig vers le haut po...

Page 29: ...oyage p riodique de votre ventilateur de plafond est le seul entretien n cessaire Utilisez une brosse ou un chiffon doux non pelucheux pour viter de rayer la peinture de finition S il vous pla t coupe...

Page 30: ...os polosal cableado instalado de acuerdo con las normas locales 4 No deseche los aparatos el ctricos en los vertederos municipales como un desecho sin clasificar utilice las instalaciones de recolecci...

Page 31: ...erta x 1 B Piezas met licas del accesorio del alabe 5 Varilla vertical est ndar de 6 x 1 Varilla vertical de 4 5 m nimo x 1 Tornillos de 1 4 x 15 8mm con arandelas de cierre x 10 6 Acoplamiento de la...

Page 32: ...m del tornillo se enrosque en el soporte NOTA Los tornillos del soporte que se proporcionan son para su uso exclusivo con estructuras de madera Para estructuras distintas de las de madera se debe util...

Page 33: ...no de enganche 1 Para finalizar vuelva a apretar los tornillos colocados 3 Deslice la cubierta del acoplamiento 8 tapa de la cubierta 6 y la cubierta 5 en la varilla vertical 7 Fig 5 Vuelva a instalar...

Page 34: ...es Fig 7 Alinee los agujeros del volante 4 con el motor del ventilador 1 y asegure el volante con los tornillos de ste 5 que se adjuntan Fig 8 Mientras sujeta el conjunto de iluminaci n LED bajo el ve...

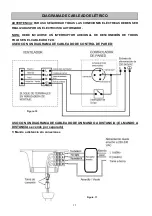
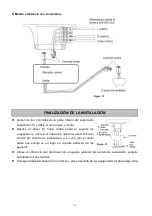
Page 35: ...BE INCLUIRSE UN INTERRUPTOR ADICIONAL DE DESCONEXI N DE TODOS POLOS EN EL CABLEADO FIJO USEO CON UN DIAGRAMA DE CABLEADO DE CONTROL DE PARED USO CON UN DIAGRAMA DE CABLEADO DE UN MANDO A DISTANCIA EL...

Page 36: ...io de traba del dosel sobre el tornillo del soporte de suspensi n a su vez gire el dosel hasta que encaje en su lugar en la parte estrecha de los agujeros Alinee el orificio circular del dosel con el...

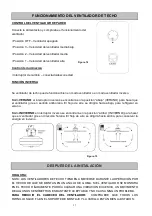
Page 37: ...e dirigir hacia abajo para refrigerar en verano Modo INIVIERNO el interruptor inverso se encontrar en la posici n arriba INVIERNO para hacer que el ventilador gire en direcci n horaria El flujo de air...

Page 38: ...LIMPIEZA La limpieza peri dica de su ventilador de techo es el nico mantenimiento requerido Utilice un pa o libre de pelusa o un cepillo suave para evitar rayar el acabado de la pintura Por favor apag...

Page 39: ...Un interruttore onnipolare deve essere incorporato nel cablaggio fisso secondo le norme di cablaggio locali 4 Non smaltire apparecchi elettrici nei rifiuti urbani indifferenziati utilizzare servizi di...

Page 40: ...x 2 4 Coperchio inferiore x 1 B Attrezzi per atttacco pale 5 Gruppo barra discendente standard 6 x 1 Barra discendente da minimo 4 5 x 1 Viti da 1 4 x 15 8mm con rondelle bloccanti x 10 6 Copertura ac...

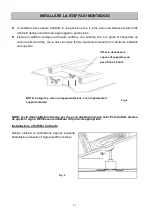
Page 41: ...0 mm della vite filettato nel supporto NOTA le viti della staffa forniti sono per l uso con strutture in legno solo Per strutture diverse da quelle in legno DEVE essere utilizzato il tipo di vite appr...

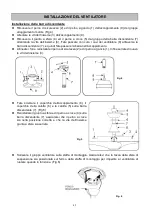
Page 42: ...e il perno di sicurezza 2 ed il perno a gancio 1 Infine serrate di nuovo le viti dell insieme 3 Fate scivolare il coperchio dell accoppiamento 8 il coperchio della calotta 6 e la calotta 5 sulla barra...

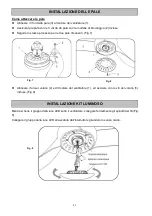
Page 43: ...pale rimanenti Fig 7 Allineare i fori sul volano 4 ed il motore del ventilatore 1 ed assicure con le viti del volano 5 incluse Fig 8 Mentre si tiene il gruppo della luce LED sotto il ventilatore coll...

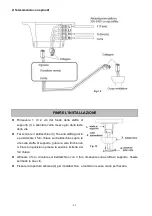
Page 44: ...CISTA QUALIFICATO NOTA UN SUPPLEMENTARE ALL POLE SEZIONATORE DEVE ESSERE INCLUSO NEL CABLAGGIO FISSO USARE CON IL DIAGRAMMA DI CABLAGGIO DELL INTERRUTTORE A MURO USARE CON IL DIAGRAMMA DI CABLAGGIO DE...

Page 45: ...il foro chiave sul baldacchino sopra la vite sulla staffa di supporto girare la vela finch non si blocca in posizione presso la sezione ristretta dei fori chiave Allineare il foro circolare sul balda...

Page 46: ...entilatore in direzione anti oraria Il flusso d aria sar diretto verso il basso per rinfrescare in estate Modalit WINTER INVERNALE L interruttore di inversione si trover nella posizione su WINTER INVE...

Page 47: ...li in una certa misura MANUTENZIONE E PULIZIA La pulizia periodica del vostro ventilatore a soffitto l unica manutenzione richiesta Utilizzare una spazzola morbida o un panno privo di peli per evitare...

Page 48: ...polige ontkoppeling moet in de vaste bedrading voorzien worden in navolging van locale elektriciteitsregels 4 Gooi elektrische apparatuur niet in de normale vuilnisbak maar bring dit product naar de m...

Page 49: ...mm x 2 4 Overdekkingsdeksel x1 B Bladen bevestigings hardware 5 Standaard 6 stang x1 minimum 4 5 stang x1 1 4 x 15 8mm schroeven met sluitring x 10 6 Koppeling deksel x1 C Vliegwiel bevestigings hardw...

Page 50: ...g ervoor dat tenminste 30 mm van de schroef in het draagvlak geschroefd is OPMERKING De voorziene houderschroeven kunnen alleen in hout gebruikt worden Voor andere structuren MOETEN de toepasselijke s...

Page 51: ...en installer de rots pin 2 en de trekpin 1 opnieuw Draai tot slot de set schroeven 3 terug Schuif de koppelingsdeksel 8 overdekkingskap 6 en de overdekking 5 op de stang 7 Fig 5 Herinstalleer het kog...

Page 52: ...voor de 2 overblijvende bladen Fig 7 Breng de gaten op het vliegwiel 4 in lijn met de ventilator motor 1 en zet deze vast met de vliegwiel schroeven 5 voorzien Fig 8 Houdt de LED licht kit assemblage...

Page 53: ...N UITGEVOERD WORDEN OPMERKING EEN EXTRA TWEEPOLIGE ONTKOPPLINGSSCHAKELAAR MOET OP DE VAST BEDRADING WORDEN TOEGEVOEGD GEBRUIK MET WANDSCHAKELAAR SCHAKELSCHEMA GEBRUIK MET AFSTANDSBEDIENING SCHAKELSCHE...

Page 54: ...uder en plaats het gaatje van de kap over de schroef van de houder draai de kap totdat deze vastzit Aligneer het ronde gaatje van de kap met het andere gaatje in de houder en draai de twee schroeven g...

Page 55: ...luchtstroom wordt naar beneden gericht voor koelen in de zomer WINTER Modus De omkeerschakelaar moet omhoog positive staan WINTER om de ventilator te laten draaien met de klok mee De luchtstroom wordt...

Page 56: ...HOONMAAK Periodieke schoonmaak van de ventilator is het enige vereiste onderhoud Gebruik een zachte borstel of een stofvrije doek om krassen op de verflaag te voorkomen Zet de stroom uit voor het scho...

Reviews: