background image

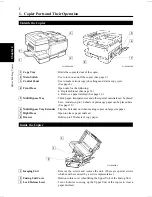
1. Copier Parts and Their Operation

Outside the Copier

1 Copy Tray

: Holds the copies fed out of the copier.

2 Main  Switch

: Use to turn on and off the copier. (See page 9.)

3 Control Panel

: Use to make various copy job settings and start a copy cycle.

(See page 8.)

4 Front Door

: Open only for the following:

Replenish toner (See page 32.)

Remove a paper misfeed (See page 36.)

5 Multi Bypass Tray

: Thick paper, transparencies and other special materials can be placed

here.  And also, up to 30 sheets of plain copy paper can be placed here.
(See page 19.)

6 Multi Bypass Tray Extender : Flip this Extender out when making copies on large size paper.

7 Right Door

: Open to clear a paper misfeed.

8 Drawer

: Holds up to 250 sheets of copy paper.

Inside the Copier

1 Imaging Unit 

: Remove the screws and remove the unit. (These are special screws

which must be removed by a service representative.)

2 Fusing Unit Cover

: Hold onto this cover when lifting the Upper Unit of the Fusing Unit.

3 Lock Release Lever

: Turn clockwise to swing up the Upper Unit of the copier to clear a

paper misfeed.

1

2

3

4

5

6

7

8

C1159O004DA

C1159O005DA

1

2

3

C1159O003EA

Chapter 2

Befor

e Making Copies

6

Summary of Contents for CSPRO EP1031

Page 1: ...1159 7704 05 Operator s Manual EP1031 EP1031F ...

Page 2: ...facturer s Name Plate The Manufacturer s Name Plate is affixed at the position indicated by the arrow Please write down the Model Name and Serial No of your copier here Model Serial No Manufacturer s Name Plate C1159O001EA ...

Page 3: ... over 60 percent In addition high speed copiers will be set to automatically make double sided copies An organization s paper costs can be reduced by 60 a month and the volume of paper sent into the waste stream will decline It takes 10 times more energy to produce a piece of paper than it does to make a single copy on a copier Therefore using less paper also means decreased national energy consum...

Page 4: ...ce tool for immediately clarifying any questions which may arise MC 02 WARNING This equipment has been tested and found to comply with the limits for a Class A digital device pursuant to Part 15 of the FCC Rules These limits are designed to provide reasonable protection against harmful interference when the equipment is operated in a commercial environment This equipment generates uses and can rad...

Page 5: ...ent p 3 Using the Copier Properly p 3 Moving p 3 Care of Copier Supplies p 3 Chapter 2 Before Making Copies p 5 1 Copier Parts and Their Operation p 6 Outside the Copier p 6 Inside the Copier p 6 Semi automatic Document Handler SDH p 7 2 Control Panel and Its Operation p 8 Control Panel p 8 Service Indicators p 8 3 Turning ON OFF and Initial Mode p 9 Turning ON and OFF p 9 When the Copier is Turne...

Page 6: ...18 Inch Areas p 18 6 Multi Bypass Copying p 19 Using the Multi Bypass p 19 7 Hints for Advanced Copying p 20 Two Sided Copying p 20 Composite Copying p 20 Chapter 4 Special Functions p 21 1 Toner Replenisher p 22 Toner Replenisher Function p 22 2 Drum Dehumidifier p 23 Drum Dehumidifier Function p 23 3 User s Choice p 24 User s Choice Item p 24 User s Choice Function and Explanation of Settings p ...

Page 7: ...feed p 35 Removing a Paper Misfeed p 36 J2 J3 Copier p 36 J8 Semi automatic Document Handler SDH p 37 6 C Display p 38 Resetting the Copier p 38 Chapter 6 Troubleshooting p 39 1 When This Type of Copy is Produced p 40 2 Copier Does Not Work Properly p 42 Chapter 7 Miscellaneous p 43 1 Copier Specifications p 44 2 Daily Maintenance p 45 Cleaning Before cleaning always make sure the Main Switch for ...

Page 8: ...ronment conditions and restrictions 1 Installing the Copier p 2 Installation Site p 2 Power Source p 2 Space Requirements p 2 2 Precautions for Use p 3 Operating Environment p 3 Using the Copier Properly p 3 Moving p 3 Care of Copier Supplies p 3 Chapter 1 Safety Notes 1 ...

Page 9: ...al Cover A place away from a curtain or the like that may catch fire and burn easily An area where there is no possibility of being splashed with water or other types of liquid An area free from direct sunlight A place out of the direct air stream of an air conditioner heater or ventilator A well ventilated place A dry place A dust free location An area not subject to undue vibration A stable and ...

Page 10: ...TE Locate the Copier in a Well Ventilated Room A negligible amount of ozone is generated during normal operation of this copier An unpleasant odor may however be created in poorly ventilated rooms during extensive copier operations For a comfortable healthy and safe operating environment it is recommended that the room be well ventilated REMARQUE Placer le copieur dans une pièce largement ventilée...

Page 11: ...2 Precautions for Use Chapter 1 Safety Notes 4 ...

Page 12: ... p 6 Outside the Copier p 6 Inside the Copier p 6 Semi automatic Document Handler SDH p 7 2 Control Panel and Its Operation p 8 Control Panel p 8 Service Indicators p 8 3 Turning ON OFF and Initial Mode p 9 Turning ON and OFF p 9 When the Copier is Turned ON p 9 Initial Mode p 9 4 Convenient Functions p 10 Clear Stop p 10 Auto Reset p 10 Auto Power Off p 10 Chapter 2 Before Making Copies 5 ...

Page 13: ...30 sheets of plain copy paper can be placed here See page 19 6 Multi Bypass Tray Extender Flip this Extender out when making copies on large size paper 7 Right Door Open to clear a paper misfeed 8 Drawer Holds up to 250 sheets of copy paper Inside the Copier 1 Imaging Unit Remove the screws and remove the unit These are special screws which must be removed by a service representative 2 Fusing Unit...

Page 14: ...s originals that are automatically ejected after copying 4 Document Feed Tray Load the originals face down on this tray See page 14 5 Document Feed Tray Extender Can be pulled out when using large size originals 6 Misfeed Removal Knob Turn to remove an original misfeed NOTE EP1031 has an original cover EP1031F has an SDH for original handling 1 2 3 4 5 C1159O005DA C1159O003EA 6 Before Making Copie...

Page 15: ...each time the one 1 key is pressed and increase by ten each time the ten 10 key is pressed See page 15 When used to set the zoom ratio the number in the display panel will increase or decrease by one each time the respective key 78 is pressed The zoom range is from 64 to 156 See page 17 6 Copy Quantity Zoom Selection Key Switches the operation of the 1 and 10 keys between copy quantity and zoom fu...

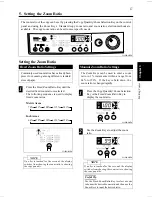
Page 16: ... Initial Mode The copy mode will be displayed on the control panel when the Main Switch is turned on This is called the initial mode This is the mode that forms the basis for all control operations Number of Copies 1 Zoom Ratio 100 Copy Density Auto Exposure Paper Source Drawer Turning Copier ON Press the Main Switch to the e ON position Turning Copier OFF Press the Main Switch to the d OFF positi...

Page 17: ... copy has been made or any key has been operated this function will clear all settings and restore the initial mode automatically Useful Tip The timing for this function can be set within a range from 30 seconds to four minutes This setting can also be disabled Refer to User s Choice on page 24 Auto Power Off In order to save energy the copier will be automatically turned off after a preset period...

Page 18: ...nals p 14 Positioning the Original p 14 3 Setting the Number of Copies p 15 Setting the Number of Copies p 15 4 Setting Image Density p 16 Setting Image Density p 16 Auto Exposure Mode p 16 Manual Exposure Mode p 16 5 Setting the Zoom Ratio p 17 Setting the Zoom Ratio p 17 Fixed Zoom Ratio Settings p 17 Manual Zoom Ratio Settings p 17 Zoom Ratio Table Original Size to Copy Paper Size p 18 Metric A...

Page 19: ...he Copy Quantity Zoom Selection Key and select the zoom ratio with the Fixed Zoom Ratio Key See page 17 The zoom ratio cannot be changed while the SDH mode is used The setting remains at 100 To change image density 3 Use the Exposure Control Keys 46 to adjust image density See page 16 4 Set the number of copies to be made Use the Copy Quantity keys to set the number of copies to be made See page 1...

Page 20: ...e down on the glass 3 Align the center of the original with the f marker on the scale provided 4 Gently lower the original cover Transparent Originals The original is a transparency or translucent paper 1 Place the original the same way as for a paper original 2 Cover the original with a piece of paper that is the same size as the original 3 Gently lower the original cover C1159O013DA C1159O019DA ...

Page 21: ...ers Free of curls tears folds or other imperfections Free of sections affixed by tape or glue Free of processing such as a carbon transfer coating Transparencies are also not permitted Originals not meeting these guidelines should not be used in the SDH They can be copied by placing on the glass Positioning the Original 1 Adjust the Document Guide Plates to match the size of the original 2 The ori...

Page 22: ...1 key is pressed and increase by ten each time the ten 10 key is pressed Setting the Number of Copies 1 Example 23 copies To enter 23 press the ten 10 key twice 2 Then press the one 1 key three times The setting is complete 3 If an error is made press the Clear Stop Key and reenter the setting C1159O008EA C1159O011EA C1159O010EA C1159O012EA Making Copies Chapter 3 15 ...

Page 23: ...e A will light up Each time the 5 Key is pressed it will switch between auto exposure mode and manual exposure mode Useful Tips The auto exposure mode automatically sets the copier for the best copy image density The initial setting is auto exposure mode Manual Exposure Mode Image density can be manually set to any one of nine levels 1 Press the 46 keys to set the desired level For a darker copy 6...

Page 24: ... key is touched for five seconds the display switches from showing the zoom ratio to showing the copy quantity Manual Zoom Ratio Settings The Zoom Keys can be used to enter a zoom ratio in 1 increments within a range from 64 to 156 If the key is held down the zoom ratio is changed rapidly 1 Press the Copy Quantity Zoom Selection Key or the Fixed Zoom Ratio Key to display the zoom ratio 2 Use the Z...

Page 25: ...B6 122 B5 182 257 mm 7 1 4 10 A5 81 B6 70 A4 115 B6 128 182 mm 5 7 1 4 A6 81 A5 115 B5 141 Inch Areas Original Size Paper Size Zoom Ratio Legal 8 1 2 14 215 9 355 6 mm Foolscap 92 Letter 78 Foolscap 8 1 2 13 215 9 330 2 mm Letter 84 Invoice 64 Letter 8 1 2 11 215 9 279 4 mm Invoice 64 Invoice 5 1 2 8 1 2 139 7 215 9 mm Legal 154 Follscap 152 Letter 129 Zoom Ratio Paper Size Original Size 1 inch 25...

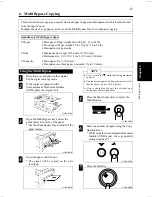
Page 26: ... copy mode 2 If the copier is equipped with a Semi automatic Document Handler SDH place the original in it 3 Open the Multi Bypass tray and set the guide plates to the size of the paper Use the Multi Bypass Tray Extender if the paper is large 4 Insert the paper until it stops The paper will be copied on the side facing up NOTE Never exceed the b mark indicating maximum capacity Fan the plain paper...

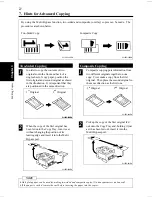
Page 27: ...ing edge and insert it into the Multi Bypass port Composite Copying 1 Composite copying puts information from two different originals together on one copy First make a copy from the first original Then place the second original in the same direction as the first one 2 Pick up the copy of the first original fed out onto the Copy Tray and holding it just as it has been fed out insert it into the Mul...

Page 28: ... 24 User s Choice Item p 24 User s Choice Function and Explanation of Settings p 24 U 1 Auto Reset Mode p 24 Making User s Choice Selections p 25 4 Default Manual Exposure Level Adjustment p 26 Default Manual Exposure Level Adjustment p 26 5 Default Auto Exposure Level Adjustment p 27 Default Auto Exposure Level Adjustment p 27 6 Total Check Function p 28 Counter Display p 28 Checking Total Copies...

Page 29: ...er is warmed up the toner begins to be supplied 3 While the Toner is being replenished the LEDs at the bottom of the Display Panel will light up one at a time in the clockwise direction 4 Press the Clear Stop Key to stop the Toner Replenishing mode NOTE Copying cannot be performed while the Toner is being replenished If copying must be performed stop the Toner Replenishing mode with the Clear Stop...

Page 30: ... works much like photographic film 1 Turn the Main Switch off While pressing the 6 Exposure Control Key turn the Main Switch on The copier is now in the Drum Dehumidifier mode which will continue for approximately three minutes 2 Press the Clear Stop Key to stop the Drum Dehumidifier mode NOTE Copying can be performed while the Drum Dehumidifier mode is in operation The Drum Dehumidifier mode cann...

Page 31: ...oice Item Choice No Setting U 1 Auto Reset Mode User s Choice Function and Explanation of Settings U 1 Auto Reset Mode The time from when the last copy was made until the Auto Reset function activates can be set The Auto Reset function can also be disabled Code Description Initial Setting 0 Disable Auto Reset 05 Activates after 30 seconds 1 Activates after 1 minute 2 Activates after 2 minutes 3 Ac...

Page 32: ...ty Keys to select the desired User s Choice code 4 Press the Clear Stop Key The User s Choice code is now registered 5 Press the Clear Stop Key once again User s Choice is canceled and the copier returns to the initial mode NOTE The User s Choice mode cannot be selected under the following conditions the starter is being refilled and the indicators show that an error or paper misfeeds has occurred...

Page 33: ...sure Control Key 5 turn on the copier The copier enters the Default Manual Exposure Level Adjustment 2 Press the Exposure Control Keys 4 and 6 to select a density setting 3 Press the Start Key to print one copy in order to check the selected density 4 Press the Clear Stop Key to enter the setting and exit the adjustment Copy density 1 lightest Copy density 2 lighter Copy density 3 lighter Copy den...

Page 34: ...opier 2 Press the Exposure Control Key 5 again The copier enters the Default Auto Exposure Level Adjustment 3 Press the Exposure Control Keys 4 and 6 to select the density level 4 Press the Start Key to print one copy in order to check the selected density 5 Press the Clear Stop Key to enter the setting and exit the adjustment Copy density 1 lightest Copy density 2 lighter Copy density 3 lighter C...

Page 35: ...es PM Count 1 Press the Clear Stop Key for three seconds The total count will appear Press the Clear Stop Key for three seconds and the total count will appear Continue to hold the key down for another three seconds a total of six seconds and the PM count will appear 2 Press the Clear Stop Key to exit the counter display Total Count Shows the total number of copies since the copier was installed P...

Page 36: ...Display p 31 Replenishing Paper p 31 Removing a Paper Misfeed p 31 3 A Add Toner Indicator p 32 Replacing the Toner Cartridge p 32 4 E Display p 34 Resetting the Copier p 34 5 J Display p 35 Paper misfeed p 35 Removing a Paper Misfeed p 36 J2 J3 Copier p 36 J8 Semi automatic Document Handler SDH p 37 6 C Display p 38 Resetting the Copier p 38 Chapter 5 Error Messages and Indicators 29 ...

Page 37: ...a paper misfeed at the paper take up area of the copier Remove the paper misfeed See page 36 There is a paper misfeed at the paper exit of the copier Remove the paper misfeed See page 36 There is an original paper misfeed in the Semi automatic Document Handler SDH Remove the original paper misfeed See page 37 Trouble There is a problem in the copier Contact service representative See page 34 There...

Page 38: ... 3 Adjust the paper guide plates and gently return the drawer to the copier Press the Clear Stop Key NOTE For details on supplying paper using the Multi Bypass Tray refer to page 19 Removing a Paper Misfeed 1 Open the Right Door and remove the paper misfeed 2 Open the drawer remove the paper and push the paper lifting plate down 3 Fan the paper and reload it Gently slide the Drawer back in 4 Press...

Page 39: ...carefully The toner could discharge Once the seal has been removed never turn the cartridge upside down 5 With toner supply port facing upward insert the cartridge into the cartridge holder in the direction a shown on the cartridge 6 Close the cartridge holder and close the Front Door NOTE Only use the toner cartridge designed specifically for this copier Failure to do so will result in damage to ...

Page 40: ...3 A Add Toner Indicator Error Messages and Indicators Chapter 5 33 ...

Page 41: ...ff and then on to reset the copier If the E appears again contact your service representative Before Calling Your Service Representative Before calling the service representative note the code being displayed Example E0 Once the service representative has been contacted turn the Main Switch off and unplug the power cord Flashes alternately C1159O096DA C1159O010DA C1159O005EA Chapter 5 Error Messag...

Page 42: ...ed before opening the door Paper Misfeed At this time J and a number will flash alternately on the Display Panel The number represents the location of the paper misfeed There is a paper misfeed in the paper take up area of the copier See page 36 There is a paper misfeed in the paper exit section of the copier See page 36 There is a paper misfeed in the Semi automatic Document Handler SDH On models...

Page 43: ...eed in the transfer area 4 Gently close the upper unit and then close the Front Door 5 Open the Right Door and remove the paper misfeed in the paper take up section 6 Pull out the drawer remove the paper and push the lifting plate down 7 Fan the sheets of paper put them back in the drawer and slide it in the copier NOTE Make sure the paper is positioned below the catches of the drawer 8 Close the ...

Page 44: ...Knob to the left while carefully pulling out the original 4 Turn the knob to the left while carefully pulling out the original 5 Lower the Semi automatic Document Handler SDH NOTE If J8 appears during the multi copy cycle check the copies on the Copy Tray and return the originals needed to the Document Feed Tray to complete the copy job C1159O105DA C1159O106DA C1159O107DA C1159O108DA C1159O109DA C...

Page 45: ...itch off and then on again This will reset the copier If the C appears again contact your service representative Before Calling Your Service Representative Before calling the service representative note the code being displayed Example C00 Once the service representative has been contacted turn the Main Switch off and unplug the power cord Flashes alternately C1159O111DA C1159O010DA C1159O112DA Ch...

Page 46: ...er 6 Troubleshooting This chapter gives you instructions on how to troubleshoot copier malfunctions 1 When This Type of Copy is Produced p 40 2 Copier Does Not Work Properly p 42 Chapter 6 Troubleshooting 39 ...

Page 47: ... to obtain a lighter image See page 16 The surface of the Original Glass is dirty Wipe the Original Glass clean with a soft dry cloth See page 45 The original is not held tightly against the Original Glass Place the original in position so that it is held tightly against the Original Glass The copy is blurry The paper is damp Replace the paper The copy has dark specks or spots The Original Glass i...

Page 48: ...n the original or reload the paper in the same direction as the original The reduction ratio selected is not in accord with the copy paper size When doing manual reduction copying Select the zoom ratio according to the copy paper size See page 17 The image on the copy is not aligned properly The original is not placed in the correct position Place the original correctly on the Original Glass See p...

Page 49: ... Is there an error display J E C on the Control Panel Take the necessary action to correct the error displayed See page 30 No power to the copier Is the Front Door closed Make sure the Front Door is securely closed Is the copier plugged in Make sure the plug is securely in the outlet Has a breaker in the power supply gone off Reset the breaker If the above steps do not correct the problem with the...

Page 50: ...is chapter provides additional information about your copier such as specifications and steps for daily maintenance 1 Copier Specifications p 44 2 Daily Maintenance p 45 3 Paper Size p 46 4 Index p 47 Chapter 7 Miscellaneous 43 ...

Page 51: ...3 Sheets Min A4L 13 Sheets Min A5L 13 Sheets Min SDH Mode Legal 12 Sheets Min Letter 13 Sheets Min Invoice 13 Sheets Min A4L 13 Sheets Min A5L 13 Sheets Min Zoom Ratios Normal 1 1 0 5 Inch Enlarge 154 129 Reduce 78 64 Metric Enlarge 141 115 Reduce 81 70 Zoom 64 to 156 In increments of 1 Continuous Copies Up to 99 Sheets Countdown Type Exposure Control Automatic and Manual Available Power Supply 11...

Page 52: ...cleaner etc when cleaning the Control Panel These cleaners can damage the control keys Original Cover Pad Use a soft cloth dampened with a mild household detergent to clean the original cover pad of the copier Original Glass Use a soft dry cloth to clean the original glass Inside of Front Door Use a soft dry cloth to clean the inside of the front door SDH Pad Use a soft cloth dampened with a mild ...

Page 53: ...Post Card 100 148 4 5 3 4 Type Size Inch Metric mm Legal 8 1 2 14 216 356 Foolscap Government Legal 8 1 2 13 216 330 Foolscap 8 13 203 330 Foolscap Folio 8 1 4 13 210 330 8 1 4 11 3 4 8 1 4 11 3 4 210 301 Letter 8 1 2 11 216 279 Government Letter 8 10 1 2 203 267 Quarto 8 10 203 254 Statement Invoice 5 1 2 8 1 2 140 216 Chapter 7 Miscellaneous 46 ...

Page 54: ...l Exposure p 16 Multi Bypass Copying p 19 P Paper Misfeeds J Display p 35 PC Display p 31 Paper Size p 46 Paper Supply Display PC Display p 31 PM Count p 28 Positioning the Original p 13 Power Supply On Off p 9 R Removing Paper Misfeed J2 J3 Display p 36 J8 Display p 37 S Start Key p 8 T Toner Replenisher p 22 Total Check Function p 28 Total Count p 28 Trouble Displays C Display p 38 E Display p 3...

Page 55: ...d in China The information contained in this manual is subject to change without notice to incorporate improvements made on the product or products the manual covers MINOLTA CO LTD 3 13 2 Chome Azuchi Machi Chuo ku Osaka 541 Japan 1997 10 ...

Reviews: