background image

Preset white-balance settings must be set before the image is taken.
Once set, the effect is immediately visible on the LCD monitor.

If the flash is used, white balance is automatically set to the color
temperature of the flash. Use flash cancel to prevent the flash from firing.

31

30

A

UTO

-

RECORDING MODE

/ M

OVIE

-

RECORDING MODE

Automatic white balance

The automatic white balance compensates for the color temperature of a
scene. In most cases, the auto setting will balance the ambient light and
create beautiful images, even under mixed-lighting conditions. When the
built-in flash is used, the white balance is set for the color temperature of
the flash. No indicator is displayed for automatic white balance.

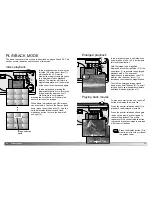
White balance is the camera’s ability to
make different types of lighting appear
neutral. The effect is similar to selecting
daylight or tungsten film, or using color
compensating filters in conventional
photography. An indicator will be displayed
on the monitor if a setting other than auto
white-balance is chosen. White balance is
set by pressing the white-balance/delete
button. Each time the button is pressed,
the white balance mode cycles in the
following order: Automatic, Daylight,
Cloudy, Tungsten, and Fluorescent.

White balance

Preset white balance

Fluorescent - for fluorescent
lighting: office ceiling lights.

Daylight - for outdoor and sunlit
subjects.

Cloudy - for overcast outdoor
scenes.

MOVIE-RECORDING MODE

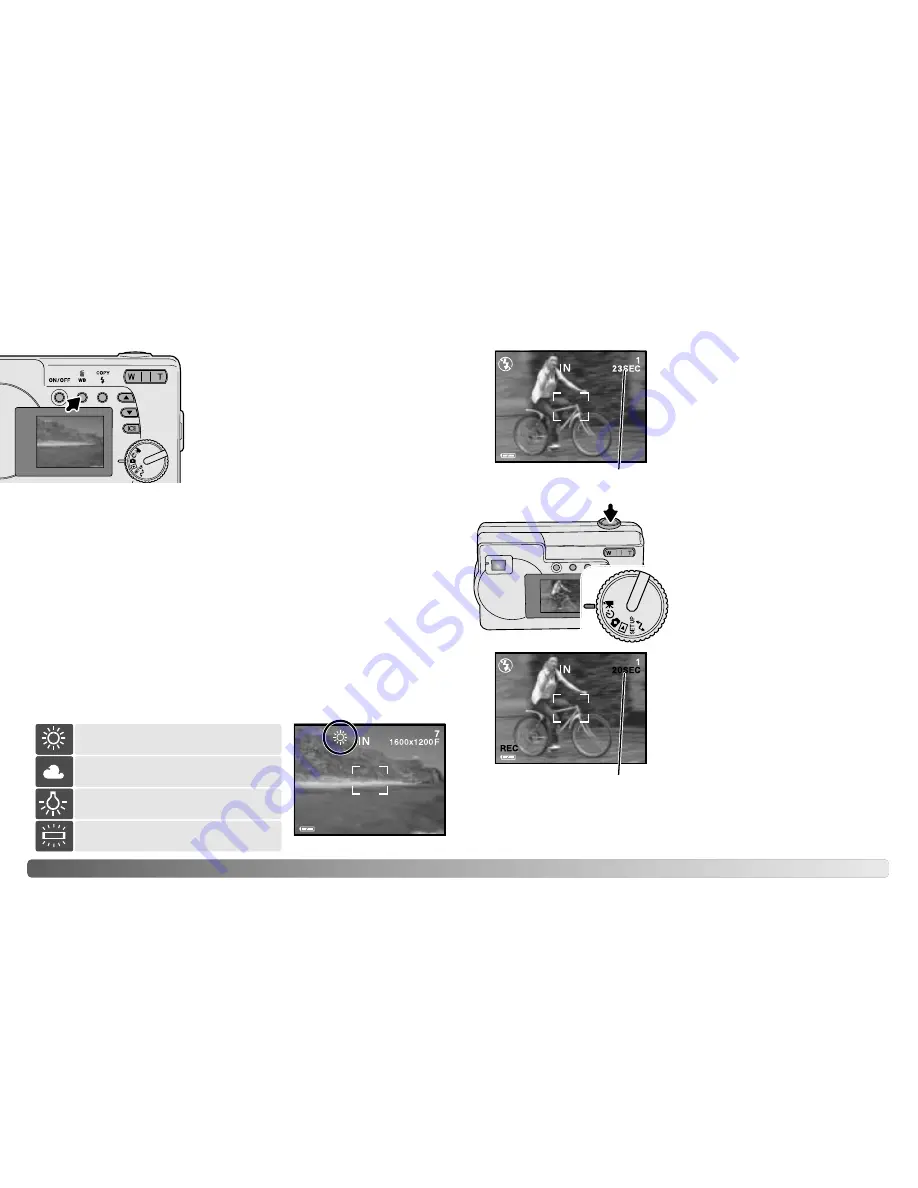
This camera can record digital video with
sound. Approximately 23 seconds can be
recorded in the internal memory. On a
memory card, a maximum of 60 seconds
can be taken depending on the card
capacity. Autofocus is not used in movie
recording.

Before recording, the maximum recording
time in seconds that can be recorded on
the next movie clip is shown.

Shooting digital video is simple. Set
the mode dial to movie recording (1).
Frame the picture and press the
shutter-release button (2) all the way
down and release to start recording.

During recording, the digital zoom is
available; the optical zoom can only be
adjusted before recording starts. The
camera will continue to record until the
recording time is used or the shutter-
release button is pressed again. When
recording, the frame counter will count
down the remaining time.

2

1

Recording time

Tungsten - for incandescent lighting:
household filament light bulbs.

Countdown in seconds

Summary of Contents for DiMAGE E223

Page 1: ...INSTRUCTION MANUAL E ...

Page 2: ...pose batteries to fire high temperatures water or moisture Do not attempt to short or disassemble batteries Do not store batteries near or in metallic products Do not mix batteries of different types brands ages or charge levels Do not charge alkaline or lithium batteries When recharging rechargeable batteries only use the recommended charger Do not use leaking batteries If fluid from the batterie...

Page 3: ... heat or smoke discontinue use Immediately remove the batteries taking care not to burn yourself as the batteries become hot with use The continued use of a damaged product or part may cause injuries or fire Take the product to a Minolta Service Facility when repairs are required Do not use or store the product in a hot or humid environment such as the glove compartment or trunk of a car It may da...

Page 4: ...icator lamp 22 Focus lock 22 Special focusing situations 23 Playback mode display 24 Viewing images 24 Display button playback mode 25 Deleting images 25 Auto recording mode 26 Flash modes 26 Flash range 27 Display button recording mode 27 Exposure compensation 28 What is an Ev What is a stop 29 White balance 30 Automatic white balance 30 Preset white balance 30 Movie recording 31 Program recordin...

Page 5: ... 10 The tripod socket is located on the bottom of the body Microphone Viewfinder window Viewfinder p 18 24 LCD monitor White balance Delete button p 25 30 Speaker Mode dial Battery Card chamber door p 11 16 Display Enter button p 25 27 Indicator lamp p 22 Main switch Flash mode Copy button p 26 36 Zoom lever p 20 Scroll up button Scroll down button Mode dial Movie recording mode p 31 Program recor...

Page 6: ...e strap around your wrist in the event that the camera is accidentally dropped Attaching the hand strap Pass the other end of the strap through the small loop and tighten 2 2 1 Pass the small loop of the hand strap through the strap eyelet on the camera body 1 Close the battery chamber door 3 and slide it toward the body 4 to engage the safety catch 3 4 Installing batteries Insert the batteries as...

Page 7: ...uto power off To conserve battery power the camera will shut down if an operation is not made within three minutes To restore power press the main switch The AC Adapter AC 6 allows the camera to be powered from an electrical household outlet The AC Adapter is recommended when the camera is interfaced with a computer or during periods of heavy use Always turn off the camera before changing between ...

Page 8: ... format The main setup menu is displayed Highlight the date time option with the scroll buttons and press the display enter button to continue Use the scroll buttons 3 to select the clock option Press the display enter button 4 to display the date time setting screen MONTH DAY DAY MONTH SET UP 00 2003 1 1 ADJUST CLOCK SET NEXT COPY 00 Use the scroll buttons 3 to select the style option Press the d...

Page 9: ...ctly If the card protect message appears the inserted card in the camera is locked The card s write protect switch must be in the unlock position to use the card If the memory card error message appears the inserted card may need to be formatted or may not be compatible with this camera To format the memory card see pages 38 and 40 A card used in another camera may have to be formatted before bein...

Page 10: ...lity display p 41 Focus frame p 21 Date time p 14 Date time appears briefly when the mode is changed Zoom scale p 20 Battery condition indicator p 12 Exposure compensation display p 28 When the mode dial is turned to the auto recording mode position the following display will appear in the LCD monitor Indicators are displayed when camera settings are changed Viewfinder Because the optical viewfind...

Page 11: ...oom by up to 3X in 0 2X increments When the digital zoom is active the image magnification is displayed on the monitor Digital zoom images are interpolated to the set image size There can be some loss of quality with images taken with the digital zoom Zoom scale Digital zoom magnification Turn the camera on 1 and turn the mode dial to the auto recording mode 2 Basic recording operation Place the s...

Page 12: ...blinks and the focus frame will not turn red In this situation focus lock can be used to focus on an object at the same distance as the main subject and then the image can be recomposed on the monitor p 22 Two subjects at different distances overlap in the focus frame The subject is near a very bright object or area Indicator lamp Special focusing situations The shutter can be released when the ca...

Page 13: ...es Magnification display p 35 Playback mode display To delete the displayed image press the white balance delete button 1 A confirmation screen will appear Deleting images Pressing the display enter button in the playback mode switches between the full display and the image only display Display button playback mode 1 2 Press the display enter button 2 to delete the image or press any other button ...

Page 14: ... to illuminate the subject or the subject is beyond the flash range 27 26 AUTO RECORDING MODE Autoflash Autoflash with red eye reduction Flash cancel Fill flash Flash modes Flash range The camera will automatically control the flash output For well exposed images the subject must be within the flash range Flash range 0 6m 2 5m 2 0 ft 8 2 ft Monitor off The display button controls the LCD monitor d...

Page 15: ...ture is taken What is an Ev What is a stop Ev stands for exposure value The term stop comes from the name of aperture plates used in early lenses A change of one Ev or one stop will adjust the exposure calculated by the camera by a factor of two Change in Ev Change in stops Adjustment to exposure 2 0 Ev 1 0 Ev 0 0 Ev 1 0 Ev 2 0 Ev 2 stops 1 stop 1 stop 2 stops 4X as much light 2X as much light 1 2...

Page 16: ...e delete button Each time the button is pressed the white balance mode cycles in the following order Automatic Daylight Cloudy Tungsten and Fluorescent White balance Preset white balance Fluorescent for fluorescent lighting office ceiling lights Daylight for outdoor and sunlit subjects Cloudy for overcast outdoor scenes MOVIE RECORDING MODE This camera can record digital video with sound Approxima...

Page 17: ...osition from the camera lens Because of parallax the LCD monitor or close framing guide should be used to compose the picture Use of flash is not recommended For pictures of people Most portraits look best at a telephoto setting longer focal lengths do not exaggerate facial features and the shallower depth of field softens the background The flash mode is set to autoflash automatically but can be ...

Page 18: ...ied displayed press the right side T of the zoom lever 1 to activate the enlarged playback mode The degree of magnification is displayed on the LCD monitor Use the zoom lever 1 to increase or decrease the magnification To scroll the enlarged image up and down press scroll buttons 2 To scroll left and right use white balance delete and flash mode copy buttons 3 Enlarged playback 3 1 1 2 3 PLAYBACK ...

Page 19: ...tup mode p 38 Viewing images on a television Images are stored either in the 8MB internal memory or in a memory card Stored images can be copied between the internal memory and a memory card The copy function makes exact copies of still image or movie files DPOF settings are not copied with image files Files are copied from the selected memory To switch between the internal memory and a memory car...

Page 20: ...e menu Pressing the display enter button will select a highlighted option Navigating the setup menu Once a setting has been selected the cursor will return to the menu options Setting can continue to be made 2 1 With the setup mode is selected in the mode dial use the scroll buttons 1 to scroll through the menu options The second half of the menu will appear after scroll past the last option displ...

Page 21: ...card or internal memory is formatted all data is erased Image quality is based on two factors image size and compression rate Image size is the pixel dimensions of the image such as 1600 x 1200 pixels The greater the image size the larger the file size Choose image size based on the final use of the image smaller images will be more suitable for web sites whereas larger sizes will produce higher q...

Page 22: ...d slot of DPOF compatible printers When a DPOF file is created a misc folder is automatically created p 52 Only a DPOF file created on a memory card can be used for printing The print menu option is used to set an order for standard prints from still images on the memory card Single multiple or all images can be printed Date imprinting can also be set See navigating the setup menu section on page ...

Page 23: ...etting the date and time See page 14 to set the date and time Memory type This camera stores images in either the 8MB internal memory or a separate SD Memory Card or MultiMediaCard Memory type affects all the camera operations If Internal internal memory is selected the images will be stored in the internal memory in the recording modes and playback format and delete all functions will be executed...

Page 24: ...talled the Windows 98 driver software must repeat the installation procedure The updated version of the driver software included on the supplied DiMAGE Viewer CD ROM is required for the operation of the DiMAGE E223 with a computer The new software will have no affect on the performance of older DiMAGE cameras Connecting the camera to a computer 1 The memory type option in the setup mode must be se...

Page 25: ...98 Second Edition No special driver software is required for other Windows or Macintosh operating systems During installation if the operating system requests the Windows 98 CD ROM insert it into the CD ROM drive and follow the accompanying instructions on the screen Connecting to Windows 98 and 98 Second Edition To install the Windows 98 driver follow the instructions in the connecting the camera...

Page 26: ...ime system requirements IBM PC AT Compatible Pentium based computer Windows 95 98 98SE NT Me 2000 Professional or XP 32MB or more of RAM Sound Blaster or compatible sound card DirectX 3 0 or later recommended To install QuickTime follow the instructions in the installer Macintosh users can download the latest version of QuickTime free of charge from the Apple Computer web site http www apple com A...

Page 27: ...umber on the memory card e g from 100MLT32 to 101MLT32 The number in the image file name may not correspond to the frame number of the image As images are deleted in the camera the frame counter will adjust itself to show the number of images on the card and reassign the frame numbers accordingly The serial numbers used with image files will not change when an image is deleted When a new image is ...

Page 28: ...ow indicating the unplug or eject hardware routine Never disconnect the camera when the indicator lamp is blinking the data or memory card may permanently be damaged A third and final screen will appear to indicate the camera can be safely disconnected from the computer Close the window turn the camera off and then disconnect the USB cable The hardware devices to be stopped will be displayed Highl...

Page 29: ... without flash Slow shutter speeds result in blurred images when the camera is hand held Use a tripod or use the flash p 26 While using flash the pictures are too dark The subject is beyond the flash range p 27 Move closer to the subject No image message appears in playback mode Different memory type is selected Select the memory type internal memory or memory card where the images were saved p 45...

Page 30: ...t the camera is functioning properly before using Care and storage Operating temperatures and conditions This camera has been designed for use in temperatures from 0 C to 40 C 32 F to 104 F Never leave the camera exposed to extreme high temperatures such as in a car parked in the sun or to extreme humidity When taking the camera from a cold to a warm environment place it in a sealed plastic bag to...

Page 31: ...ile formats JPEG Motion JPEG AVI with audio DCF1 0 compliant DPOF compliant supported by printing functions in ver 1 1 Printing output control Exif 2 2 PRINT Image Matching II LCD monitor 3 8cm 1 5 inch TFT color Total pixels 62 000 approx Field of view 100 approx Menu languages English German French Spanish Movie recording File format Motion JPEG AVI Number of recorded pixels 320 x 240 60s max at...

Page 32: ...tput NTSC PAL selected on the camera Dimensions 106 0 W X 66 5 H X 34 D mm 4 2 W X 2 6 H X 1 3 D in without lens section Weight Approximately 200g 7 1 oz without batteries or recording media Operating temperature 0 40 C 32 104 F Specifications are based on the latest information available at the time of printing and are subject to change without notice ...

Page 33: ...ch Belgium Minolta Schweiz AG Riedstrasse 6 CH 8953 Dietikon Switzerland Minolta Svenska AB Albygatan 114 S 171 54 Solna Sweden Finnish Branch Niittykatu 6 PL 37 SF 02201 Espoo Finland Minolta Portugal Limitada Av do Brasil 33 A P 1700 Lisboa Portugal Minolta Corporation 101 Williams Drive Ramsey New Jersey 07446 U S A Minolta Canada Inc 369 Britannia Road East Mississauga Ontario L4Z 2H5 Canada M...

Page 34: ...r für eine erste Funktionsüberprüfung verwendet werden Im praktischen Einsatz sollten NiMH Akkus das externe Powerpack EBP 100 oder ein Netzgerät eingesetzt werden NiMH Akkus müssen vor dem Einsatz in der Kamera voll geladen werden Bitte beachten Sie die Hinweise des Akku Herstellers bzw Ladegerät Herstellers Reinigen Sie alle Kontakte an Akkus und Kamera vor dem Einsetzen mit einem weichen sauber...

Page 35: ...kkeavissa käyttöolosuhteissa Vaikka kameran mukana tulee alkaaliparistot niiden riittoisuus on hyvin rajallinen Käytä alkaaliparistoja vain koekuviin tai kun määriteltyä paristoa Ni MH akkuja tai AC adapteria ei ole käytettävissä Kun laitat pariston tai akut kameraan puhdista niiden navat liasta ja jäämistä käyttäen kuivaa kangasta Hienoviritteisestä tietokonejärjes telmästä johtuen kamera tarkkai...

Page 36: ... correction menu in the Movie Enhancer cannot be used with Movie files captured with the DiMAGE E223 A computer system error will occur About the DiMAGE Viewer Minolta DiMAGE E223 Minolta Co Ltd 9229 2727 22 PM A304 9229 2727 22 03 4 2 1 00 PM Page 1 ...

Reviews: