background image

MODE
CONTINUOUS

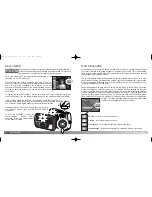
In the movie mode, press the left/right keys to scroll through the
movie clips. Press the central button to start the playback.
Press the left/right key to rewind/fast forward the playback. You
can rewind/forward faster if you press the left/right key again
while rewinding/fast forwarding. Press the up key to pause the
playback. Press the central button to restart. To view one of the
images in the movie clip, press the right button while the
playback is paused. To view in reverse order, press the left
button. To exit the playback, press the down key.

You can view movie clips on your computer using Quick Time included on the CD-ROM.

In the single-frame advance mode, using the left/right keys of the controller, scroll
through the images on the memory card.

50

P

LAYBACK MODE

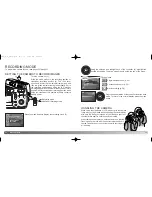
SETTING THE CAMERA TO PLAYBACK MODE

51

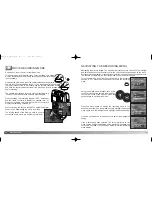
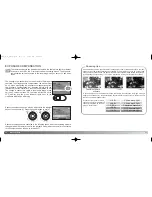
Using the up/down and left/right keys of the controller (4), highlight the
desired drive mode. The drive mode menu is on the top line of the menu.

Press the central button of the controller to set the drive mode. To return to
the normal display, press the menu button.

Turn the camera on (1). Slide the mode switch to the
playback position (2). Press the menu button to
display the playback menu (3).

Drive modes

Single-frame advance

Continuous advance

Movie

1

3

4

2

BASIC PLAYBACK OPERATION

100-0002

2003.12.14

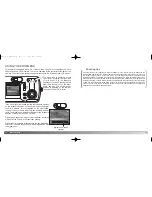
In the continuous advance mode, press the left/right keys
to scroll through the continuous advance image folders.
Press the central button to start the playback. Press the
up key to pause the playback. To display the
previous/next image, press the left/right key. Press the
central button to restart. To exit the playback, press the
down key.

100-0002

2003.12.14

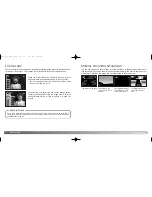
Date of recording

Folder number -file number

Change image
protect setting

PROTECT

100-0001

100KB

2003.12.14 10:30

PLAYBACK MODE

2729_E_A_print.qxd  03.7.11  11:11 AM  Page 50

Summary of Contents for DIMAGE E323 - SOFTWARE

Page 1: ...INSTRUCTION MANUAL E 2729_E_A_print qxd 03 7 11 11 11 AM Page 1...

Page 2: ...e batteries specified in this instruction manual Do not install the batteries with the polarity reversed Do not use batteries which show wear or damage Do not expose batteries to fire high temperature...

Page 3: ...product or part may cause injuries or fire Take the product to a Minolta Service Facility when repairs are required Handling the cord on this product may expose you to lead a chemical known to the St...

Page 4: ...the navigation sections The appendix contains a troubleshooting section to help answer questions about the operation of the camera Information covering camera care and storage is also provided Please...

Page 5: ...ction against harmful interference in a residential installation This equipment generates uses and can radiate radio frequency energy and if not installed and used in accordance with the instructions...

Page 6: ...4 Main switch USB port Video out terminal p 69 71 Battery Card chamber door p 12 15 DC terminal p 14 Shutter release button Viewfinder window Viewfinder Indicator lamp p 85 Mode switch Controller LCD...

Page 7: ...atch the door can then be opened 2 Insert the batteries as shown 3 Never force the batteries Close the battery chamber door 4 and slide it toward the body 5 to engage the safety catch 4 5 When using N...

Page 8: ...face is toward the front of the camera Always push the card in straight never at an angle Never force the card If the card does not fit check that it is orientated correctly To eject a memory card pr...

Page 9: ...can be viewed in the playback mode Slide the mode switch to the playback position Select the playback mode from the single frame continuous advance or movie clips p 50 Setting to the setup mode The s...

Page 10: ...ion the indicator lamp next to the viewfinder will turn red The shutter will not release The batteries must be replaced 19 Low battery warning blinks while you press the shutter release button the shu...

Page 11: ...ect them from being erased when the card is reformatted Always reformat the memory card using this camera never use a computer to reformat a card Every memory card including the supplied card must be...

Page 12: ...ntroller 4 highlight the desired drive mode The drive mode menu is on the top line of the menu Press the menu button to display the recording menu 3 Press the central button of the controller to set t...

Page 13: ...also create a strong perspective which gives a sense of depth in the image Telephoto lenses compress the space between the subject and background and create a weak perspective Shooting tips USING THE...

Page 14: ...NGLE FRAME ADVANCE RECORDING MODE See page 22 to set the single frame advance mode 2 27 1 Press the shutter release button all the way down 2 to take the picture After the shutter releases the indicat...

Page 15: ...CUSING SITUATIONS The camera may not be able to focus in certain situations In these situations the focus lock function p 28 can be used to focus on another object at the same distance as your main su...

Page 16: ...eduction Fill flash Flash cancel Autoflash 31 To set the focus mode simply press the up key of the controller 1 until the desired mode is displayed The focus mode setting will remain in the recording...

Page 17: ...lash CAMERA SHAKE WARNING The continuous advance drive mode allows a series of images to be captured while holding down the shutter release button There are two continuous advance methods standard and...

Page 18: ...U Navigating the menu is simple The menu button turns the menu on and off The left right and up down keys of the controller control the cursor and change settings on the menu Pressing the central butt...

Page 19: ...x 2160 2048 x 1536 1600 x 1200 640 x 480 4 Compression p 42 Fine Normal 5 Self timer p 44 Self timer cancel 6 7 Exposure compensation p 46 White balance p 45 Self timer 2 second delay Self timer 10 se...

Page 20: ...white balance Sunny Cloudy Fluorescent Incandescent 9 Help display p 66 1 2 3 4 5 7 1 Mode Single frame advance p 26 Continuous advance p 33 Movie recording p 34 2 Full auto Sports Portrait Setup p 64...

Page 21: ...ephoto setting longer focal lengths do not exaggerate facial features and the shallower depth of field softens the background The focus is set to around 2 5m 8 2ft LANDSCAPE optimized to produce sharp...

Page 22: ...y to produce a 2880 X 2160 pixel image it takes approx 4 seconds to record the data after the shutter release button is pressed all the way down RESOLUTION AND COMPRESSION RATE SETTINGS The frame coun...

Page 23: ...ability to make different types of lighting appear neutral The effect is similar to selecting daylight or tungsten film or using color compensating filters in conventional photography One automatic an...

Page 24: ...xposure meter is deceived by certain conditions Exposure compen sation can be used in these situations For example a very bright scene such as a snowy land scape or a white sandy beach can appear too...

Page 25: ...K MODE CONTINUOUS ADVANCE RECORDING METHOD INSTANT PLAYBACK In all the recording modes the last image can be displayed for a while by simply pressing the central button of the controller You can also...

Page 26: ...Using the up down and left right keys of the controller 4 highlight the desired drive mode The drive mode menu is on the top line of the menu Press the central button of the controller to set the driv...

Page 27: ...PLAYBACK With the image to be magnified displayed press the right side of the zoom lever 1 to enlarge Pressing the right side of the zoom lever increases the image magnification Pressing the left sid...

Page 28: ...ing the up down and left right keys change the settings To select the settings and set the adjustments press the central button 9 10 12 11 Single frame advance Continuous advance Movie 1 Protecting im...

Page 29: ...series and movie clips A protected file cannot be erased either the playback mode menu functions or the instant playback However the reformatting function p 20 will erase all files on a memory card w...

Page 30: ...E mail copy the compression cannot change Copies of protected images are unprotected DPOF information is not copied The amount of data can be converted into E mail copies depends on the free space re...

Page 31: ...cel the operation If an index print order is created any additional images saved afterwards on the card will not be included in the index print The number of images printed per sheet differs between p...

Page 32: ...and effect sitting by using the up down and left right keys Press the central button to set Select START and then press the central button to start the slide show presentation This function makes a s...

Page 33: ...u option that needs to be changed Press the central button In the option setting display using the up down and left right keys change the settings To select the menu settings and set the adjustments p...

Page 34: ...the CD ROM See page 21 for how the set the date and time The date format that is used in the monitor displays and date imprinting can be changed Y M D year month day M D Y month day year D M Y day mon...

Page 35: ...ET SETTINGS This function affects all modes When selected a confirmation screen will appear choosing YES resets to the default settings N0 cancels the operation Following settings will not change cloc...

Page 36: ...mpatibility information North America http www minoltausa com Europe http www minoltaeurope com pe digital languages_stage html Users with Windows 98 or 98 second edition will need to install the driv...

Page 37: ...B driver click on the starting up the USB device driver installer button A window will appear to confirm that the driver should be installed click Yes to continue Automatic Installation When the drive...

Page 38: ...ess the camera s memory card see page 77 Choose the recommended search for a suitable driver Click Next Choose to specify the location of the driver The browse window can be used to indicate the drive...

Page 39: ...was purely an exercise in camera design It was unveiled at Photokina in Germany in 1966 The Electro zoom X was an electronically controlled aperture priority mechanical SLR with a built in 30 120mm f...

Page 40: ...in with VCLP followed by a four digit file number and a mov extension They are stored in the folder named VCLP When the index number exceeds 999 for the single frame image files 99 for the continuous...

Page 41: ...mera to remake the USB connection Never remove the card when the indicator lamp is orange the data or memory card may permanently be damaged The hardware devices to be stopped will be displayed Highli...

Page 42: ...sure the subject is within the autofocus range p 26 A special situation is pre venting the autofocus sys tem from focusing p 29 Use the focus lock function to focus on an object at the same distance a...

Page 43: ...n the camera off using the main switch otherwise the memory card may be damaged and camera settings reset Part of the image area is hidden behind a dark object The lens was partially covered with an o...

Page 44: ...ts entirety to get the best results from your camera With proper care your camera will provide years of service Camera care Do not subject the camera to shock or impact Turn off the camera when transp...

Page 45: ...e it in a sealed plas tic bag to prevent condensation from forming Allow the camera to come to room tem perature before removing it from the bag LCD monitor care Although the LCD monitor is manufactur...

Page 46: ...108 mm Focusing range Wide 0 11 m infinity from the front of the lens Telephoto 0 50 m infinity Autofocusing system Video AF Shutter CCD electronic shutter plus mechanical shutter Shutter speeds 2 1 2...

Page 47: ...92 MEMO 93 2729_E_A_print qxd 03 7 11 11 11 AM Page 92...

Page 48: ...94 MEMO 95 2729_E_A_print qxd 03 7 11 11 11 AM Page 94...

Page 49: ...asse 6 CH 8953 Dietikon Switzerland Minolta Svenska AB Albygatan 114 S 171 54 Solna Sweden Finnish Branch Niittykatu 6 PL 37 SF 02201 Espoo Finland Minolta Portugal Limitada Av do Brasil 33 A P 1700 L...

Reviews: