(2181) 9
REPAIR GUIDE
+
−
−
−
−
−
■
■
■
■
■
Fig. 4
Fig. 4
Fig. 4
Fig. 4
Fig. 4
SHUTTER CHARGE GEAR
SHUTTER CHARGE GEAR
SHUTTER CHARGE GEAR
SHUTTER CHARGE GEAR
SHUTTER CHARGE GEAR
SHUTTER SPACER
SHUTTER SPACER
SHUTTER SPACER
SHUTTER SPACER
SHUTTER SPACER
■
■
■
■
■
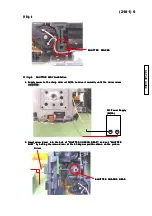
Fig. 5 SHUTTER ASSY Installation
Fig. 5 SHUTTER ASSY Installation
Fig. 5 SHUTTER ASSY Installation
Fig. 5 SHUTTER ASSY Installation
Fig. 5 SHUTTER ASSY Installation
1. Supply power to the charg motor at 2V/1A to drive it normally until the mirror raises
1. Supply power to the charg motor at 2V/1A to drive it normally until the mirror raises
1. Supply power to the charg motor at 2V/1A to drive it normally until the mirror raises
1. Supply power to the charg motor at 2V/1A to drive it normally until the mirror raises
1. Supply power to the charg motor at 2V/1A to drive it normally until the mirror raises
completely.
completely.
completely.
completely.
completely.
DC Power Supply
DC Power Supply
DC Power Supply
DC Power Supply
DC Power Supply
(2V/1A)
(2V/1A)
(2V/1A)
(2V/1A)
(2V/1A)
Driver
Driver
Driver
Driver
Driver
2. Insert screw driver into the hole of "SHUTTER CHARGE GEAR", and put "SHUTTER
2. Insert screw driver into the hole of "SHUTTER CHARGE GEAR", and put "SHUTTER
2. Insert screw driver into the hole of "SHUTTER CHARGE GEAR", and put "SHUTTER
2. Insert screw driver into the hole of "SHUTTER CHARGE GEAR", and put "SHUTTER
2. Insert screw driver into the hole of "SHUTTER CHARGE GEAR", and put "SHUTTER
ASSY" by holding the screw driver at the 90 degrees position shown on the picture.
ASSY" by holding the screw driver at the 90 degrees position shown on the picture.
ASSY" by holding the screw driver at the 90 degrees position shown on the picture.
ASSY" by holding the screw driver at the 90 degrees position shown on the picture.
ASSY" by holding the screw driver at the 90 degrees position shown on the picture.
Summary of Contents for DYNAX 7
Page 6: ...6 2181 REPAIR GUIDE...


