8
Error Messages
Frequent jams in any area indicate that the area should be checked, repaired, cleaned,
and/or replaced. Repeated jams will also occur if the media does not match the
specifications noted in the
User’s Guide
. To order approved consumables, contact your
local vendor or Q-SHOP (www.q-shop.com).
Error Message Problem
Solution
ADC SENSOR
DUSTINESS
WARNING
The density sensor is too
dusty.
Clean the density sensor.
CALL FOR
SERVICE <
X>
A service call is needed for
<X
> (the specified item).
Reboot the printer. Place a service call.
Refer to the
Service & Support Guide
or www.minolta-qms.com for further
information
.
<
COLOR
>
TONER EMPTY
The indicated toner
cartridge is empty.
When the message reads
<
COLOR
>
TONER EMPTY
, replace the cartridge.
Reset the statistics on the control panel
(Operator Control/Consumables/Item
Replaced/
<
COLOR
>
Toner) menu.
<
COLOR
>
TONER LOW
The indicated toner
cartridge is low. There
is still enough toner for
approximately 100
letter/A4 pages (at 5% cov-
erage) before the printer
stops.
<
COLOR
>
TONER
MISSING
The indicated toner
cartridge is missing or
misinstalled.
Replace the toner cartridge.
ENERGY SAVER
Energy Saver is activated.
No action needed.
FRONT COVER
OPEN
The front cover is not
closed properly.
Close the cover.
INVALID
IMAGING UNIT
The printer has detected a
nongenuine MINOLTA-
QMS imaging unit.
To resume printing and to prevent
permanent damage to your MINOLTA-
QMS printer, replace the imaging unit
with a genuine MINOLTA-QMS imaging
unit. If you are using a genuine
MINOLTA-QMS imaging unit and still
receive this error, contact Support.
Refer to the
Service & Support Guide
Summary of Contents for Magicolor 3100 Series
Page 1: ...magicolor 3100 Maintenance Guide 1800657 001D...
Page 4: ...2 Loading Media 1 2 3 A5 A5 5 4...
Page 5: ...3 5 7 6 7 8 8 9 10 11 12 13...
Page 7: ...5 7 8 9 H B 4 4 4 4 5 5 5 5 10 11 12 4 4 4 4 5 5 5 5 13 14...
Page 12: ...10 Replacing a Toner Cartridge 1 2 3 4 5 6...
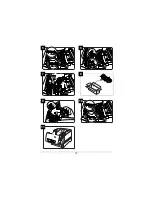
Page 13: ...11 7 8 9...
Page 14: ...12 Replacing the Imaging Unit A 1 2 3 4 26 660 mm 5 6...
Page 15: ...13 7 8 9 1 2 10...
Page 16: ...14 Replacing the Fuser Unit and Media Feed Roller s Fuser Unit A 1 2 3 B 4 4 4 4 5 5 5 5 4...
Page 17: ...15 5 6 7 8 1 1 2 1 2 1 2 1 5 5 5 5 5 5 5 5 4 4 4 4 9 10 11...
Page 18: ...16 Media Feed Roller s 1 2 12 6 6 6 6 13 14 15 16 2 1 3 17...
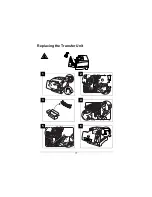
Page 19: ...17 Replacing the Transfer Unit A 1 1 1 2 2 2 3 4 5 1 2 6...
Page 22: ......
Page 23: ......
Page 24: ......


