background image

3. Using Your Camera 

25 


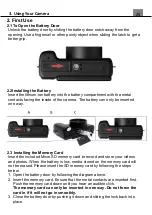
4.  To remove the memory card, simply push in and the card will eject back 

out. 


NOTE: After closing the battery door, make sure that the door is 

closed securely and the lock engaged. 


2.4 Charging the Battery 

Connect your camera to the included AC adaptor with the USB cable 

provided for charging. Insert the small end of the USB plug into the camera’s 

port under the battery door, and the larger end in to the included AC adaptor. 

While charging the LED indicator light will light up solid red, when finished 

charging the light will turn off. 


NOTE: 

Please format the memory card before using the camera 

(Caution, this will erase all data on the card). 


Do not remove or insert the memory card when recording. It 

may damage the card or cause data loss. 


Memory card rating must be Class 6 or above. 

Summary of Contents for MND30

Page 1: ...pment does cause harmful interference to radio or television reception which can be determined by turning the equipment off and on the user is encouraged to try to correct the interference by one or m...

Page 2: ...mera strap with care and never place the strap around the neck of an infant or child Wrapping the strap around a neck may cause suffocation Do not subject the LCD screen to impact To prevent the risk...

Page 3: ...ment If the inside of the camera is damaged the waterproof performance will deteriorate Do not use soap natural detergents or chemicals such as benzene for cleaning Do Not Apply Strong Impact to the C...

Page 4: ...F as this could cause damage or malfunction If you notice any abnormalities such as excessive heat smoke or an unusual smell coming from the battery immediately discontinue use and consult your retai...

Page 5: ...ens monitor or camera body To remove ngerprints or other stains that cannot be removed with a blower gently wipe the parts with a soft dry cloth If you wipe with too much pressure or with a rough clot...

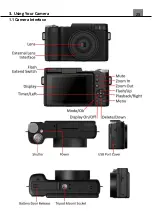
Page 6: ...3 Using Your Camera 25 1 1 Camera Interface...

Page 7: ...ecorder video or image In Playback Tap to delete the image or video on the screen In Settings Tap to select desired setting Menu Tap to show the settings available in each mode Shutter In Photo Tap to...

Page 8: ...stalling the Memory Card Insert the included Micro SD memory card to record and store your videos and photos When the battery is low media stored on the memory card will not be erased Please insert th...

Page 9: ...for charging Insert the small end of the USB plug into the camera s port under the battery door and the larger end in to the included AC adaptor While charging the LED indicator light will light up so...

Page 10: ...how MSDS and PC Camera Use the UP or DOWN buttons to select your desired mode Press the MODE OK to select your desired mode If no selection is made the camera will automatically enter MSDS mode 2 8 Us...

Page 11: ...icon within Photo Mode is explained in the table below 1 Photo Mode 7 Memory Card Inserted 13 White Balance 2 Image Size Resolution 8 Flash Status 14 Light Exposure 3 Scene 9 Anti Shake 15 Metering 4...

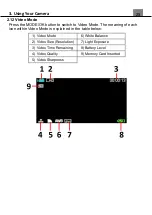
Page 12: ...to switch to Video Mode The meaning of each icon within Video Mode is explained in the table below 1 Video Mode 6 White Balance 2 Video Size Resolution 7 Light Exposure 3 Video Time Remaining 8 Batter...

Page 13: ...tion 3 1 1 Shooting Multi Snapshot Photo Burst This function allows to you capture 3 consecutive photos with one click of the PHOTO button 1 In Photo Mode press the MENU button 2 Select Shooting using...

Page 14: ...cenery Portrait Scenery Sport Party Beach High Sensitivity 4 Press the MENU button to exit the settings menu without making a selection 3 1 5 Beauty Face Filter This feature applies a filter effect on...

Page 15: ...ns to navigate the menu and press the MODE OK button to confirm your selected option Auto Daylight Cloudy Incandescent Florescent 4 Press the MENU button to exit the settings menu without making a sel...

Page 16: ...button to confirm your selected option Sharp Normal Soft 4 Press the MENU button to exit the settings menu without making a selection 3 1 13 Effect This function sets the color filter effect of a pho...

Page 17: ...lect Metering using the LEFT or RIGHT buttons 3 Press the UP or DOWN buttons to navigate the menu and press the MODE OK button to confirm your selected option Center Multi Spot 4 Press the MENU button...

Page 18: ...e duration of time in which the camcorder will wait with no user input before automatically powering off 1 In Photo Mode press the MENU button 2 Select Setup using the LEFT or RIGHT buttons 3 Select A...

Page 19: ...the MODE OK button to enter the Format menu 4 Press the UP or DOWN buttons to navigate the menu and press the MODE OK button to confirm your selected option OK Cancel 5 Press the MENU button to exit t...

Page 20: ...r Camera 25 4 Press the UP or DOWN buttons to navigate the menu and press the MODE OK button to confirm your selected option OK Cancel 5 Press the MENU button to exit the settings menu without making...

Page 21: ...on the greater the video quality and the larger the file size of the video 1 In Video Mode press the MENU button 2 Select Size using the LEFT or RIGHT buttons 3 Press the UP or DOWN buttons to navigat...

Page 22: ...ghtness in your photograph 1 In Video Mode press the MENU button 2 Select Exposure using the LEFT or RIGHT buttons 3 Press the UP or DOWN buttons to navigate the menu and press the MODE OK button to c...

Page 23: ...ith the imprint the imprint cannot be removed 1 In Video Mode press the MENU button 2 Select Date Stamp using the LEFT or RIGHT buttons 3 Press the UP or DOWN buttons to navigate the menu and press th...

Page 24: ...menu and press the MODE OK button to confirm your selected option Off 1 Minute 3 Minutes 5 Minutes 5 Press the MENU button to exit the settings menu without making a selection 3 2 13 Setup Sound Effec...

Page 25: ...3 2 16 Setup Version This setting displays the current firmware version of your camera 1 In Photo Mode press the MENU button 2 Select Setup using the LEFT or RIGHT buttons 3 Select Version using the...

Page 26: ...the SHUTTER button to stop the video Power the camera on and press the MODE OK button to switch to Playback Mode In Playback Mode the following options are available 3 3 1 Delete This function is use...

Page 27: ...our selected option Crop Cancel 5 A blue box will appear on the image the area inside the box is the part of the image that will be saved as a new image 6 Press the ZOOM IN button to enlarge the box p...

Page 28: ...itivity Auto 100 200 400 LCD Screen 3 0 TFT Flip Up LCD Screen Assistive Light White LED Power Saving Mode OFF 1 Minute 3 Minutes 5 Minutes White Balance Control Auto Daylight Cloudy Incandescent Flor...

Page 29: ...Street 61st Floor New York NY 10005 USA Tel 800 441 1100 www minoltadigital com www elitebrands com Copyright 2022 Elite Brands Inc If you re having difficulties with your camera or would like furthe...

Reviews: