background image

- 5 -

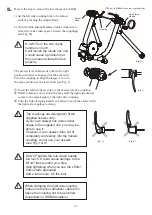
Here is the step to mount the rear wheel onto LR341.

1) Set the left side coupling tube to be almost

center by turning the Adjust Knob.

2) Turn the Hub Clamp Handle counter-clockwise to 

retract (to make wide space between the couplings). 
(see Fig. H)

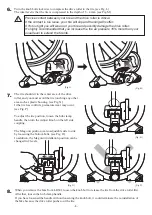
The couplings are designed to fit the 

supplied skewer only.

If your own skewer has quite similar 

shape to the supplied one, you may be 

able to use it.

However, if your skewer does not fit 

completely and evenly into the trainers 

coupling, do not use your skewer.

(see Fig. J & K)

!

(Fig. J)

(Fig. K)

!

Do NOT tighten the hub clamp handle 

too much. It could cause damage to the 

LR341 frame and/or your bike.

Stop tightehing when you see the LR341 

frame starts spreading.

Add 2 turns more. It's the limit.

(Fig. H)

!

Do NOT turn the hub clamp 

handle too much.

It will loosen the inside nut, and 

it could cause a problem that 

the you cannot clamp the hub 

properly.

Coupling

(Wheel  is hidden for easier explanation)

5.

Hub Clamp 

Handle

Adjust 

Knob

The skewer lever shaft needs to be in the right 
position in order to engage your bike correctly. 
Turn the coupling to align the larger cut out to 
the same position as the lever shaft. (see Fig. I)

(Fig. I)

Insert the left side (lever side) of the skewer into the coupling.

While holding it, move down the bike until the right side skewer 

comes to the same height of the right side coupling.

Turn the hub clamping handle clockwise to catch the skewer with 

the right side coupling to clamp.

!

When clamping the right side coupling, 

make sure the rear derailleur cable runs 

above the coupling not to be pinched. 

(especially on SRAM derailleur)

Summary of Contents for LiveRide LR341

Page 1: ...tact the shop first where you originally purchased this product or call the distributors in your country The distributors list can be found on our web site When you cannot get enough service you can c...

Page 2: ...and roller contact will eventually wear both your tire and the trainer roller Wipe the tire surface to remove any solid dust away before setting the bike on the trainer in order to maximize the drive...

Page 3: ...spring and the nut on the opposite side Temporarily tighten the nut Acorn spring must be positioned that the narrower side faces inward Raise up the lever Adjust the nut tightening until you feel resi...

Page 4: ...ide Required Tools 10mm Spanner 4mm Hex Wrench not supplied Fig G Fig E 1 2 4 Install the Mag unit to the frame First install the knob bolt to micro adjust the roller pressure against the tire Put the...

Page 5: ...ing Add 2 turns more It s the limit Fig H Do NOT turn the hub clamp handle too much It will loosen the inside nut and it could cause a problem that the you cannot clamp the hub properly Coupling Wheel...

Page 6: ...L The ideal level is that the tire is compressed in the depth of 3 4mm see Fig M Fig N Fig P Fig O Fig L Fig M Precise contact between your tire and the drive roller is critical If the contact is too...

Page 7: ...o increase the resistance level Twist the shifter lever toward H symbol How to reduce the resistance level Twist the shifter lever toward L symbol L is not zero resistance There is still some resistan...

Page 8: ...Lock Nut to set the cable tension properly see Fig V 4 Install the cover cap again Adjusting Screw Cap Lock Nut If you wish to use a tire size 24x1 75 or smaller you need to install the Z shaped Small...

Reviews: