- 3 -
!
!
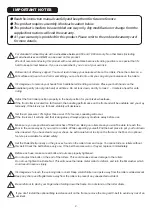
Do NOT use brakes when on the rollers. This could cause serious injury.
To stop, simply stop pedaling and wait for the bike to stop rolling.
The belt will stretch over time. To help keeping its shape, we recommend folding the rollers down when not in use.
The belt is made of urethane material. It should be flexible enough but it could get longer and may not fit your roller
position setting. Replace the belt if it becomes too long.
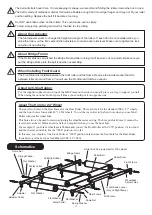
About Foot Adjuster
The foot adjuster works to change the height and angle of the rollers. If each drum is not parallel when you
place the rollers on the floor, extend the adjusters to to make each roller level. Make sure to tighten the lock
nut when done adjusting.
!
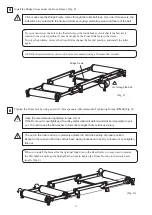
About Bridge Frame
If the Roller Belt has scratched the Bridge Frame while running, it will be worn out so quickly. Make sure you
put the Bridge Frame into the belt loop when assembling.
!
When Installing Front Guard
The Front Guard is installed between the front roller and the frame. Remove the inside washer that sits
between roller drum and frame. You will use the Front Guard itself as a spacer.
!
About Anti-Slip Rubber
Put the supplied rubber sheet on top of the Mid Frame on the side you usually place your leg to support yourself.
When using the optional Foot Step at all times, you should put it on opposite side.
About The Hole for 24" Wheel
There are two holes on the Rear Frame for the Rear Roller. The rear hole is for the standard 700c / 27" wheels,
and the front hole is for smaller 24" / 650c wheels. You set the rear roller in the front hole when you use MoZ-
Roller with smaller wheel bike.
This hole also can be used for micro-adjusting the wheelbase size setting. The hole pitch is 40mm. It means the
rear wheel can be set 20mm ahead (a half of hole pitch) when you use the front hole.
For example, if your bike's wheelbase is 980mm and you set the Front Roller at the "970" position, it's too short
and may become unstable, but the "1000" position is too far.
In this case, you should set the Front Roller at "1000" position hole and use the front hole for the Rear Roller.
It enables to get the best size for 980mm (1000 - 20 = 980).
Roller Drum
Roller End Cap (universal for R & L sides)
Roller Belt
Adjuster
Dome Nut
Spring Washer
Flat Washer
Metal Collar
Bridge Frame
Wheelbase
Adjust holes
Schematics
Adjuster Collar
Lock Release Lever
(only on Right frame)
Anti-Slip Rubber
Dome Nut
Spring Washer
Flat Washer
Metal Collar
Rear Frame
Mid Frame
Front Frame
Flat Washer
Flat Washer

