background image

1

2

3

- 4 -

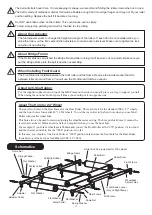
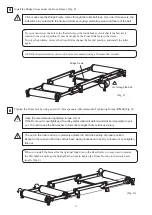
Hole for 650c / 24"

Hole for 700c / 27"

Metal Collar

Flat Washer

Spring Washer

Dome Nut

Left Frame

These instructions are based on NOT using the the Front Guard. If you plan on installing the Front 
Guard, refer to this section on page 8 of these instructions.

There is a metal bracket in the Front Frame which holds the Bridge Frame in position that 
connects both frame sides. This bracket won't move while fixed with bolts, but it will move freely 
in the frame tubing once the bolts are released.
When you install the front roller, make sure to place this bracket towards the center frame before 
assembling. Failure to do so might cause an issue where the bracket comes off over the front 
roller axle making it impossible to install the Bridge Frame.

How To Assemble MoZ-Roller

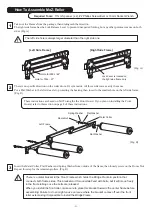
Take out the Frames from the package, then distinguish the direction.
The right side frame has the Lock Release Lever to prevent unexpected folding, but any other points are same on both 
sides. (Fig.A)

[Left Side Frame]

[Right Side Frame]

There is no specific direction on the roller drum. It's symmetric. All three rollers are exactly the same.
Put a Flat Washer to the left side axle to protecting the bearing, then insert to the smaller hole on the left side frame.
(Fig. B)

Insert the Metal Collar, Flat Washer and Spring Washer from outside of the frame, then loosely screw on the Dome Nut. 
Repeat this step for the remaining rollers. (Fig. B)

Required Tools:

  17mm Spanner (x 2), #2 Phillips Screwdriver or 10mm Socket Wrench

(Fig. A)

Lock Lever is located on 

the right side frame only

(Fig. B)

The left side hole is always larger diameter than the right side one.

Flat Washer

!

!

Summary of Contents for moz-roller

Page 1: ...is not included in this kit The Foot Step and Front Guard included are not shown in this image Contact If you have questions or need help please contact the shop where you purchased this product or t...

Page 2: ...ers While supporting yourself find the best place to put your foot down when needed If you have cleats on your shoes be extra careful not to slip on the frame or the floor An optional foot step is ava...

Page 3: ...ed rubber sheet on top of the Mid Frame on the side you usually place your leg to support yourself When using the optional Foot Step at all times you should put it on opposite side About The Hole for...

Page 4: ...possible to install the Bridge Frame How To Assemble MoZ Roller Take out the Frames from the package then distinguish the direction The right side frame has the Lock Release Lever to prevent unexpecte...

Page 5: ...al Collar must be inserted from the larger left side Flat Washer Metal Collar Flat Washer Dome Nut Left Frame Spring Washer If you will install the optional Mag Unit to increase the resistance power p...

Page 6: ...using a pair of 17mm spanners Recommended Tightening Torque 8 N m Fig G 6 When you install the bracket for the optional Mag unit on the Rear Roller you may need to remove the Flat Washer and keep the...

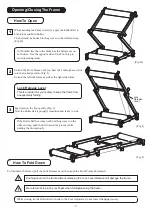
Page 7: ...has the belt groove on both sides Use the opposite side of the Foot Step to avoid jamming issues 2 Extend the Front Frame until you hear the Locking Lever click into the locked position Fig I Extend t...

Page 8: ...Rear Frame to move the bike itself 20mm a half pitch of the holes forward At this moment you can use the 1 000mm position as 980mm size This number corresponds to the wheelbase when the Rear Roller i...

Page 9: ...ody again Put the Lock Nut through the Adjuster and screw into the Long Nut 4 Set the Adjuster length to 110mm from the groove bottom to the adjuster top Tighten the Lock Nut toward the Long Nut with...

Page 10: ...not work on other Minoura rollers Install the Mount Bracket to the Rear Roller Either side is OK Hook the V belt to both roller drum and the pulley Push down to lock If the belt tension is too loose...

Reviews: