- 11 -
If Your Unit Doesn't Work
The first step in trouble shooting your unit is to make sure you are using the most current version of our
firmware. Update your firmware by going to the link posted above.
To get this service, you must be registered to Minoura as an official user.
http://www.minoura.jp/data/trainer/smartturbo/firmware-update-instructions-2-jp.pdf
How To Adjust Belt Tension
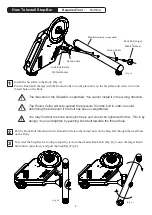
[
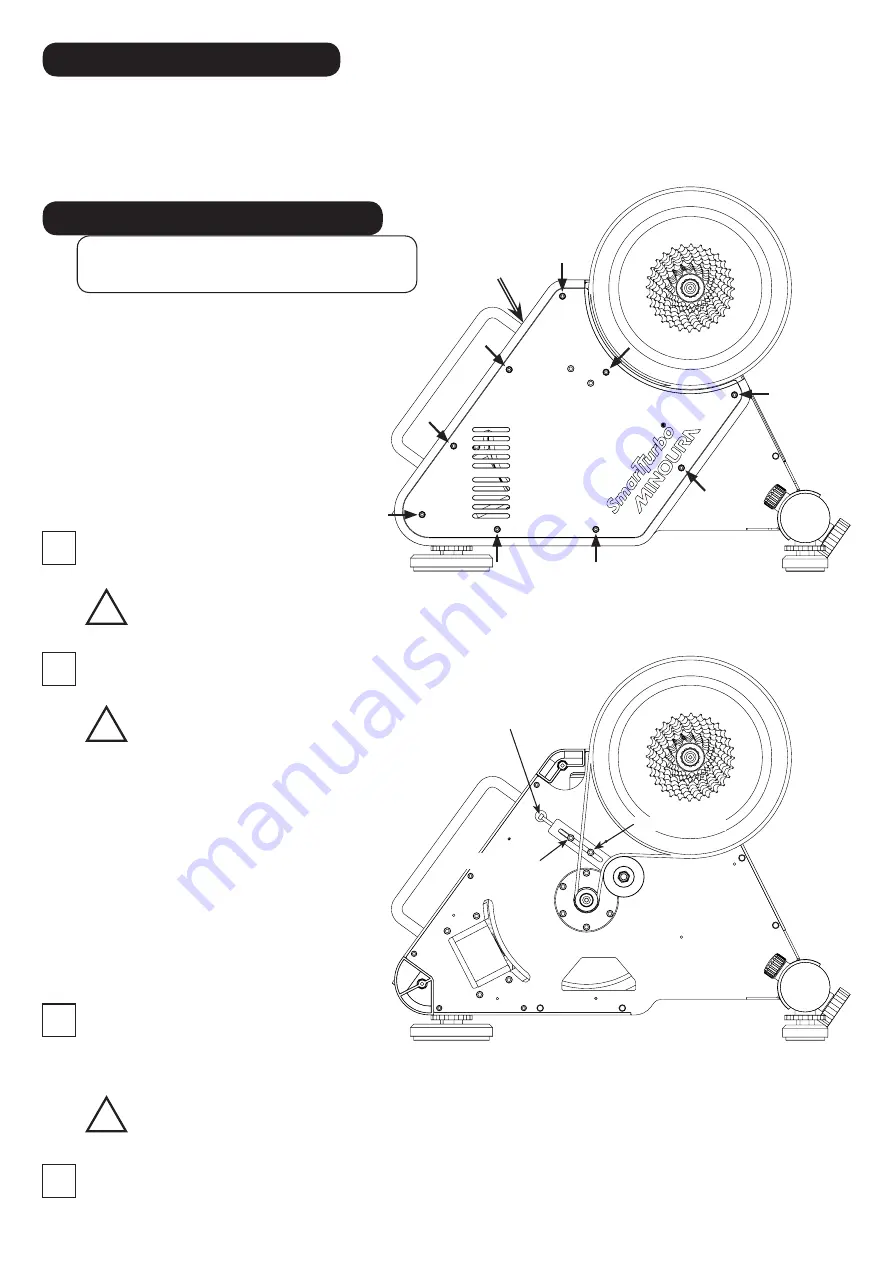
Locking Bolt
A & B
Belt Tension
Adjusting Bolt
(in the hole)
(Fig. U)
Side Cover Bolt
(9 pcs)
Long
(Fig. V)
Belt Tension
Adjusting Bolt
Locking Bolt A
Locking Bolt B
As mentioned previously, it may become
necessary to tighten the belt if you experience
slippage, especially under heavy loads. To do
this, remove the Side Cover and follow these
steps.
This job can be done while the Side Cover sits
on the body (Fig. U) once you understand the
inside mechanism. (Fig. V)
1
2
3
4
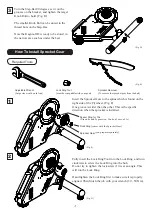
Remove all 9 bolts that hold the Side
Cover. (Fig. U)
Required Tools:
3mm Hex Wrench
4mm
Hex
Wrench
We use a special long bolt here.
Do not misplace them.
!
Slightly loosen both Locking Bolt A and B
by 4mm hex wrench.
Do not overloosen the Locking
Bolt-A more than one rotation.
The Tension Adjusting Bolt
pushes the Locking Bolt-A
from sideward. At this moment,
the thread area has been
slightly damaged on the Bolt-A
due to the pressure from the
adjusting bolt.
Therefore, the Locking
Bolt-A will not be able to turn
smoothly if it has been turned
more than one rotation.
!
Turn the Belt Tension Adjusting Bolt
approximately 1/2 turns clockwise with
a 3mm hex wrench to give more tension
to the belt.
Too much belt tension will lead to premature wear and could
cause other issues. Be careful not to over-tighten the belt.
!
Tighten both Locking Bolt A and B firmly and set the Side Cover.
(inside mechanism after removing the side cover)
Long


