background image

- 7 -

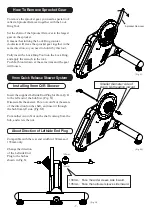
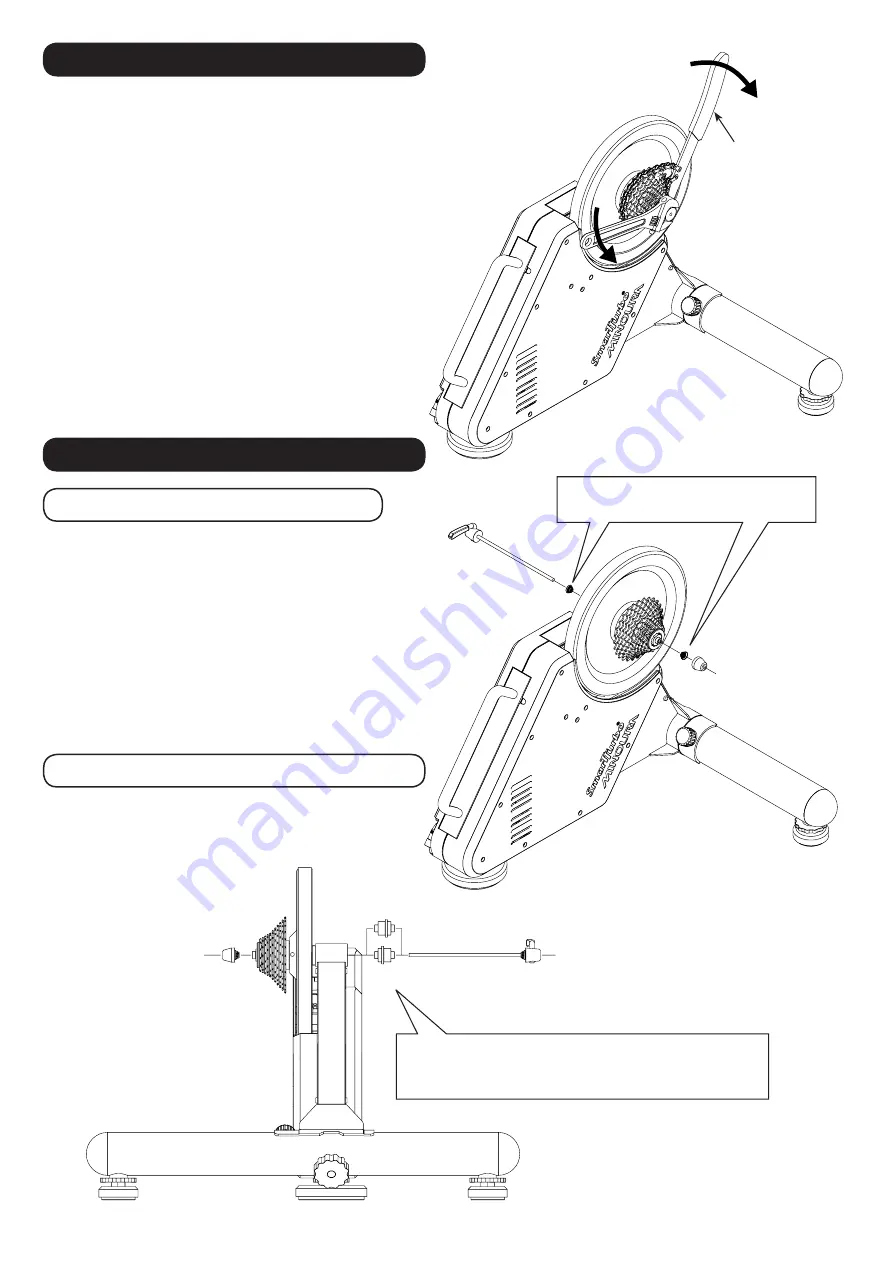
How To Remove Sprocket Gear

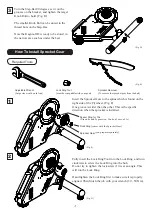
To remove the sprocket gear, you need a special tool 
called a Sprocket Remover together with the Lock 
Ring Tool.

Set the chain of the Sprocket Remover to the largest 
gear on the sprocket.
It means that turning the Lock Ring counter-
clockwise will move the sprocket gear together in the 
same direction, so you need to hold it by this tool.

Fully insert the Lock Ring Tool into the Lock Ring, 
and apply the wrench to the tool. 
Push both tools down at the same time and the gear 
will loosen.

(Fig. L)

Sprocket Remover

Installing 9mm Q/R Skewer

(Fig. M)

(Fig. N)

Smaller diameter side of 

Acorn Nut heading inward

Insert the supplied Leftside End Plug for 9mm Q/R 
to the left end of the hub first. (Fig. N)
Disassemble the skewer. Put an Acorn Nut (be aware 
of the direction) on the shaft, and insert it through 
the hub from left side. (Fig. M)

Put another Acorn Nut on the shaft coming from the 
hub, and screw the nut.

About Direction of Leftside End Plug

Compatible with the rear end width in 130mm and 
135mm only.

130mm :  Face the wider sleeve side inward.
135mm :  Face the narrower sleeve side inward.

130mm

135mm

9mm Quick Release Skewer System

Change the direction 
of the Leftside End 
Plug to the hub as 
shown in Fig. N.

Summary of Contents for SmartTurbo KAGURA LSD9200

Page 1: ...ual Direct Drive Bicycle Trainer Sprocket gear is sold separately Compatibility Kagura DD is compatible with Shimano and SRAM 8s 9s 10s and 11s Campagnolo is currently NOT supported You need to prepar...

Page 2: ...ot to pinch your finger when retracting the Step Bar Make sure your Kagura DD has the correct electric plug that fits your country s regulation If not replace the power cable to the appropriate one th...

Page 3: ...e Skewer Spacer Ring for 10s 1 Knob Bolt Large Knob Bolt Small Foot Adjuster Foot Adjuster Leftside End Plug for 9mm Q R Leftside End Plug for 12mm Thru Axle Rightside End Plug for 12mm Thru Axle Supp...

Page 4: ...lar Round Collar Knob Bolt Small M6 Flat Washer Fig A The direction of the Step Bar is specified You cannot install it in the wrong direction You may find that the knob bolt spins freely and cannot be...

Page 5: ...the hub Fig E Fig F Fig G Insert the Sprocket Gear to the spline which is found on the right side of the Flywheel Fig F One groove is wider than the other This is the specific direction when the sproc...

Page 6: ...ied special plug Fig H Hub end for standard 9mm Q R system Hub end for 12mm Thru Axle Apply the wrench to the original right side end plug and turn it counter clockwise to remove while holding the fly...

Page 7: ...oosen Fig L Sprocket Remover Installing 9mm Q R Skewer Fig M Fig N Smaller diameter side of Acorn Nut heading inward Insert the supplied Leftside End Plug for 9mm Q R to the left end of the hub first...

Page 8: ...on the top gear then set the bike frame on Kagura DD gently Fig O 4 Make sure the bike frame has been set stable and vertical close the skewer lever to hold Adjust the skewer nut tightening correctly...

Page 9: ...to the left side of the hub Fig Q Make sure the other side end plug has been replaced with the supplied Rightside End Plug for 12mm Thru Axle Fig H Hold the bike frame just above Kagura DD and keep th...

Page 10: ...hat happens on your Kagura DD now Be careful to keep the cord away from anything it can become snagged or catch on Undue pressure on the cord can pull the internal circuit board out of position and ca...

Page 11: ...ig U once you understand the inside mechanism Fig V 1 2 3 4 Remove all 9 bolts that hold the Side Cover Fig U Required Tools 3mm Hex Wrench 4mm Hex Wrench We use a special long bolt here Do not mispla...

Reviews: