50
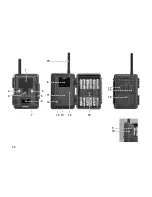
On the bottom of the camera there are additional
ports for:
- external power supply (13)
- USB cable (14) for attaching the camera to a com-
puter (read more under “Attaching the camera to
a computer”)
To close the camera body, proceed as follows:
1. Place your DTC 1000 on a flat surface in front of you.
2. Fold the camera body to the right.
3. Fold up the latch (5) on the right.
4. Slide the latch (5) down until firmly in place.
Inserting the Batteries
Your DTC 1000 camera is designed for AA alkaline,
lithium-ion (Li-Ion) or nickel metal hydride (NiMH)
batteries. To insert the batteries, open your camera
and insert twelve 1.5 Volt AA batteries into the bat-
tery compartment (16), making sure that the (+/-)
poles are in the right direction.
Note:
Alternatively, an external power supply of
6V or 9V can be used. If the camera is connected
to an external power supply, the batteries will be
bypassed – it is thus not possible to recharge bat-
teries while they are in the camera. Please do not
use a 12V power supply as this will damage the
camera and nullify the warranty.
Checking the Battery Status
Switch the DTC 1000 into SET mode (main switch
(12) to the middle). You can find the battery status
symbol in the bottom left of the LCD display (8).
Note:
For best results, we recommend using high
quality batteries. The battery life can be prolonged
by producing shorter video segments, short photo
bursts or longer “quiet times” – see “Quiet Time”
under “Camera Settings”.
Inserting the Memory Card
Your DTC 1000 camera supports (SD/SDHC) memory
cards with a capacity of up to 32 GB. Insert the mem-
ory card into the memory card slot (9) with the brass
colored contacts toward the inside of the camera.
Make sure that the camera is off and that the SD
card is not locked.
Note:
Format your SD card using your PC before
every use – we suggest not to format the card with


