background image

65

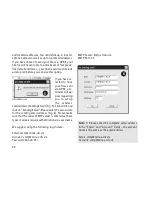
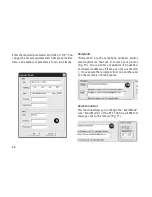
Please make sure to enter the password using the 

upper and lower case letters (MinoX-DTC). 

Note 2:

 If you use a different email address, it 

cannot be encrypted with an SSL or TSL security 

protocol. These email servers do not allow the 

sending of photos sent via your DTC 1000. For more 

information, please contact your email provider. 

Send To

Here you can define whether the DTC 1000 should 

send your photos to a telephone number, an email 

address or to both. 

If you have chosen “Phone”, your DTC 1000 will send 

the images to a maximum of 4 telephone numbers. 

If you have chosen “Email”, your DTC 1000 will send 

the images to a maximum of 4 email addresses. If 

you have chosen “Both”, your DTC 1000 will send the 

images to a maximum of 4 telephone numbers and 

up to 4 email addresses simultaneously.

Note:

 If you choose the GPRS option, you can 

send images only to email addresses and not to 

telephone numbers – the options “Phone” and 

“Both” are not possible. 

Operator Parameter

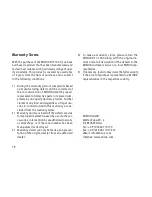
Your DTC 1000 has been pre-configured to selected 

mobile phone providers around the world. You can 

select the pre-configured settings for your country 

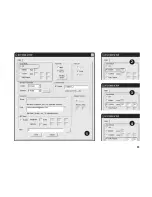
[Fig. 7] or manually configure your camera if your 

provider is not listed. 

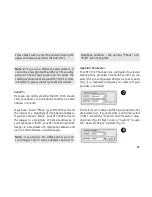
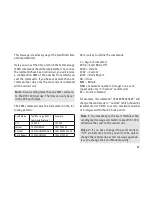
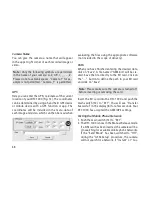
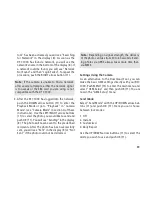
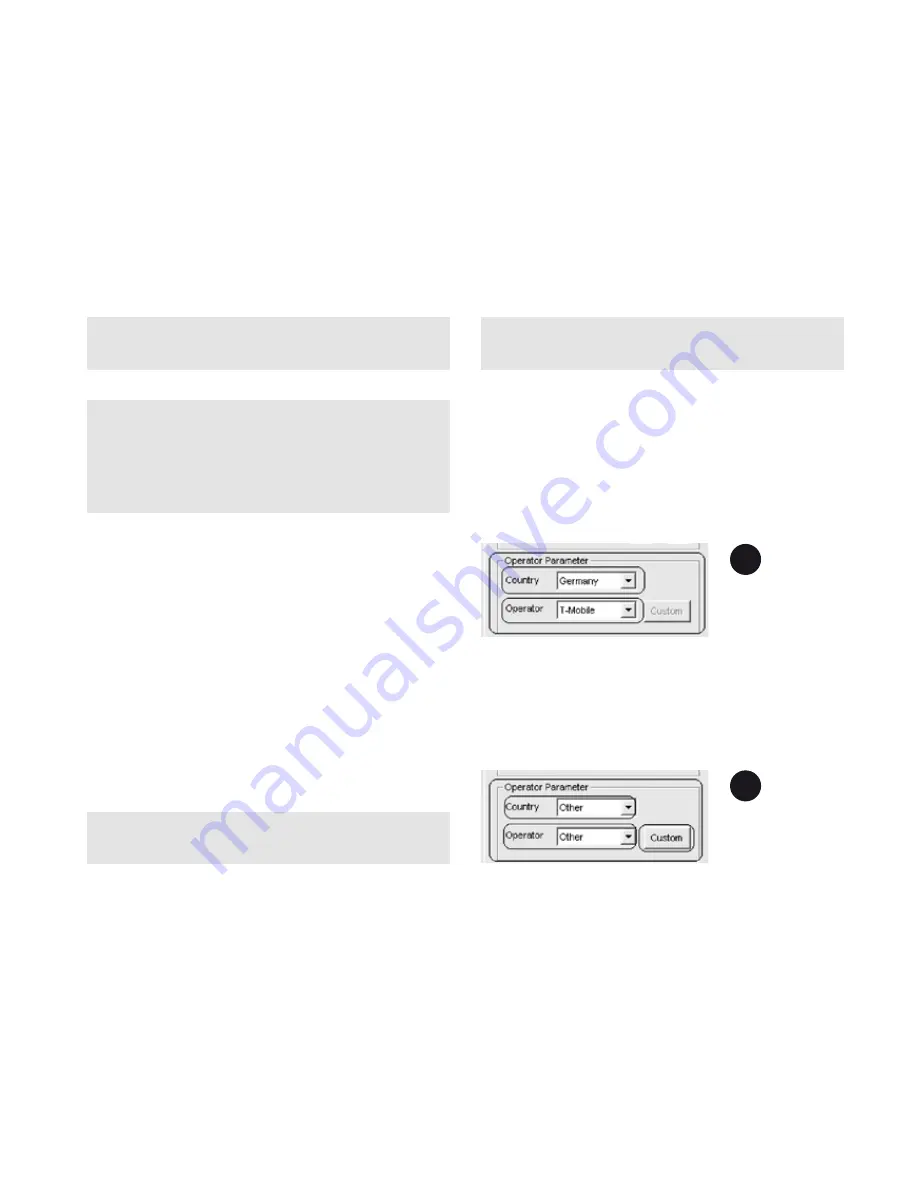
First select your country and then your provider in the 

drop-down lists. If your provider is not listed, select 

“Other” in both the “Country” and “Operator” drop-

down lists [Fig. 8]. Next, click on “Custom” to open 

the “Operator Param” window [Fig. 9].

7

8

Summary of Contents for DTC 1000

Page 1: ...1 MINOX DTC 1000 Instructions ...

Page 2: ...2 MINOX DTC 1000 English page 43 ...

Page 3: ...etup and Operational Modes 52 Setup Mode 52 Operational Mode 52 Menu Functions and Settings 53 Manual Release 53 Camera Mode 53 Video Mode 53 Day and Night Modes 54 Photo and Video Playback 54 Delete Photos or Videos 54 Video Playback 54 A Camera Setting 55 Camera Mode 55 Photo Format 55 Photo Resolution 55 Photo Burst 55 Video Resolution 55 Video Length 56 Video Sound 56 Quiet Time 56 Illuminatio...

Page 4: ...ttings Using the Camera 69 Send Mode 69 Send Via 71 Send To 71 Network Setup 71 Download Tool 73 Remote Control 73 C GPS Input 74 D Language 74 E Camera Information 74 Files Count 74 Storage 75 Firmware Version 75 Camera Name 75 Connecting the Camera to a Computer 75 Connecting With a USB Cable 76 Transferring Photos and Videos Via SD Card 76 MPEG 4 Visual Patent Portfolio License 76 Technical Dat...

Page 5: ...wever if you use a different card please format the card as described on page 59 Files on the card from other devices can affect the functionality of the camera Accessories optional Power adapter EU version order no 65016 Cable for attachment to an external battery order no 65017 Bracket order no 65019 Further information about accessories for the DTC 1000 can be found on the MINOX website www min...

Page 6: ... traditional values fostered by MINOX It combines functionality and best optical quality in the smallest possible space Simple and fast operation makes the MINOX DTC 1000 ideal for digi tal photos and videos in the intended fields of use These instructions are to help you make the most of the full range of functions offered by your MINOX DTC 1000 trail camera ...

Page 7: ... video number get captured during the past 24 hours the battery level and remaining storage space IR flash with black filter Adjustable motion sensor High range IR flash of more than 50 feet 15 m 8 megapixel resolution Convenient 2 0 color monitor Simple and intuitive operation 6 button control panel Short shutter release delay of just 1 second Picture series and short videos Multilingual menu nav...

Page 8: ...48 17 18 17 8 19 11 12 13 14 15 16 2 3 4 5 6 7 1 9 10 ...

Page 9: ...he right of the camera body 3 Fold the latch 5 over to the right 4 Open the front of the camera to the left On the left of the opened camera body you will see the controls 11 12 15 and on the right the battery compartment 16 On the left outer edge of the cam era body you can find the memory card and SIM card slots 9 10 At the top of the inner surface is the 2 LCD display 8 Below the display you wi...

Page 10: ...ted to an external power supply the batteries will be bypassed it is thus not possible to recharge bat teries while they are in the camera Please do not use a 12V power supply as this will damage the camera and nullify the warranty Checking the Battery Status Switch the DTC 1000 into SET mode main switch 12 to the middle You can find the battery status symbol in the bottom left of the LCD display ...

Page 11: ...card is not locked with a PIN Note MINOX assumes no responsibility for any costs that may arise in connection with the use of mobile telephone networks Insert the SIM card into the correct slot 10 with the chip towards the front of the camera A schematic imprint of the proper card position is indicated next to the card slot Note Please make the sure the camera is turned off before inserting or rem...

Page 12: ...d Setup and Operational Modes Your camera has two main modes Setup Mode Switch your DTC 1000 to SET 12 You are now in Manual Release mode Push MENU 15 once to enter the main menu of the camera In this mode you can program the camera and set the date time temperature etc to be displayed in the photos or video footage Operational Mode Switch your DTC 1000 to ON 12 In this mode your DTC 1000 camera w...

Page 13: ...ormal digital camera As with any common digi tal camera you can view scenes on the display and capture them as photos or videos The DTC 1000 is in Manual Release mode by default after switch ing the camera to SET see Setup and Operational Modes You can switch between the camera and video mode using the LEFT RIGHT arrow buttons 11 Push MENU 15 to enter the main menu Push MENU again to go back to th...

Page 14: ...t the top left By pushing the LEFT RIGHT arrow but tons 11 you can browse the files If the GSM settings have been correctly made you can send a selected photo directly to a predefined number or email ad dress by pushing OK 11 It is not possible however to send videos via your SIM card Push MENU 15 to enter the main menu or the DOWN arrow button 11 to go back to Manual Release mode Delete Photos or...

Page 15: ...n 11 to enter the previous menu Photo Resolution Go to the main menu and select Camera Setting and then push OK 11 Select Photo Resolution and verify with OK 11 Select the desired resolu tion 3 MP 5 MP or 8 MP using the UP DOWN arrow buttons 11 and verify with OK 11 You will automatically enter the Camera Setting menu You can make further settings or push the LEFT arrow button 11 to enter the prev...

Page 16: ...fy with OK 11 You will automatically enter the Camera Setting menu You can make further settings or push the LEFT arrow button 11 to enter the previous menu Quiet Time Here you can set the intervals between shutter re leases where the DTC 1000 should not record images ie how long the motion sensor should be deactivated during a desired interval The intervals can be set between 5 to 59 seconds and ...

Page 17: ...ically enter the Camera Set ting menu You can make further settings or push the LEFT arrow button 11 to enter the previous menu Time Format Choose your desired time format of 12 or 24 hours and then push OK 11 You will automatically enter the Camera Setting menu You can make further settings or push the LEFT arrow button 11 to enter the previous menu Set Date Time In the top row you can set Day Mo...

Page 18: ...and then verify with OK 11 In the sub menu choose Disable Pass word and push OK 11 You will automatically enter the Camera Setting menu You can make further settings or push the LEFT arrow button 11 to enter the previous menu Power Type Your DTC 1000 Trail Camera is a high tech precision device It is highly suggested to use high quality alkaline Lithium Ion or NiMH batteries To set the correct typ...

Page 19: ...elete all files on the card and format it for the next use Select No and then OK 11 if you decide not to format your card or push the LEFT arrow button 11 to enter the previous menu Note It is recommended to record some images directly after inserting the SD card to verify the camera s functionality Temperature Here you can set the temperature to be displayed in your photos or videos in degrees of...

Page 20: ...lect Disable and verify with OK 11 You will automatically enter the Duty Time menu You can make further settings or push the LEFT arrow button 11 to enter the previous menu Time lapse This is not to be confused with the duty time and is for the express purpose of defining a time frame between which photos or videos should be made regardless if the motion sensor has been triggered or not During thi...

Page 21: ...WN arrow buttons 11 select Default Set and then verify with OK 11 Choose No or Yes and verify with OK 11 You will automatically enter the Camera Setting menu You can make further settings or push the LEFT arrow button 11 to enter the main menu B GSM Setup Settings Using the Download Tool Software With the Download Tool you can set your DTC 1000 to send photos via a mobile phone network For a quick...

Page 22: ... the first 10 photos made with the DTC 1000 will be sent at 09 30 to the predefined phone numbers or email addresses Note The time can only be set in the 24 hour for mat and the maximum number of photos that can be sent cannot exceed 30 With Daily Report Fig 4 you can have a daily report of the most important data sent to your mo bile phone per text message SMS at the predefined time The report co...

Page 23: ...63 1 2 3 4 ...

Page 24: ... up the sender s email address Sending Email Fig 5 Click on OK and click on Sending Email Please enter the access data for the sending email address Fig 6 Please make sure that the correct SMTP server is entered as these types of servers require authentication via a username We suggest using the following log in data Email smtp minox dtc de Account smtp minox dtc de Password MinoX DTC SMTP Server ...

Page 25: ...ages to a maximum of 4 email addresses If you have chosen Both your DTC 1000 will send the images to a maximum of 4 telephone numbers and up to 4 email addresses simultaneously Note If you choose the GPRS option you can send images only to email addresses and not to telephone numbers the options Phone and Both are not possible Operator Parameter Your DTC 1000 has been pre configured to selected mo...

Page 26: ...one numbers and or email addresses that are to receive your photos Fig 10 You can enter a maximum of 4 numbers and 4 email addresses Please use only a semicolon to separate the recipients from one another and no other symbols or blank spaces Remote Control This function allows you to change the Send Mode see Send Mode of the DTC 1000 via a SMS text message sent to the camera Fig 11 9 10 11 ...

Page 27: ...00 E C 00 E Instant C 01 NNN E C 01 008 E Custom C 02 HHMM NN E C 02 0930 05 E Daily Report C 03 HHMM E C 03 1230 E Here is a key to define the commands C begin of command 00 Send Mode Off 01 Instant 02 Custom 03 Daily Report HH Hour MM Minute NNN maximum number of images to be sent applicable only in Custom send mode E end of command For example this command C 02 0930 05 E will change the send mo...

Page 28: ...in the scope of delivery Path When you have finished entering the desired data click on Save A file named GSM bin will be cre ated Save the file directly to the SD card Click on the button to define the path to your SD card and click on Save Note Please make sure the camera is turned off before inserting or removing the card Insert the SD card into the DTC 1000 and push the main switch 12 to SET Y...

Page 29: ...s 11 to select the photo you would like to send and push OK 11 You will see Sending in the display 8 The photo will now be sent to the predefined recipients After the photo has been successfully sent you will see Sent in the display 8 or Not Sent if the photo could not be delivered Note Depending on signal strength the delivery of the photo can take from 20 to 60 seconds Send ing photos via GPRS a...

Page 30: ...h the UP DOWN arrow buttons 11 to set the desired unit and the RIGHT and LEFT arrow buttons 11 to change positions from hour to minutes When you have finished making your settings push OK 11 to save your setting or MENU 15 to exit without saving If for example you have set the time to 09 30 and Daily Max to 10 the first 10 photos made with the DTC 1000 will be sent to the pre defined recipients at...

Page 31: ...ur DTC 1000 will send the images to a maximum of 4 telephone numbers If you choose Email your DTC 1000 will send the images to a maximum of 4 email addresses If you choose Both your DTC 1000 will send the images to a maximum of 4 telephone numbers and up to 4 email addresses simultaneously Go to the main menu and select GSM Setup and then push OK 11 Using the UP DOWN arrow buttons 11 select Send T...

Page 32: ... to the main menu and select GSM Setup and then push OK 11 Using the UP DOWN arrow buttons 11 select Network Setup and then verify with OK 11 Select Recipient Email to enter up to four email addresses and then push OK 11 Choose a position with the UP DOWN arrow buttons where you wish to save an email address and push OK 11 Use the LEFT RIGHT arrow buttons 11 to select the fields and the UP DOWN ar...

Page 33: ...ge SMS commands should be implemented This function allows you to change the Send Mode of the DTC 1000 via a SMS text message sent to the camera This message is read every day at the predefined time and implemented For instructions on how to set up the commands please see Remote Control under Settings Using the Download Tool Software Go to the main menu and select GSM Setup and then push OK 11 Usi...

Page 34: ...ou will automatically enter the GPS Input menu Push the LEFT arrow button 11 to enter the main menu or MENU 15 to go to Manual Release mode D Language The DTC 1000 Trail Camera is set to English by factory default To change the menu navigation to a different language please follow these steps 1 Push the main switch 12 to SET mode 2 You are now in Manual Release mode 3 Push MENU 15 once You are now...

Page 35: ...sable the camera name or select Enable and push OK 11 to enter the name for your camera Use the LEFT RIGHT arrow buttons 11 to select the fields and the UP DOWN arrow buttons to select the number letter or symbol needed for the name If you have entered a wrong figure use the LEFT RIGHT buttons to select the LEFT ARROW icon and push OK 11 to delete the figure Each time OK 11 is pushed a figure will...

Page 36: ...ying the files to your PC and before every use we suggest not to format the card with the DTC 1000 see also For mat under Camera Setting This procedure de letes older data from the SD card and prepares your card for an error free operation in your camera It is recommended to record some images directly after inserting the SD card to verify the camera s function ality Please make sure that the came...

Page 37: ... Night shots Black and white User friendly interface 6 button control panel Real time screen display Photo video playback Settings Date time temperature on each image video External memory SD SDHC card with up to 32 GB Ports USB port 6 Volt 9 Volt for external power supply min 2000 mA Cables USB cable included Batteries 12 x 1 5 V AA batteries Alkaline Li Ion or NiMH Password protection 4 digit co...

Page 38: ... ex cluded from the warranty terms 2 Warranty claims are invalid if the defects are due to improper treatment caused by use of other ac cessories intervention by unauthorized persons or workshops or if the serial number has been manipulated or destroyed 3 Warranty claims can only be made upon presen tation of the original receipt from an authorized dealer 4 To make a warranty claim please return t...

Page 39: ...terations without notice MINOX is a registered trademark of MINOX GmbH Wetzlar MINOX GmbH Walter Zapp Str 4 D 35578 Wetzlar Germany Tel 49 0 6441 917 0 Fax 49 0 6441 917 612 e mail info minox com www minox com 99544 07 13 ...

Reviews: