49
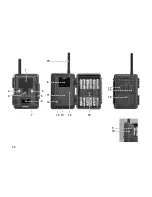
Controls
1. IR LEDs with a black filter for night recordings
2. Twilight sensor
3. Blue activation LED
4. Camera lens
5. Lockable latch
6. Motion sensor
7. Rubber plug for external power supply
8. 2” LCD color display
9. Memory card slot
10. SIM card slot
11. Control buttons, OK button
12. Main switch with three positions:
Off / Setup Mode / Operational Mode
13. Port for external power supply (6V/9VDC)
14. USB cable port
15. Menu button
16. Battery compartment for 12 x 1.5 Volt AA batteries
17. Mounting brackets
18. ¼” tripod thread
19. Antenna
Preparing Your Camera
Explanation of the Controls
Proceed as follows to prepare the camera for use:
1. Place your DTC 1000 on a flat surface.
2. Push the latch (5) up on the right of the camera body.
3. Fold the latch (5) over to the right.
4. Open the front of the camera to the left.
On the left of the opened camera body you will see
the controls (11, 12, 15) and on the right the battery
compartment (16). On the left outer edge of the cam-
era body you can find the memory card and SIM card
slots (9/10). At the top of the inner surface is the 2”
LCD display (8). Below the display you will see the
four directional buttons to make selections in the menu
(11). In the center of these buttons you will find the OK
button (11) used to confirm the selected menu settings;
the oval-shaped ENTER button to the upper right (15) is
to switch back to the main menu while in Setup Mode.
On the bottom left is the main switch (12) with three
positions for the following settings:
1. OFF = main switch to the left
2. SET = Setup Mode; main switch in the middle
3. ON = Operational Mode; main switch to the right


