background image

22

WIRING DIAGRAMS

Summary of Contents for mc20001ce

Page 1: ...gan 48906 Fax 517 484 9836 Email CustServe Michco com Web site www Michco Com Parts Web site www FloorMachineParts Com Order Parts on Line at www FloorMachineParts Com Directly to Parts Service By Email Shop Michco com By Fax 517 702 2041 By Voice Use numbers above Serving the Cleaning Industry Since 1922 Notice All copyrighted material remains property of original owners all trademarks are proper...

Page 2: ...200X Traction Drive Deluxe Floor Scrubber Battery Model MC20001QP CE MC20002QP CE OPERATION SERVICE PARTS CARE ...

Page 3: ......

Page 4: ...llation Removal 6 BaseAssembly Traction Drive 7 8 BaseAssembly Deluxe 9 10 TankAssembly 11 12 UpperAssembly 13 ConsoleAssembly 14 Motor LiftAssembly Deluxe 15 16 Motor LiftAssembly Traction Drive 17 ScrubheadAssembly 18 Dashboard Back Panel Assembly 19 Squeegee Lift MechanismAssembly 20 Squeegee Assembly Complete 21 Wiring Diagram 22 23 Wiring Diagram CE 24 25 ...

Page 5: ...rforming any maintenance procedures Store or park this machine on a level surface only These machines are designed for level floor operation only DO NOT OPERATE on ramps or inclines Battery acid can cause burns When working on or around batteries wear protective clothing and safety glasses Remove metal jewelry Do not lay tools or metal objects on top of batteries This machine is not suitable for p...

Page 6: ... not lay tools or metal objects on top of batteries BATTERY INSTALLATION 1 Raise tank assembly by gripping the front of the tank and lift the tank backward as shown in Fig 1 2 Install batteries as shown in Figure 2 CHARGING OF BATTERIES Charging of batteries generates explosive gases DO NOT CHARGE BATTERIES WHEN OPEN FLAMES OR SPARKS ARE PRESENT DO NOT SMOKE Make sure the charger is turned off bef...

Page 7: ...wn Black Aggressive stripping with 80 Grit and scrubbing tile Silicon Carbide floors unfinished Coarse Bristle concrete floors Strata Grit Nylon impregnated Long Dark Blue Black Heavy duty with 46 Grit stripping scrubbing Silicon Carbide unfinished concrete Coarse Bristle 1 Squeegee lift lever 2 Recovery dump hose 3 Reverse handle 4 Dashboard control panel 5 Forward handle 6 Safety bar switch 7 So...

Page 8: ...ism engages or by pressing brush up switch 19 on Deluxe models Brush will come on automatically when brush in on the floor and forward 5 or reverse 3 handles are squeezed and remain on approximately 5 seconds after release 6 Adjust solution control feed lever 7 Select vacuum operations Vacuum On mode 23 Vacuum will remain on until switched to the off position Vacuum Auto mode 23 Vacuum will come o...

Page 9: ... enough raise the castor by turning the stem counter clockwise to adjust the castor height to allow more down pressure on the squeegee Repeat Step 2 6 Make sure that there is an even deflection on the entire length of the rear blade Adjust the castors and retighten the wing jam nuts to lock the castor setting in place 7 Pitch adjustment is necessary if the outer ends on the squeegee blade does not...

Page 10: ...e scrubhead shroud while lining up the center hex drive hub and pressing the brush up until the brush engages on the drive hub REMOVAL Traction Drive 1 Raise the scrubhead to the UP position by depressing the pedal A downward as shown on Fig 1 Deluxe Model 1 Raise the scrubhead to the UP position by pressing the switch BRUSH UP B switch as shown on Fig 2 until the scrubhead stops retracting upward...

Page 11: ...7 BASE ASSEMBLY TRACTION DRIVE ...

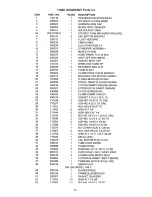
Page 12: ...8 TRACTION DRIVE Parts List ...

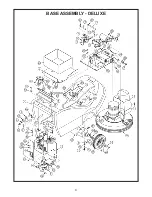
Page 13: ...9 BASE ASSEMBLY DELUXE ...

Page 14: ...10 DELUXE Parts List ...

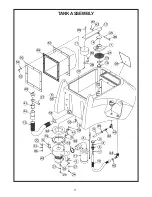
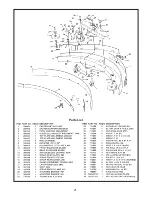
Page 15: ...11 TANK ASSEMBLY ...

Page 16: ...12 TANK ASSEMBLY Part List ...

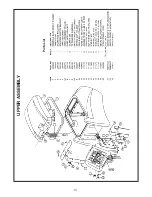
Page 17: ...13 UPPER ASSEMBLY Parts List ...

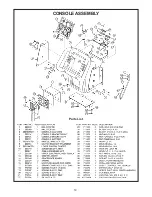
Page 18: ...14 CONSOLE ASSEMBLY Parts List ...

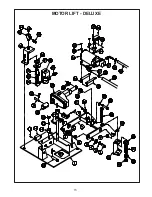
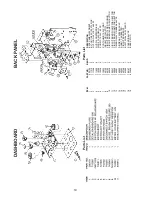
Page 19: ...15 MOTOR LIFT DELUXE ...

Page 20: ...lt 5 16 x 1 75 26 711515 6 WSR Flat 406 x 81 x 063 27 711373 1 Nut Nyloc 1 4 20 200285 Pump Actuator Assembly 28 200174 1 Pump Mounting Bracket 29 712638 4 Nut Nyloc 10 24 SS 30 200248 1 Pivot Tube 31 831965 1 Clevis Pin 3 8 x 1 63 32 711808 1 Cotter Pin 33 743503 1 Actuator 34 833299 1 Pump 35 711505 4 WSR Flat 1 4 36 712532 4 SCR MC 10 24 x 1 SS 37 833325 2 Elbow 3 8 Barb x 1 4 NPT 38 450076 2 C...

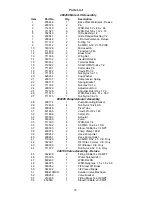
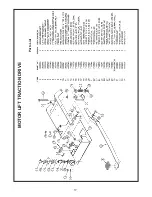
Page 21: ...17 MOTOR LIFT TRACTION DRIVE Parts List ...

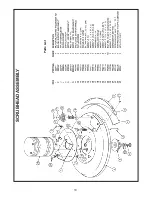
Page 22: ...18 SCRUBHEAD ASSEMBLY Parts List ...

Page 23: ...10 24 X 62 SS 7 712823 1 SCR THUMB 10 24 Xl ZINC 8 740132 2 INSULATOR GLASTIC 9 740159 1 CIRCUIT BRKR 175 RED HOUSING 10 740238 2 CIRCUIT BRKR 18AMP PUSH BUTTON 11 740247 1 CIRCUIT BRKR 3OAMP PUSH BUTTON 12 740549 1 CIRCUIT BRKR 5OAMP PUSH BUTTON 13 742091 1 TIMER DELAY ON BREAK 24VDC 14 742000 3 DIODE ASY 24 26 32 38 AC 15 742403 1 SHUNT CALIBRATED 16 742748 4 CIRCUIT BRKR BOOT 17 743250 1 ELECTR...

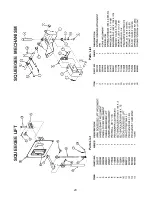
Page 24: ...20 SQUEEGEE LIFT SQUEEGEE MECHANISM Parts List Parts List ...

Page 25: ...21 Parts List ...

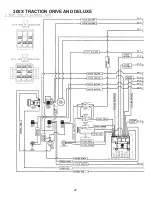
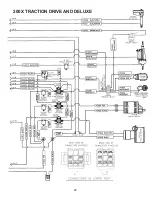
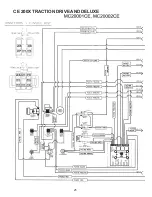
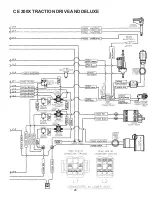
Page 26: ...22 WIRING DIAGRAMS ...

Page 27: ...23 200X TRACTION DRIVE AND DELUXE ...

Page 28: ...24 200X TRACTION DRIVE AND DELUXE ...

Page 29: ...25 CE 200X TRACTION DRIVE AND DELUXE ...

Page 30: ...26 CE 200X TRACTION DRIVE AND DELUXE ...

Page 31: ... exact original equipment replacement All warranteed items become the sole property of Minuteman International Inc or its original manufacturer whichever the case may be Minuteman International Inc disclaims any implied warranty including the warranty of merchantability and the warranty of fitness for a particular purpose Minuteman International Inc assumes no responsibility for any special incide...

Reviews: