background image

5

OPERATING INSTRUCTIONS

1. Filling: Fill the solution tank with the desired amount of water and add liquid cleaning solution to

the proper dilution ratio. DO NOT USE powdered cleaning chemicals. Powders are unlikely to
dissolve thoroughly, resulting in clogging the in-line solution filter.  This can reduce or stop water
flow to the brush.

2. Lower brush assembly.

-

To lower the brush, first push the pedal slightly towards the center of the machine
(unlock it), then release it slowly.

-

To lift the brush, press the pedal down until lift mechanism engages.

3. Turn on brush switch.

4. Adjust solution control feed lever.

5. Turn on vacuum switch.

6. Lower squeegee assembly.

After Use:

1. Turn off solution feed.

2. Switch off brush and raise.

3. Raise squeegee assembly.

4. Turn off vacuum motor.

Solution and recovery tanks should be emptied after every use.

MAINTENANCE: Unplug from outlet before servicing.

Daily

1. Clean float assembly & squeegee blades.

Monthly

1. Check wear on squeegee blades.
2. Grease rear wheels.
3. Grease pivot points on brush motor assembly.

Every 500 hours check condition of carbon brushes on vacuum motor and
brush drive motor.

Summary of Contents for MC20115

Page 1: ...Model MC20115 MC20230 MC20230CE OPERATION SERVICE PARTS CARE 200 Floor Scrubber Electric Revised 8 03 ...

Page 2: ......

Page 3: ...Control Panel Identification 3 Brush Installation Instructions 4 Operating Instructions Maintenance 5 Main Polyethylene Components 6 7 Solution Recovery Tank 8 9 Vacuum Components 10 11 Brush Drive Assemblies 12 13 Back Panel 14 15 Squeegee Assembly 16 17 Wiring Diagram 18 ...

Page 4: ... center Use only cord specified by manufacturer Do not pull or carry by cord use cord as a handle close a door on cord or pull cord around sharp edges or corners Do not run appliance over cord Keep cord away from heated surfaces Do not unplug by pulling on cord To unplug grasp the plug not the cord Do not handle plug or appliance with wet hands Do not put any object into openings Do not use with a...

Page 5: ...5 volt AC or above 125 volts AC could cause serious damage to the motor Model MC20230 This machine is designed to operate on a standard 16 amp type L fused 230 volt 50 hz AC circuit Voltages below 200 voltsAC or above 250 volts AC could cause serious damage to the motor I E C Class 1 GROUNDING INSTRUCTIONS This floor finishing machine should be grounded while in use to protect the operator from el...

Page 6: ...ble 11 Recovery tank dump hose 6 Power assist control 12 Solution tank dump hose SQUEEGEE PITCH CONTROL ADJUSTMENTS Some minor adjustments may be required due to floor types and conditions to extend downward travel Remove clevis pin 3 and unscrew yoke 1 from cable 2 To adjust pitch angle of squeegee loosen bolts 5 and knobs 4 Squeegee angular position can now be changed for best performance ...

Page 7: ...er machine as shown lining up center hex drive hub 6 By releasing foot pedal B to lower brush mechanism drive hub will engage REMOVAL Figure 2 1 Disconnect power cable mains from machine 2 Set brush assist lever A to rabbit 3 Raise brush mechanism B to up position by depressing pedal downward as shown 4 Remove side skirt C by lifting up and away 5 Brush has snap on push off clutch plate By pushing...

Page 8: ...elease it slowly To lift the brush press the pedal down until lift mechanism engages 3 Turn on brush switch 4 Adjust solution control feed lever 5 Turn on vacuum switch 6 Lower squeegee assembly After Use 1 Turn off solution feed 2 Switch off brush and raise 3 Raise squeegee assembly 4 Turn off vacuum motor Solution and recovery tanks should be emptied after every use MAINTENANCE Unplug from outle...

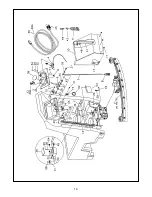
Page 9: ...6 ...

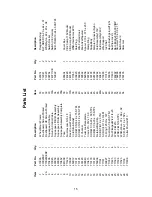
Page 10: ...6 210052 1 Splash Skirt 17 210056 1 Skirt Retainer Front 18 210053 1 Skirt at Access Panel 19 210057 1 Skirt Retainer at Access Panel 20 210058 1 Skirt Retainer at Wheel 21 210054 1 Skirt at Wheel 22 210059 1 Access Panel 23 833214 1 Knob 3 Sided 24 450062 1 Cord Nylon 25 210061 1 Pocket Pull 26 430126 2 Hinge Backing Plate 27 715089 1 Decal 200 28 715060 1 Decal Minuteman 29 712822 5 No 10 24 x 5...

Page 11: ...8 ...

Page 12: ... 450081 3 WSR SS 1 908 x 2 41 x 03 20 711124 1 SCR ST B 10 x 37 NI 21 710353 2 SCR MC 10 32 x 37 ST PL 22 710985 2 SCR SC 3 8 16 x 62 23 711504 1 WSR Flat 1 4 ID SS 24 711594 1 WSR Flat 56 x 88 x 03 NI 25 712092 1 SCR Nylon 1 4 20 x 2 5 26 712567 1 SCR MC 1 4 20 x 2 00 SS 27 712569 1 SCR MC 1 4 20 x 1 50 SS 28 712665 1 Nut Hex 1 4 20 SS 29 712667 2 Nut Hex 1 4 20 SS NYLOC 30 210045 1 Solution Cont...

Page 13: ...10 ...

Page 14: ... 22 711506 4 WSR Flat 5 16 STPL 23 711509 6 WSR Flat 1 2 STPL 24 711517 4 WSR Flat 77 x 1 37 x 03 25 711515 6 WSR Flat 44 x 87 x 07 26 710874 2 SCR SC 1 2 x 13 x 3 75 27 740429 1 Vac Motor 115V Model 27A 741030 1 Vac Motor 240V Model 28 710180 8 SCR MC 1 4 20 x 75 29 760859 1 Hose Clamp 30 210075 1 Hose Rubber Flex 2 x 15 31 801013 1 Sleeve Hose 32 832136 1 Nylon Sleeve Solution Feed 33A 381041 1 ...

Page 15: ...12 ...

Page 16: ... HH 20 x 1 25 35 712683 2 Nut Nyloc 5 16 18 SS 36 712761 2 WSR Flat 28 x 1 25 x 059 SS 37 711328 2 Nut Hex 3 8 16 38 711425 4 Nut Flanged Wizz 1 4 20 Item Part No Qty Description 39 711439 2 Nut Flanged Wizz 3 8 16 40 711506 3 WSR Flat 5 16 STPL 41 711515 1 WSR Flat 44 x 87 x 07 42 210066 1 Drive Hub Retainer Bolt 43 711517 1 WSR Flat 77 x 1 37 x 03 44 711523 2 WSR Wave 37 x 68 x 02 45 711535 10 W...

Page 17: ...14 ...

Page 18: ...4 711425 4 Nut Flanged Wizz 1 4 20 25 711503 2 WSR Flat 10 26 711506 2 WSR Flat 5 16 STPL 27 711523 1 WSR Wave 37 x 68 x 02 28 711106 1 SCR ST A 10 x 75 PL 29 711808 1 Cotter Pin Hair 13 Item Part No Qty Description 30 829014 1 Flanged Bushing 31 712041 2 BLT SDER 1 4 20 x 44 x 37 32 712320 2 WSR Nylon 22 x 45 x 04 33 809754 2 Switch Rocker 33A 740711CE 2 Switch CE Version 34 712822 8 SCR THMS 10 ...

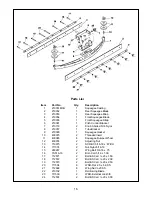
Page 19: ... Squeegee Gasket 10 430075 2 Threaded Insert 11 430085 4 Squeegee Bumper Wheel 12 430074 2 Adjusting Nut 13 710975 2 SCR SC 5 16 18 x 87 BH 14 711374 2 Nut Nyloc 5 16 18 15 260267 2 Wing Bolt 3 8 16 x 75 16 70 516 16 2 Bolt Carr 5 16 x 1 00 17 712571 2 Bolt SS Carr 20 x 1 50 18 712572 2 Bolt SS Carr 20 x 2 00 19 712573 2 Bolt SS Carr 20 x 2 50 20 711504 8 WSR Flat 25 x 56 SS 21 712668 8 Wing Nut 2...

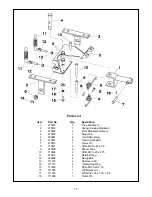
Page 20: ...60041 4 Oilite Bushing 6 210391 2 Torsion Spring SS 7 210415 1 Clevis Pin 8 712811 2 SCR MC 10 24 x 50 9 210400 2 Spacer Tube 10 710592 2 SCR MC 20 x 2 75 11 210413 2 Return Spring 12 260292 2 Swing Bolt 13 711316 2 Nut Hex 20 14 711713 2 Retaining Ring 15 710180 1 SCR MC 20 x 75 16 711535 1 WSR Helical 17 711519 1 WSR Flat 25 x 1 00 x 06 18 711808 1 Cotter Pin ...

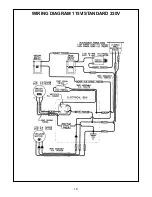
Page 21: ...18 WIRING DIAGRAM 115V STANDARD 230V ...

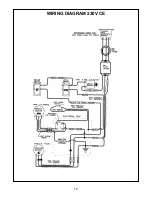
Page 22: ...19 WIRING DIAGRAM 230V CE ...

Page 23: ... All warranteed items become the sole property of Minuteman International Inc or its original manufacturer whichever the case may be Minuteman International Inc disclaims any implied warranty including the warranty of merchantability and the warranty of fitness for a particular purpose Minuteman International Inc assumes no responsibility for any special incidental or consequential damages This li...

Reviews: