5
OPERATING INSTRUCTIONS
1. Filling: Fill the solution tank with the desired amount of water and add liquid cleaning solution to
the proper dilution ratio. DO NOT USE powdered cleaning chemicals. Powders are unlikely to
dissolve thoroughly, resulting in clogging the in-line solution filter. This can reduce or stop water
flow to the brush.
2. Close lid.
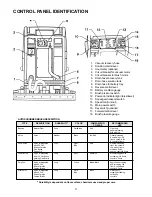
3. Turn on main power switch (Refer to Page 3 #15).
4. Adjust main speed control #14 to full counter-clockwise position.
5. Lower brush assembly (ref. page 3 #11) using switch. Brushes will not come on until forward #17
or reverse #9 lever are pulled. Brushes will remain on for 3 to 5 seconds after levers are released.
Adjustments to brush pressure can be made by depressing switch #11 and reading brush pressure
gauge #18.
6. Squeegee Control/Vacuum. Switch #13 has two positions one is for
transport
/ double scrubbing,
when the switch is in this position the squeegee will raise and the vacuum will turn off. With the
switch in
automatic
mode the squeegee will automatically lower in forward movement of the
machine and vacuum will turn on. When the machine is reversed the squeegee will automatically
raise and the vacuum motor will turn off.
7. Solution Control #2. The solution lever is a mechanical cable that opens the solution valve. This
lever must be moved to the full on position then decrease to desired flow to operate properly.
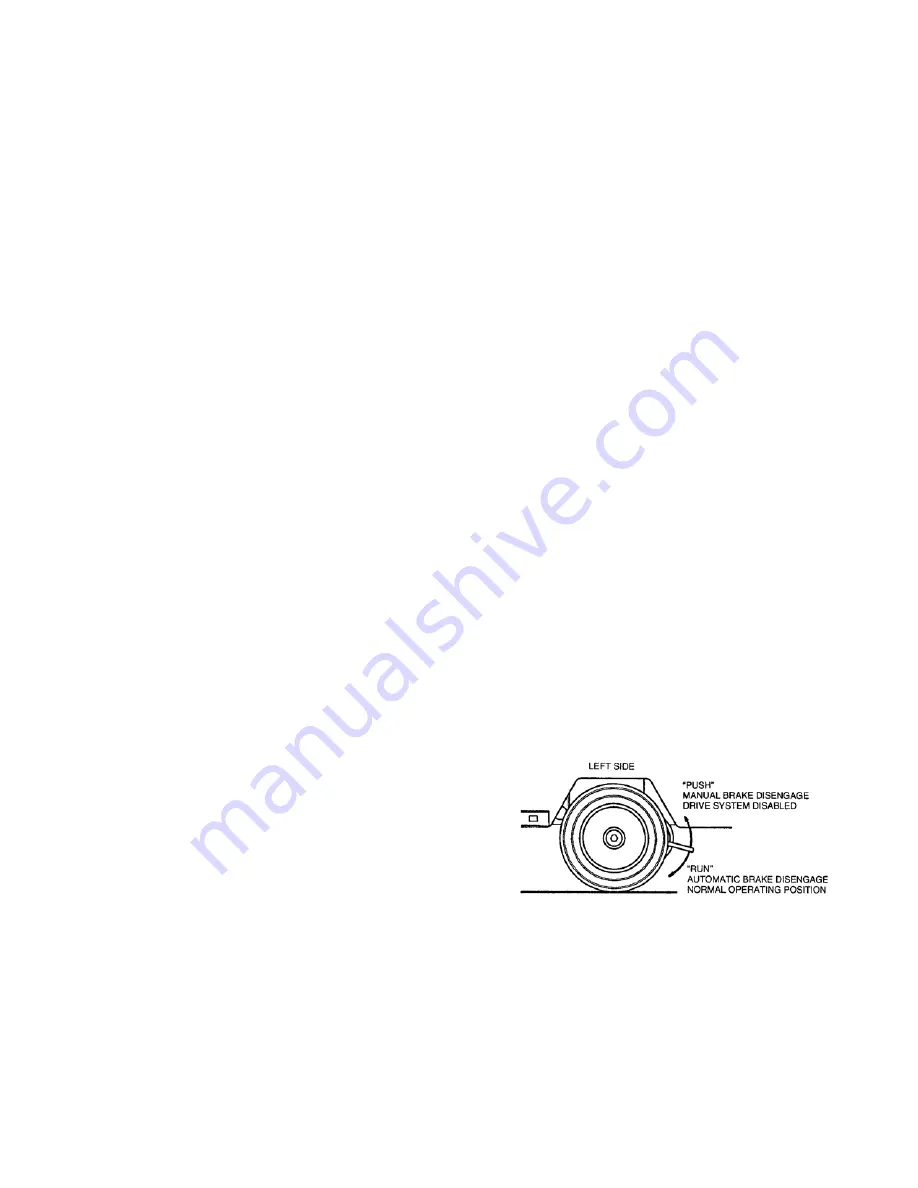
AUTOMATIC PARKING BRAKE OPERATION (CE Only):
Brake lever located behind left wheel.
Run Mode
- Normal operation; Brake lever in down position.
•
When the power is turned off the brake is automatically engaged.
•
When the power is turned on the brake is automatically disengaged and the drive system is
enabled.
Push Mode
- Machine inoperable; Brake lever in up position.
•
Brake is manually disengaged.
•
Power is shut off to the drive system.
MAINTENANCE:
Daily
1. Clean float assembly & squeegee blades. Vac filter.
2. Recharge batteries (check battery acid levels before and after charging).
Monthly
1. Check wear on squeegee blades.
2. Grease rear wheels.
3. Grease pivot points on brush motor assembly.
Summary of Contents for Powerboss PB32036CE
Page 2: ......
Page 11: ...8 ...
Page 15: ...12 ...
Page 17: ...14 ...
Page 19: ...16 ...
Page 24: ...21 WIRING DIAGRAM STANDARD MODEL ...
Page 25: ...22 WIRING DIAGRAM CE MODEL ...


