background image

User Manual

MiVue Manager

Summary of Contents for mivue drive 50 series

Page 1: ...Hardware User Manual MiVue Drive Series...

Page 2: ...r the first time familiarize yourself with your device and its operation On main roads the distance to an exit calculated by your Mio may be further than the distance shown on road signs Road signs sh...

Page 3: ...lithium ion battery The battery may burst or explode if mishandled releasing hazardous chemicals To reduce the risk of fire or burns do not disassemble crush or puncture the battery Recycle or dispose...

Page 4: ...Low Voltage Directive 2014 35 EU issued by the Commission of the European Community Compliance with these directives implies conformity to the following European Standards EN 300 328 EN 300 440 1 EN 3...

Page 5: ...a vehicle 7 Enabling Traffic TMC Reception 7 Getting to know your Mio 8 How do I turn on my Mio 9 Using the power button 9 Resetting the device 9 How do I charge the battery 10 How do I charge the bat...

Page 6: ...actions Term Description Press Press and release a button quickly Tap Press and release an item displayed on the touch screen Select Tap an item in a list or tap a command from a menu Disclaimer Not...

Page 7: ...lly just beneath the rear view mirror To protect your Mio against sudden surges in current connect the in car charger only after the car engine has been started Enabling Traffic TMC Reception Traffic...

Page 8: ...nnector for in car charger USB cable and home charger may be sold separately Slot for MicroSD memory card Connector for rear camera not available on all modes may be sold separately Memory card slot f...

Page 9: ...uspended state When you next briefly press the power button your Mio will return to the Main Menu To turn off your Mio press and hold the power button for 3 seconds Resetting the device Occasionally y...

Page 10: ...rge the battery via my computer For optimal charging results ensure that your Mio is turned off while connected to your computer 1 Turn on your computer 2 Plug the large end of the USB cable may be so...

Page 11: ...when the device is turned on Hold the card MicroSD by the edges and gently insert it into the slot as shown in the illustration To remove a card gently push the top edge of the card inwards to release...

Page 12: ...way from excessive moisture and extreme temperatures Avoid exposing your Mio to direct sunlight or strong ultraviolet light for extended periods of time Do not place anything on top of your Mio or dro...

Page 13: ...power may be too low to operate your Mio If the problem still persists reset your Mio Screen freezes Reset your Mio Screen is hard to read Increase the screen brightness Cannot establish a connection...

Page 14: ......

Page 15: ......

Page 16: ......

Page 17: ......

Page 18: ......

Page 19: ......

Page 20: ......

Page 21: ......

Page 22: ......

Page 23: ......

Page 24: ......

Page 25: ......

Page 26: ......

Page 27: ......

Page 28: ......

Page 29: ......

Page 30: ......

Page 31: ......

Page 32: ......

Page 33: ......

Page 34: ......

Page 35: ......

Page 36: ......

Page 37: ......

Page 38: ......

Page 39: ......

Page 40: ......

Page 41: ......

Page 42: ......

Page 43: ......

Page 44: ......

Page 45: ......

Page 46: ......

Page 47: ......

Page 48: ......

Page 49: ......

Page 50: ......

Page 51: ......

Page 52: ...o o o o...

Page 53: ......

Page 54: ......

Page 55: ......

Page 56: ......

Page 57: ......

Page 58: ......

Page 59: ...o o o o...

Page 60: ......

Page 61: ......

Page 62: ......

Page 63: ......

Page 64: ......

Page 65: ......

Page 66: ......

Page 67: ......

Page 68: ......

Page 69: ......

Page 70: ......

Page 71: ......

Page 72: ......

Page 73: ......

Page 74: ...o o o...

Page 75: ......

Page 76: ......

Page 77: ......

Page 78: ......

Page 79: ......

Page 80: ......

Page 81: ......

Page 82: ......

Page 83: ......

Page 84: ......

Page 85: ......

Page 86: ......

Page 87: ......

Page 88: ......

Page 89: ......

Page 90: ...User Manual MiVue Manager...

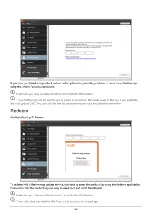
Page 91: ...ur computer s operating system Playing the recording files 1 Remove the memory card from the recorder and access the card on the computer via a card reader L L You are advised to copy the recording fi...

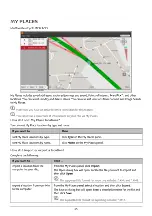
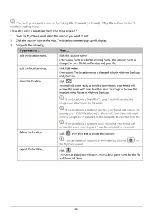
Page 92: ...o a different location for the playback 5 During playback you can check more driving information from the dashboard panel and the G sensor chart that are displayed below the video playback screen On t...

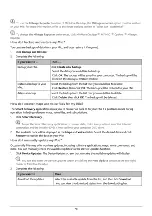
Page 93: ...es and saves the current video image to the specified location on your computer Opens the Settings Menu to access the following items Change Language Change Skin Check for Update requiring Internet ac...

Page 94: ...f their respective companies Disclaimer Specifications and documents are subject to change without notice MiTAC does not warrant this document is error free MiTAC assumes no liability for damage incur...

Reviews: