background image

16

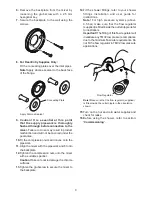
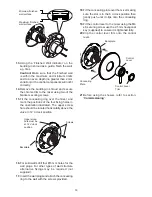
13. 

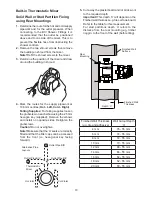
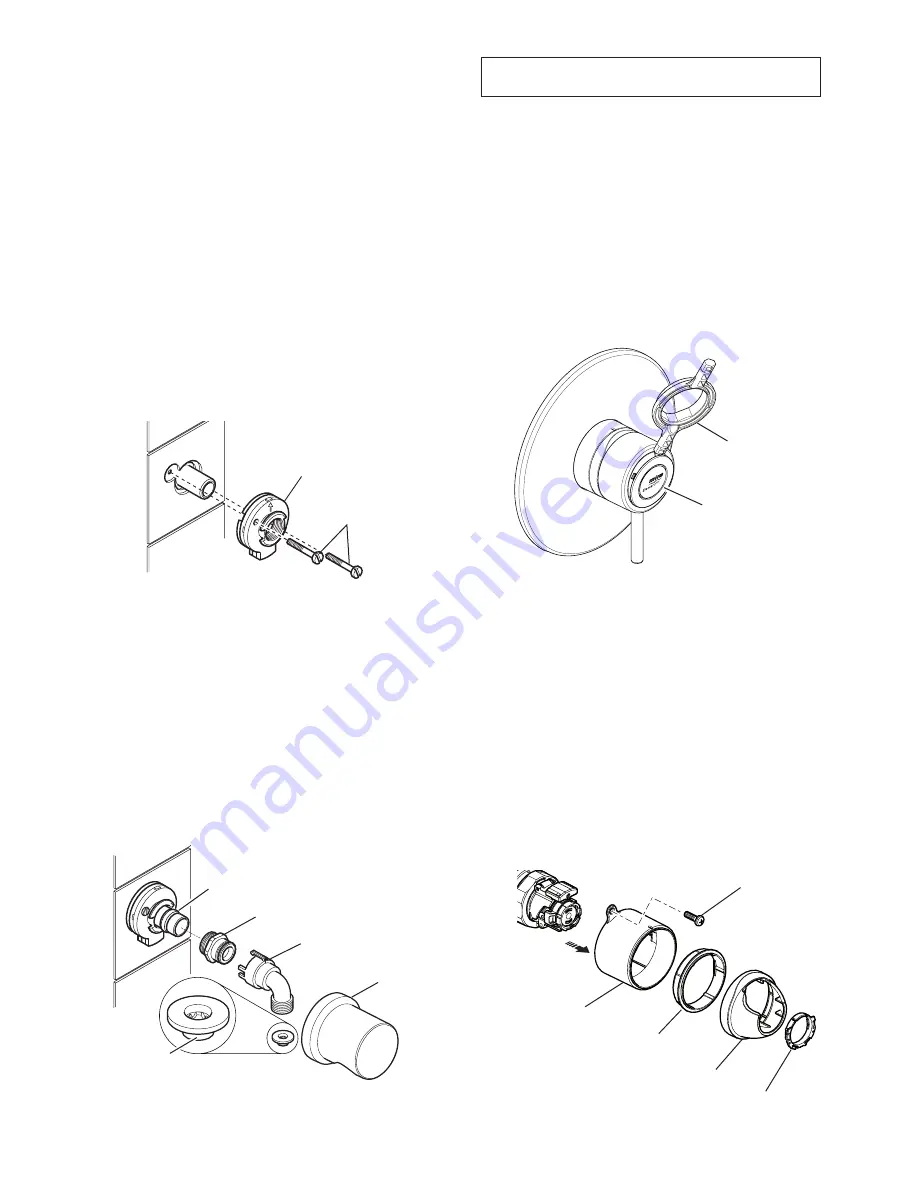
For solid walls drill two Ø6 mm holes for the 

wall plugs. For other types of wall structure 

alternative fixings may be required (not 

supplied). If necessary, make a recess 6 mm 

deep to accept the wall plate for flush fitting of 

the outlet to the wall surface.

14. 

Fit the two wall plugs supplied and secure the 

wall plate with the wall plate screws.

15. 

Make sure that there is clearance behind the 

wall plate and temporarily fit the two backplate 

screws into the wall plate. This will prevent 

the fixing holes from becoming blocked with 

plaster or grout.

16.

 Finish the wall, e.g. tiles.

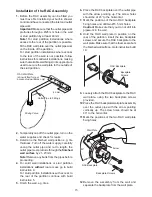
17. 

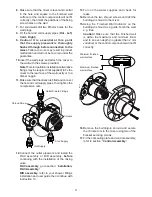
Place the backplate over the outlet pipe with 

the arrow pointing vertically up and tighten the 

two backplate screws. Make sure that the foam 

seal abuts the finished wall surface.

18. 

Check that the blue ‘O’ seal is fitted inside the 

backplate nut. Fit the olive and the backplate 

nut over the outlet pipe and tighten the nut.

19. 

Check that the second ‘O’ seal (black) is fitted 

to the outside of the backplate nut. Press 

the elbow onto the backplate, make sure 

that the clips on the elbow engage with the 

backplate.

20. 

Press the shroud over the elbow, make 

sure that it engages with the lugs on the 

backplate.

21. 

This completes the installation of the RAC 

assembly.

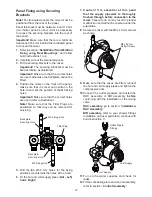
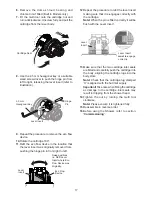
Dome

Shroud

Chrome Trim

(Built-in models only)

Dome

Clamp

Bearing

Bracket 

Securing 

Screw

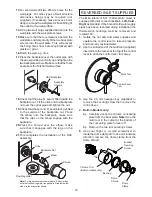
REVERSED INLET SUPPLIES

The Mira Element SLT thermostatic mixer is 

supplied with inlet connections 

Hot - Left, Cold - 

Right

 as standard. If the hot and cold water supply 

pipes have been reversed during installation the 

thermostatic cartridge must be removed and 

rotated 180°. 

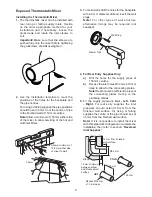
1.

  Isolate the hot and cold water supplies and 

operate the control lever to relieve pressure 

and drain any residual water.

2.

  Use the slotted end of the multi tool (supplied) 

inserted into the recess at the top of the control 

lever to prise the control lever trim away.

3.

  Use  the  2.5  mm  hexagon  key  (supplied)  to 

remove the securing screw then remove the 

control lever.

4.  Built-in Models only:

a). 

Carefully unclip the chrome concealing 

plate from the backplate. 

Note!

 Use the 

multi tool in the cutout at the bottom of 

the concealing plate to lever off.

b). 

Remove the two trim securing screws.

5

.  Use your finger or a small screwdriver to 

rotate the dome clamp 90° in an anti-clockwise 

direction, remove the dome clamp from the 

dome shroud.

Multi Tool

Control Lever

Trim

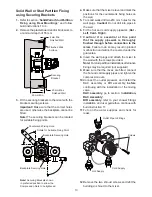
Note!

 For high pressure systems (above 0.5 bar) make 

sure that the flow regulator (supplied) is fitted inside the 

elbow in the orientation shown.

RAC Backplate

Backplate 

Screws

Elbow

Shroud

Flow Regulator

Backplate Nut

Olive

Summary of Contents for Element SLT

Page 1: ...1 MIRA ELEMENT SLT INSTALLATION AND USER GUIDE THERMOSTATIC MIXER These instructions must be left with the user...

Page 2: ...ngle lever for on off and temperature control A Mid Flow Overide feature allows up to 30 reduction in flow at low pressures and a Temperature Overide warns when moving into a hotter temperature zone A...

Page 3: ...commissioned operatedand maintained in accordance with manufacturer s recommendations 2 Type 2 Valves are only used for applications covered by their approved designations refer to section Type 2 Valv...

Page 4: ...1 x 2 5 mm Hexagonal Key q 1 x 2 5 mm Hexagonal Key q 1 x Multi Tool q 1 x Multi Tool q 1 x 14 L Min Flow Regulator q 1 x 14 L Min Flow Regulator q 2 x Securing Brackets q 4 x Bracket Securing Screws...

Page 5: ...could detrimentally affect thermostatic performance For safety and performance reasons it is recommended that the maximum hot water temperature is limited to 65 C Cold Water Range up to 25 C Minimum...

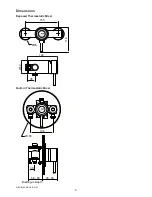
Page 6: ...6 All dimensions in mm Built in Thermostatic Mixer 153 56 116 142 35 62 183 108 30 59 80 Building in Depth 45 56 Exposed Thermostatic Mixer Dimensions...

Page 7: ...y Regulations 1999 Water Fittings or any particular regulations and practices specified by the local water company or water undertakers Note Make sure that all site requirements correspond to the info...

Page 8: ...r solid walls drill the holes for the backplate with a 6 mm diameter drill and insert the wall plugs Note For other types of wall structure alternative fixings may be required not supplied Wall Plug 4...

Page 9: ...the backplate to the wall using the screws 8 For Rear Entry Supplies Only Fit the concealing plates over the inlet pipes Note Apply silicone sealant to the back face of the flange Apply Silicone Seal...

Page 10: ...upplied Remove the elbows and install on opposite sides Retighten the grubscrews Caution Do not overtighten Note Make sure that the O seals are correctly fitted and that the filter caps can be accesse...

Page 11: ...mponents will not fit correctly then mark the positions of the fixing screw holes on the wall 7 For solid walls drill two 6 mm holes for the wall plugs 8 Fit the hot and cold supply pipes Hot Left Col...

Page 12: ...r Plugs are positioned so that they can be removed for servicing 5 Drill the two 5 5 mm holes for the fixing positions countersink the holes at the front 6 Fit the hot and cold supply pipes Hot Left C...

Page 13: ...6 mm holes for the wall plugs Caution Do not drill into pipes in the wall 6 Fit the hot and cold supply pipework Hot Left Cold Right 7 Caution It is essential at this point that the supply pipework is...

Page 14: ...rill four 6 mm holes for the wall plugs For other types of wall structure alternative fixings may be required not supplied 17 Insert the wall plugs and attach the concealing ring to the wall with the...

Page 15: ...wall surface by 21 23 mm Note Remove any burrs from the pipes before proceeding 4 For solid wall installations or stud partition installations without rear access go to build instruction 9 For stud pa...

Page 16: ...1 This completes the installation of the RAC assembly Dome Shroud Chrome Trim Built in models only Dome Clamp Bearing Bracket Securing Screw REVERSED INLET SUPPLIES The Mira Element SLT thermostatic m...

Page 17: ...nsert was originally removed from pushing the hinge pin in from right to left 13 Make sure that the two cartridge inlet seals are fitted and carefully push the cartridge into the body aligning the car...

Page 18: ...dge and engage with the temperature adjusting screw 4 Rotate the hexagon key until the required maximum temperature is obtained at the shower Turn anticlockwise to increase the temperature or clockwis...

Page 19: ...tap The maximum temperature takes account of the allowable temperature tolerances inherent in thermostatic mixing valves and temperature losses in metal baths It is not a safe bathing temperature for...

Page 20: ...ter that is to be tested Any TMV that has been adjusted or serviced must be re commissioned and re tested in accordance with the instructions given in this guide The installation of thermostatic mixin...

Page 21: ...ted or plastic fittings Do not use descalents on this product Inlet Filters The inlet filters should be checked and cleaned as necessary every 12 months Note The inlet filters must not be removed exce...

Page 22: ...mm hexagonal wrench and remove the filters Note Use pliers to carefully remove the filters 6 Clean each of the filters under a jet of water to remove any lodged particles 7 Refit the filters and tight...

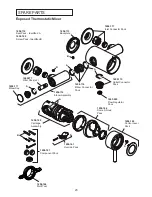
Page 23: ...nnector Pack 1663 265 Flow Regulator Pack 1656 114 Elbow Connector Pack 1656 112 Elbow Assembly 1656 111 Elbow Cap 1062477 Filter Pack x2 1656 113 Backplate 1656 117 Inlet Connector Pack 1656 110 Seal...

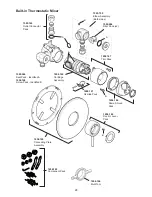
Page 24: ...B 1595 066 Filter Pack x2 1595 046 Seal Pack Identified A 1656 168 Screw Pack Identified B 1595 150 Elbow Assembly Both sides A 1656 167 Trim Pack 1656 161 Overide Pack A 1656 160 Cartridge Assembly...

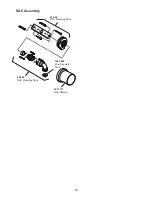
Page 25: ...25 RAC Assembly 1617 171 RAC Shroud 450 20 RAC Mounting Pack 450 20 RAC Mounting Pack 1663 265 Flow Regulator Pack...

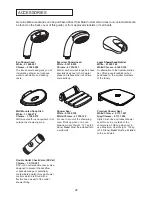
Page 26: ...DCV H Chrome 1 0 110 55 1 DCV H An outlet double check valve designed to prevent the backflow or backsiphonage of potentially contaminated water through shower controls which are fitted with a flexib...

Page 27: ...27 NOTES...
Page 28: ...d If you require further assistance call our Customer Services Team Extended Guarantees A selection of protection plans are available that enable you to cover repair bills for the life of your policy...

Reviews: