background image

Introduction 


Introduction 

Dear customer, 
Thank you for buying a mirage HDTV satellite receiver. 
This user manual provides information on  


placement 


installation, 


adjustment 


operation, 


cleaning and disposal of the receiver. 

Please carefully read the user manual before operating the receiver. 
We hope you enjoy your mirage receiver. 
 
smart electronic GmbH 
Industriestraße 29 
78112 St. Georgen 
Germany 
 

Table of Content 

1


User Information ....................................... 3


1.1


Use of this Manual ......................... 3


1.2


Signs, Symbols, Layout ................. 3


2


Product Description ................................. 4


2.1


Scope of Delivery ........................... 4


2.2


Receiver ......................................... 4


2.3


Remote Control .............................. 5


2.4


Save Energy .................................. 5


2.5


Guarantee ...................................... 6


3


Safety Instructions ................................... 6


3.1


Intended Use.................................. 6


3.2


Risks in Case of Intended Use ...... 6


3.3


Grounding ...................................... 6


3.4


Location ......................................... 6


3.5


Handling of Batteries ..................... 7


3.6


Notes on Product Liability .............. 7


4


Installation of the Receiver ...................... 7


4.1


Connection Scheme....................... 7


4.2


Connecting Satellite Antenna ........ 7


4.3


Connecting TV Set ......................... 7


4.4


Connecting a Home Cinema 
System ........................................... 8


4.5


Connecting Data Storage .............. 8


4.6


Connecting a Home Network ......... 8


4.7


Inserting the Batteries of the 
RCU ............................................... 8


5


Basic Operation ........................................ 9


5.1


Switching on Receiver ................... 9


5.2


Software Update ............................ 9


5.3


Commissioning ............................ 10


5.4


Language .................................... 10


5.5


RAPS Parameters ....................... 11


5.6


Satellite List ................................. 11


5.7


Select Operation Mode ................ 12


5.8


Call/Leave Menu ......................... 13


5.9


Menu Navigation ......................... 13


5.10


Parental Lock .............................. 13


5.11


Set Time ...................................... 13


5.12


TV ................................................ 14


6


Media Player ........................................... 22


6.1


Music ........................................... 22


6.2


Images ......................................... 23


6.3


Video ........................................... 24


7


IP Functions ............................................ 24


7.1


YouTube ...................................... 24


7.2


Web Radio ................................... 24


7.3


Web News ................................... 24


7.4


Weather Forecast ........................ 24


8


smartSTREAM ........................................ 25


© smart electronic GmbH 2014 

 
All rights, technical changes, errors as 
well as printing mistakes reserved. 
Any reproducing or copying of the 
contents requires prior written per-
mission from smart.


Summary of Contents for BOX2IP

Page 1: ......

Page 2: ...teries 7 3 6 Notes on Product Liability 7 4 Installation of the Receiver 7 4 1 Connection Scheme 7 4 2 Connecting Satellite Antenna 7 4 3 Connecting TV Set 7 4 4 Connecting a Home Cinema System 8 4 5 Connecting Data Storage 8 4 6 Connecting a Home Network 8 4 7 Inserting the Batteries of the RCU 8 5 Basic Operation 9 5 1 Switching on Receiver 9 5 2 Software Update 9 5 3 Commissioning 10 5 4 Langua...

Page 3: ... and Weight 41 Index 42 1 User Information 1 1 Use of this Manual Please carefully read this user manual before operating the device for the first time Please note all warnings and notes includ ed in this user manual Consider this user manual to be an integral part of the product and store it at a well accessible location This user manual should also be enclosed when handing over the device to a t...

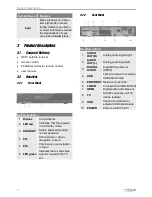
Page 4: ...in Standby mode 3 STANDBY Switch between standby normal operation 4 PR Channel down down navigation in menu 5 PR Channel up up navigation in menu 6 LED green Indicates that a valid video signal is routed to the TV set 2 2 2 Rear Panel No Description 1 AUDIO OUT R Analog audio signal right 2 AUDIO OUT L Analog audio signal left 3 DIGITAL AUDIO Digital RCA audio out SPDIF 4 USB First connection for ...

Page 5: ...information on cur rent channel 11 Not used 12 Play media player 13 Fast rewinding 14 Fast forwarding 15 Red function key 16 Green function key 17 Mute 18 BOX2IP Calls for BOX2IP mode 19 TV RADIO Switch between TV and radio mode 20 PAGE 10 entries up in menu chan nel list 21 PAGE 10 entries down in menu channel list 22 PR Switch of previously selected channels 23 FAV Call list of favorites 24 MENU...

Page 6: ...Do not bend or squeeze the cable WARNING Risk of electric shock when contacting mains voltage Damage to housing mains cable or improper repair may result in con tact to mains voltage Do not place heavy items onto the receiver Do not bend or squeeze the cable Repairs of plug cable or receiver should only be performed by qualified specialists 3 3 Grounding The satellite antenna must be grounded prop...

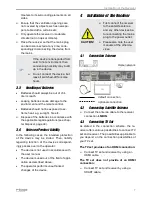
Page 7: ...ng cases the intended protection of the device may be limited Then liability regarding function of the device correspond ingly passes over to the operator The device is not used in accordance with the user manual The device is used out of the field of appli cation as described above The operator performs unauthorized changes of the device 4 Installation of the Receiver CAUTION First connect the re...

Page 8: ...ma system and the receiver by using a RCA cable c Your home cinema system cannot pro cess digital audio data no connections for digital data present Connect the home cinema system and the receiver by using a 2 pole RCA cable stereo If your home cinema system hi fi system supports HDMI con nection then use such connec tion This ensures best possible au dio and video quality with digital signals 4 5...

Page 9: ...e on the internet page www avanit tv menu item Support 2 If the version number of the update file matches with the version number of the software of the receiver which is displayed in the submenu Information of the menu Tools you do not need to do anything else Your receiver is up to date Otherwise continue with step 3 3 Save the update file to a USB data storage 4 Unpack the file with the ending ...

Page 10: ...indow The submenu Language can be accessed anytime via the menu System Setup 5 4 1 RAPS Start Your receiver is equipped with RAPS RAPS means Receiver Automatic Programming System RAPS can automatically update the channel lists of your receiver What is RAPS Currently the satellites Astra 19 2 and 23 5 Eutelsat Hot Bird 13 East Eurobird 9 and Turksat 42 offer a four digit number of digital TV and ra...

Page 11: ...installation The respective up to date RAPS lists are available via the satellite Astra 19 2 Corre spondingly RAPS can only be used within the footprint of the satellite Astra 19 2 further more your system should be suitable for digi tal Astra receiving 5 5 RAPS Parameters During installation the third installation window Automatic Programming displays various parameters No Meaning 1 Date of the R...

Page 12: ...try Select the country in which you want to use the receiver and correspondingly also the RAPS list by pressing the keys PR and PR The selectable countries are based on your satellite selection as per section Satellite List Press OK to go to the next window Your regional channel 5 6 2 Regional Channel Select your preferred regional channel which will be stored at number three in the channel list b...

Page 13: ...h many menu items you can also press the OK key select a new val ue from the list and confirm such value by again pressing the OK key Active menu items are color marked Although most settings for TV operation are made you can also make some further set tings via the menu 5 10 Parental Lock In the sub menu Parental Lock you can lock access to certain menus by using a PIN e g for protection of your ...

Page 14: ... date and time should be manually entered For this select the item Date select the position to be changed by using the keys and enter the current date by using the numeric keys Then select the item Time select the position to be changed by using the keys and enter the current time by using the numeric keys 7 GMT Greenwich Mean Time 7 Leave the menu by pressing EXIT until the screen shows the TV pi...

Page 15: ... MHz 5 Symbol rate of current channel in megasymbols second 6 Polarization of current channel 7 Scroll bar shows position of current channel in channel list 5 12 3 Channel Selection via Search Function The channel lists can be quite comprehensive correspondingly the receiver offers various possibilities to filter the list search for channels in the list or sort the list Press the FIND key to open ...

Page 16: ...numbers there are also special buttons Button Meaning CAPS yellow func tion key Changes between upper case and lower case only effective with letters Button Meaning DEL red function key or Deletes the last entered character OK blue function key Closes the windows SP Enters a space character The question mark as first character has a wildcard function Example R searches for all channel names that i...

Page 17: ...ist is displayed in its previous origi nal state 5 12 4 Channel Information Press the INFO key twice The window below will be displayed No Description 1 Genre 2 Start time and end time of current program 3 Name of current channel 4 Name of current program No Description 5 Language of current program 6 Detailed information on current pro gram 7 Frequency Polarization H horizon tal V vertical Symbol...

Page 18: ...key to go to the window EPG Press the EXIT key to close the window Single EPG and return to TV operation 5 12 5 2 EPG After pressing the blue function key in the window Single EPG you will access the win dow EPG with the following display The current program is marked with No Description 1 Thumbnail of selected channel 2 Channel number of selected channel 3 Name of selected channel 4 Name of selec...

Page 19: ...ge or Dolby AC3 Dolby Digi tal as far as provided by the TV station 4 After selecting the desired audio mode leave the menu by pressing the EXIT key 5 12 7 Teletext Teletext is an information system displayed on your TV set Teletext is only possible if the selected channel supports such function The information is organized in the main pages and subpages 5 12 7 1 Switching 0n Teletext Press the ke...

Page 20: ...o 4 3PS 4 3LB 16 9LB see below ta ble 5 12 9 2 Setting the Aspect Mode via the Menu Select Aspect Mode to set the aspect ratio by using the keys and Value Meaning Auto Default setting the receiver selects optimum value 4 3PS For playback with a 4 3 screen PS Pan Scan 4 3 program picture is opti mally displayed 16 9 program picture height is adjusted to screen picture in formation on the right and ...

Page 21: ...e haben die Wahl zwischen 576i 576p 720p 1080i und 1080p 5 12 11 Recall Press the PR key to go to the last viewed channel 5 12 12 Sleep Timer The receiver comprises of a Sleep Timer that enables an automatic change of the device from the operating mode to the standby mode 1 Select the submenu Local Time Setting in the menu System and press OK 2 Using the buttons PR and PR select the menu item Slee...

Page 22: ...ck 1 Select the track to be played by using the keys PR und PR 2 Press OK to start playback 3 Use the keys and to con trol playback 6 1 2 Playlist 6 1 2 1 Creating a Playlist Select a track by using the keys PR and PR and press the green function key to add this to the playlist favorite list The re spective track is marked with a heart sym bol You can repeat this procedure for all tracks to be add...

Page 23: ...ime file size or favorites Fa vorites are the tracks that are included in the current play list 6 1 5 Playback Mode Press key 2 to change the playback mode Symbol in Media Player window Meaning Single track is played and repeated All tracks in the current directory are played and repeated in the displayed order All tracks in the current directory are played in random order and are then repeated Pr...

Page 24: ... key copy tracks by pressing the green function key and delete tracks by pressing the yel low function key as well as create new folders by press ing the blue function key Press the EXIT key twice to leave the Edit mode You will be directed back to the ini tial window of the Media Player 6 3 3 Sorting Videos Press key 1 to sort the displayed videos by name play time or file size 7 IP Functions In ...

Page 25: ...1 1 1 Wired Network LAN 1 Connect the receiver socket ETHERNET and your router with an Ethernet cable wired LAN connection 2 Go in the menu Tools to the menu item Network Setting and press OK The win dow Network Setting opens 3 Select DHCP9F 10 On to set automatically via DHCP auto matic LAN configuration or Off to set that the network must be config ured manually manual LAN configuration Automati...

Page 26: ...ce 8 2 1 Live TV on your TV Set Simultaneously with the start of the Sat IP app the receiver channel list will be reduced It now contains only those channels broadcasted via the same transponder as the current TV chan nel In between this channel list you can switch channels with the remote control of your receiver 8 2 2 BOX2IP Mode Press the key BOX2IP or go in the menu Media to the menu item BOX2...

Page 27: ... settings being made by an expert Usu ally there are no required settings within scope of normal use of the system 9 1 1 Antenna Connection 1 In the menu Installation select the sub menu Antenna Connection and confirm by pressing OK 2 Select by using the keys and if a Fixed Antenna or a Motor Antenna is connected to the receiver 3 Press EXIT to leave the submenu Antenna Connection 4 Press EXIT aga...

Page 28: ...d confirm your selection by pressing OK You will be directed back to the satellite list Press EXIT to leave the submenu Satellite List Press EXIT to leave the menu Installation and to return to TV operation 9 1 3 Antenna Setup The submenu Antenna Setup states several entries depending on your selection at Anten na Connection Fixed Antenna Motor Antenna 9 1 3 1 Fixed Antenna At Satellite select the...

Page 29: ...2 DiSEqC1 0 supports four satellite positions 13 DiSEqC1 1 supports 16 satellite positions quired e g for certain antenna systems or to avoid disturbances In most cases Auto is to be selected factory setting At Polarity select the correct value for the selected channel Possible settings are H horizontal V vertical and Auto Factory setting is made to Auto 9 1 3 2 Motor Antenna At LNB Freq select th...

Page 30: ...t by using the keys and 3 Mark the button Go to Reference and then press OK to move the motor antenna to its starting position 4 Press EXIT to return to the submenu An tenna Setup 9 1 3 2 2 USALS A satellite position is defined as reference and the data provided for latitude and longitude are then used together with such basic values to calculate the rotary movement for all remaining satellites Se...

Page 31: ...present then this item will not be active Start channel search by selecting Search and confirm by pressing OK 9 1 5 Multi Satellite Multi Satellite differs from Single Satellite by the fact that all satellites marked in the satellite list are scanned for receivable channels 15 FTA Free To Air unencrypted channels 9 2 TV Channel List Radio Channel List You can individually customize the channel lis...

Page 32: ...el to Channel Zapping 1 Mark the corresponding channel by using the keys PR and PR 2 Press the green function key 3 Confirm by pressing OK Channels to be skipped are marked in the channel lists 4 Again press the green function key to leave the function Lock From now on the channel is skipped when switching from one channel to the next zapping 9 2 4 Move Channels to Another Channel Position 1 Press...

Page 33: ...ys PR and PR and confirm by pressing OK The respective channel is correspondingly marked Repeat step 3 as long as all channels to be deleted are marked 4 Again press the blue function key Delete or the EXIT key to leave the Delete mode 5 If you agree to overwrite the factory set channel list when leaving the menu see above the marked channels will be delet ed 9 2 7 Delete All To delete all channel...

Page 34: ...keup Date by using the keys PR and PR and enter the date by using the numeric keys 8 Mark the line On Time by using the keys PR and PR and enter the on time by us ing the numeric keys 9 Mark the line Duration by using the keys PR and PR and enter duration of the program by using the numeric keys You can go from letter to letter po sition to position in the date and time fields by pressing the keys...

Page 35: ...from 0 to 10 default value is 5 by using the keys and 9 8 Format of the Video Signal at the SCART Output 1 In the window TV system move highlight on Scart Out item and press OK 2 Press the keys PR PR to select from the list the format of the video signal at the SCART output and press OK Possible val ues are YUV and RGB Default is YUV Due to the internal signal processing it s not anymore possible ...

Page 36: ...with the remote control of your receiver 1 Select in the menu System the submenu TV System and press OK 2 Select SmartLink and use the keys und to switch the SmartLink func tion on and off 17 CEC Consumer Electronics Control HDMI feature for entertainment units provides via HDMI various control functions e g one touch recording or system standby The TV set is the control center and the TV remote c...

Page 37: ...el Exemp frequency MHz Frequency MHz Receiver 1 1 1284 Receiver 2 2 1400 Receiver 3 3 1516 Receiver 4 4 1632 Receiver 5 5 1748 Receiver 6 6 1864 Receiver 7 7 1980 Receiver 8 8 2096 Enter the frequencies of your receiving system into the last column of the table so that all relevant information is quickly available Rule of thumb highest frequency shortest cable path 10 3 Installation If the receive...

Page 38: ...window and to return to the first window Antenna Setup without saving 11 Leave the menu by pressing EXIT settings will be saved RAPS installation will be continued automatically 11 Cleaning WARNING There is the risk of electric shock when cleaning the receiver Always disconnect mains plug from power outlet before cleaning Never clean the receiver using a damp cloth Always ensure that no liquid ent...

Page 39: ... fasten cable if required Symptom Picture only in black and white and or incorrect synchronization Possible cause s The video format of your receiver is not correctly set Solution Adapt broadcast television system of the receiver to the broadcast television system of the TV set Symptom The remote control does not operate Possible cause s The batteries are empty The remote control shows into wrong ...

Page 40: ...ask your municipal administration on possibil ities for environmentally friendly and proper dis posal of the receiver Please take the batteries to a collecting point The WEEE17F 18 symbol on the product and its packaging states that this product is an electrics or electronic device Do not dispose of such device in the household refuse but take it to your local municipal collecting point collection...

Page 41: ...emote Control Range up to 7 m Batteries 2 x type AAA 15 3 2BMains Adapter Power consumption in standby less than 0 5 W Mains voltage 175 250 V 50 60 Hz 15 4 3BConnection s Data storage inter face USB 2 0 LNB in F socket Service RS232 Audio out 1 x RCA digital audio Audio Video out 1 x HDMI 1 x SCART connector EURO AV 15 5 4BTemperature Operating tempera ture 5 C to 40 C Storage temperature 40 C to...

Page 42: ...32 Provide Channels with Password Protection 32 Rename Channels 32 Skipping Channels 32 Energy saving 5 F Factory Settings 36 Favorite Lists Add a Channel 31 Rename 33 Fixed Antenna 28 Format of the Video Signal 35 Front Panel 4 G Grounding 6 Guarantee 6 H Handling of Batteries 7 HDTV Streaming 26 Home Network 8 I Inserting the Batteries of the RCU 8 Installation 7 27 Antenna Setup 28 DiSEqC 1 2 2...

Page 43: ...ng antenna type 27 Service Hotline 40 Setting the Aspect Mode 20 Signs Symbols Layout 3 Simultaneous Playback 35 Single Satellite 31 Skipping Channels 32 Sleep Timer 21 Small2Big 26 SmartLink 36 smartSTREAM 25 Software Version 36 Standby 35 Switching the Video Resolution 20 Switching to the last viewed channel 21 T Technical Data 41 Teletext 19 Terminal LNB OUT 36 Timer 34 Transport 38 Troubleshoo...

Page 44: ...Doc ID 14022001 ...
Reviews: