smartSTREAM
25
8
smartSTREAM
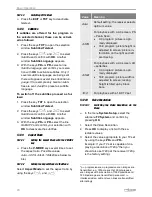
Is the ability of the receiver to transfer the TV
from the receiver to the router and from there
to a maximum of four network devices, e. g.
smartphones, tablets or PCs. After the installa-
tion of an app on the respective device, you
can enjoy the TV program not only in your
living room but at any place in the house or
garden, which is reachable via LAN or WLAN
(BOX2IP).
With the current smartSTREAM-function the
other way around is also possible. Stream e. g.
a video clip that is currently running on the
smartphone via an app through the receiver to
your TV (Small2Big).
No. Description
No. Description
1 TV set
5
WLAN-Router
2
HDMI cable
connection
6
WLAN connec-
tion
3 Mirage receiver
7
Up to 4 network
devices, e. g.
PC, smartphone
or tablet PC
4
Wired LAN or
wireless WLAN
connection
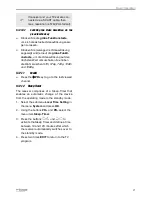
Due to the high volume of data with
HDTV programs, depending on
network usage, disturbances may
occur during streaming. Therefore,
the streaming of HDTV programs is
disabled by default. How you can
activate HDTV streaming again, is
described in section 0.
8.1
Receiver Settings
8.1.1
Connecting with the Home Network
8.1.1.1
Wired Network - LAN
1. Connect the receiver (socket
ETHERNET
)
and your router with an Ethernet cable
(wired LAN connection).
2. Go in the menu
Tools
to the menu item
Network Setting
and press
OK
. The win-
dow
Network Setting
opens.
3. Select
DHCP
9F
10
On
to set automatically via
DHCP
(auto-
matic LAN configuration)
or
Off
to set that the network must be config-
ured manually (manual LAN configuration).
Automatic LAN configuration
Go in the window
Network Setting
to the
button
Apply
and press
OK
to connect the
receiver to the network.
Manual LAN configuration
1. Insert in the window
Network Setting
the
network parameters:
IP-Address, Subnet Mask, Gateway,
DNS preferred
and
DNS alternate
by se-
lecting each parameter, inserting the right
value with the numeric keys and pressing
OK
.
2. Go to the button
Apply
and press
OK
to
connect the receiver to the network.
8.1.1.2
Wireless Network – WLAN
1. Connect via one of the receiver’s USB
sockets the
smartPORTAL-Stick PX1
(WLAN stick) which is available as acces-
sory.
2. Go in the menu
Tools
to the menu item
WiFi Manager
and press
OK
. The window
WiFi Manager
opens.
3. Select with the keys
PR+ a
nd
PR-
the
WLAN to which you want to connect your
10
DHCP = Dynamic Host Configuration Protocol, a
server (DHCP server included in the router) allocates a
network configuration to the clients (e. g. receiver).
Summary of Contents for BOX2IP
Page 1: ......
Page 44: ...Doc ID 14022001 ...


