Cleaning
38
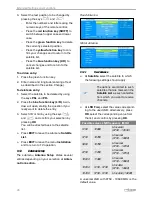
5. Select the menu item
Center Freq
to set
the frequency corresponding to the IF
channel (see allocation table).
6. Select the menu item
Sat Position
to set
the respective satellite position.
7. Mark the button
Save
and press
OK
to
save your entries and to return to the first
window
Antenna Setup
or
mark the button
Cancel
and press
OK
to
discard any previous entries in this window
and to return to the first window
Antenna
Setup
without saving.
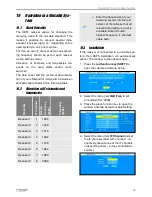
8. Press the red function key to open the
window Antenna Setup Center Freq.
9. Select the channels using the keys
PR+
and
PR
- (up to 12, depending on your sys-
tem) and insert for each the frequency (ac-
cording to the table above) using the keys
or
or numeric keys of the re-
mote control.
10. Mark the button
Save
and press
OK
to
save your entries and to return to the first
window
Antenna Setup
o
r
mark the button
Cancel
and press
OK
to discard any pre-
vious entries in this window and to return
to the first window
Antenna Setup
without
saving.
11. Leave the menu by pressing
EXIT
(settings
will be saved). RAPS installation will be
continued automatically.
11
Cleaning
WARNING!
There is the risk of electric
shock when cleaning the
receiver!
Always disconnect mains
plug from power outlet
before cleaning.
Never clean the receiver
using a damp cloth.
Always ensure that no
liquid enters the receiver.
CAUTION!
There is the risk of damag-
ing the receiver when clean-
ing the receiver!
Do not use solvent-
containing cleaning
agents like petroleum
ether or thinner.
Clean the housing of the
receiver using a dry cloth.
12
Transport and Decommission-
ing
Proceed as follows if you want to transport
the receiver of if you do not want to use the
receiver any more:
1. Disconnect the receiver and all connected
devices from power supply.
2. Disconnect any cables connected to the
receiver.
3. Remove the batteries from the remote
control.
4. Put receiver, cables and remote control
into the original packaging.
5. Store the receiver and the accessory parts
at a dry and dust-free location.
6. Protect the receiver from freeze.
Summary of Contents for BOX2IP
Page 1: ......
Page 44: ...Doc ID 14022001 ...


