background image

• When using the heater after extended periods of storage, re-attach the reflector.

The heater should never be operated without the reflector in place.

• If the heater is to be stored indoors, the gas bottle must be disconnected and left 

outside. in a dry, well-ventilated area,away from any sources of heat or ignition.

• Do not let children tamper with the bottle.

Service

If your heater needs maintenance or is not working properly, please contact your local 

authorized agent for service. It is a necessity to contact an authorized source for

replacement of parts and/or servicing. This work must be carried out by a qualified gas

technician. Spare parts may be obtained by contacting our spare parts department by

email: info@uig.biz

WARNINGS

• This product is for OUTDOOR USE ONLY
• NEVER use indoors, in an enclosed area or below ground level.
• This appliance is intended for use with LPG bottled gas only.
• This appliance has been supplied with a PROPANE REGULATOR (only use with Propane gas).
• NEVER use an adjustable regulator with this appliance.
• This appliance features a flame failure and tilt device. In the event of a wind blowing the flame out

or the unit being tipped over, the gas supply will be cut off from the cylinder. In this event, the knobs
should be set to off and you should wait 5 minutes before re-lighting.

• Failure to read and follow these instructions could result in serious injury or damage to property.
• This product will become hot when in use – take care when touching.
• Keep children and pets at a safe distance from the unit when in use.
• DO NOT move this product when in use.
• Any modification of this appliance may be dangerous.
• DO NOT use heater where the reflector is within 40 inches (1m) of any flammable structure or surface.
• NEVER operate the heater with the top half covered (burner head, reflector, etc.)
• DO NOT leave this product unattended when in use.
• Always keep the cylinder level and vertical when positioning inside the base.
• ONLY use this appliance on a flat LEVEL non flammable surface or ground. Positioning, ensure the

unit is a minimum of 40 inches (1m) from flammable items or structure from all sides and above.

• Always leak test the unit before use, annually, or after storage, when parts are replaced/serviced or if

the gas cylinder is removed or replaced.

• When storing the appliance or gas cylinder, ensure they are away from flammable materials or liquids.
• Regularly check that the regulator seal and hose is fitted and that it is in good condition. Replace

parts if necessary.

• Always follow the care and maintenance instructions – regularly maintain your appliance.
• Always replace worn parts – do not use the appliance if a leak, wear, or damage is found.
• DO NOT store or cover the appliance until fully cooled.
• DO NOT obstruct the ventilation holes of the cylinder housing.
• Always shut off the valve at the gas cylinder or the regulator before moving the appliance.
• In the event of high winds particular attention must be taken. Store the unit away or ensure it is at a

safe distance from other items in the event that the unit is blown over.

• Only use with gazebo’s specifically designed to be used with patio heaters.
• Ensure the heater is at a safe distance from glass and PVC doors and windows to stop damage from

any heat build up.

• Read the warnings and instructions use before operation.
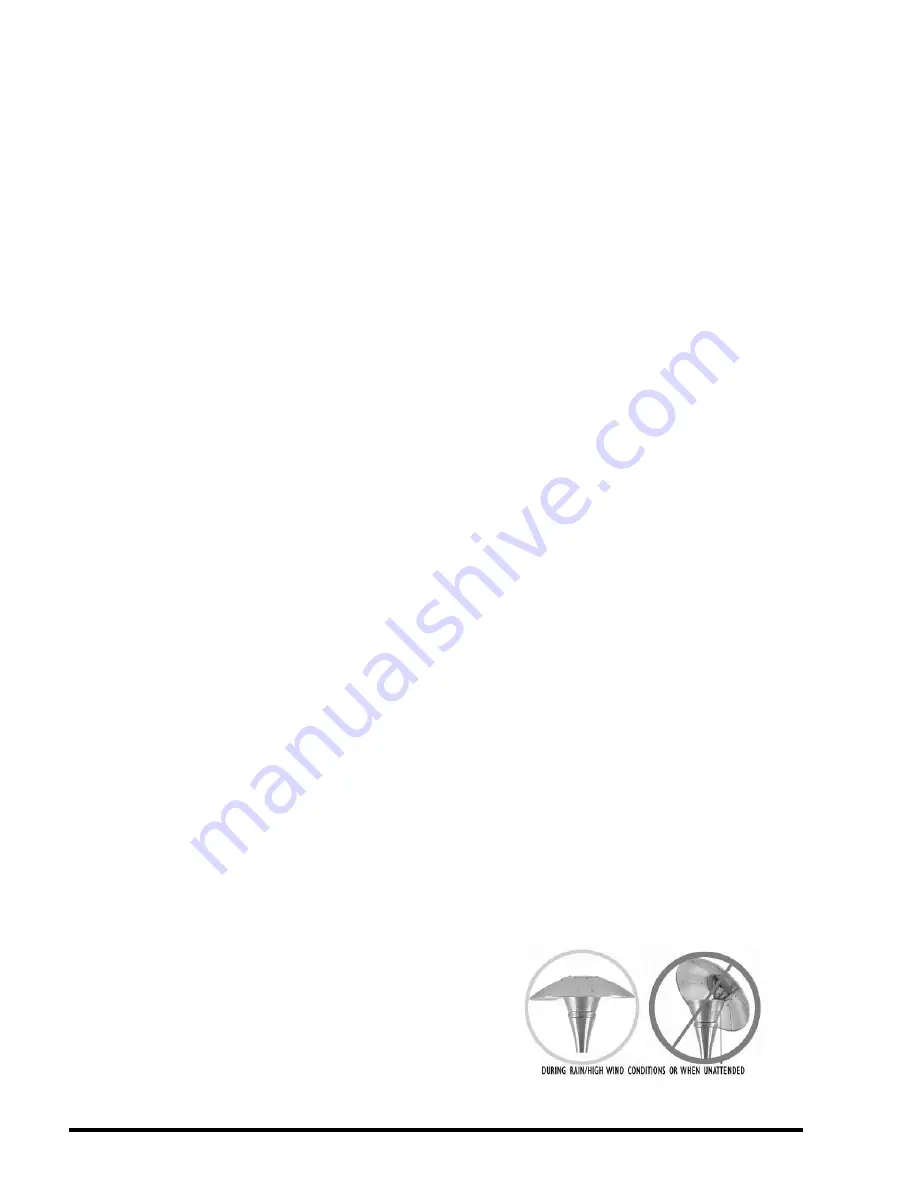
Warning:

Do not leave the heat focusing reflector of the

patio heater in the tilt position during rain or windy
conditions or when the patio heater is not in use or
unattended.
Always position the heat focusing reflector in the full
down position when not in use or during windy or rainy
conditions.

Page 16

Summary of Contents for HDMIRAGE10

Page 1: ...use gasoline or other flammable vapors and liquids in the vicinity of this or any other appliance An LP cylinder not connected for use shall not be stored in the vicinity of any other appliance WARNI...

Page 2: ...1 Base 1 7 Lower Support Pole 1 2 Upper Lower Cylinder Chamber Supports A B and C 3 8 Upper Support Pole 1 3 Cylinder Chamber Door 1 9 Lantern 1 4 Cylinder Chamber Wall 1 10 Parasol Side Panels 6 5 Cy...

Page 3: ...lay out all nuts and bolts and check lengths before assembly It is recommended that the carton is cut open and spread out on the floor and used as a protective surface during assembly Refer to the ass...

Page 4: ...step 1 Base x 1 Cylinder chamber supports Base Upper Lower Cylinder Chamber Supports A B C Fix the cylinder chamber supports A B C to corresponding location on the base with 6 M6 bolts Ref C Page 3 M...

Page 5: ...y step 2 Lower Support Pole M6x12 Dome Hex Bolt C M6 Nut A M6x12 Bolt Cylinder chamber supports Fix lower support pole to cylinder chamber supports as shown using 6 M6 bolts Ref C and 6 M6 nuts Ref A...

Page 6: ...linder Chamber Wall Cylinder Chamber Wall Cylinder Chamber Supports M6Nut A Fit the cylinder chamber wall to the cylinder chamber supports using 6 dome head bolts Ref B and 6 M6 nuts Ref A Page 5 M6x1...

Page 7: ...Assembly step 4 Cylinder Chamber door Cylinder Chamber door Hinges Hang door on hinges Ensure correct alignment and tighten bolts securely Page 6...

Page 8: ...Cylinder Chamber Top M6 x 10 Dome Bolt B Cylinder Chamber Top Fit cylinder chamber top onto cylinder chamber support legs using 3 dome head bolts Ref B and M6 nuts Ref A Page 7 M6 Nut A M6x10 Dome He...

Page 9: ...Assembly step 6 M6x12 Dome Hex Bolts Page 8 Upper Support Pole Fit upper support pole to lower suport pole using 3 x m6x12 dome hex bolts Ref C M6 x 12 Dome Hex Bolt C...

Page 10: ...Assembly step 7 M6x12 Dome Hex Bolts Page 9 Lantern 1 Feed the lantern hose down the support pole and secure lantern to support pole using 4 M6x12 Dome Hex Bolts Ref C M6 x 12 Dome Hex Bolt C 1...

Page 11: ...pear there is leakage loosen and re tighten this connection If it still leaks please contact customer service on info uig biz or 678 534 2876 Note The Cylinder must be positioned as shown in the patio...

Page 12: ...tor handle Assembly step 9 Page 11 Retaining Pin Remove R clip and retaining pin Heat focus reflector bracket Reflector handle R Clip 1 2 3 Fit reflector handle Secure with retaining pin and R clip Re...

Page 13: ...s together overlapping as shown with 18 dome head bolts and nuts B A fix the top panel to the top of assembled side panels Tighten all nuts Fix assembled parasol onto top of Parabolic Reflector Bracke...

Page 14: ...urfaces with recommended cleaning agents if necessary An appliance may be installed with shelter no more inclusive than a With walls on all sides but with no overhead cover b Within a partial enclosur...

Page 15: ...r propane gas NEVER use an adjustable regulator with this appliance Please consult your gas dealer for the most suitable gas bottles for your regulator Siting Instructions This appliance is for OUTDOO...

Page 16: ...to position Turn the gas off and disconnect at the cylinder when not in use Flame Characteristic The flame pattern at the burner mesh should be visually checked whenever the heater is operated Normall...

Page 17: ...flammable structure or surface NEVER operate the heater with the top half covered burner head reflector etc DO NOT leave this product unattended when in use Always keep the cylinder level and vertical...

Page 18: ...ults from alteration product abuse or product misuse whether performed by a contractor service company or consumer We will not be responsible for labor charges and or damage incurred in installation r...

Reviews: