Creating Layouts for a Cluster System
83
Creating Layouts for a Cluster System
It is possible to create a partial layout for a cluster system in offline mode, and then export it to the
appropriate multi-viewer for further online configuration. When configuring a layout for a room that is
associated with a cluster system, you only work on one part at a time: the part that is associated with the
current multi-viewer’s output heads. See “Creating Layouts” on page 171 for detailed instructions.
Replicating RCP Users Across a Cluster System
Currently, RCP Users are not automatically propagated to all multi-viewers. Before a user can log on to a
room associated with a cluster system, the corresponding RCP user configuration must be manually
replicated on all member multi-viewers across the cluster.
Replicating Custom Resolutions Across a Cluster System
If a room associated with a cluster system includes display screens for which you configured custom
resolutions (see “Changing Room Display Resolutions” on page 160), then these resolutions must be
added on every multi-viewer within the cluster.
Repairing a Cluster System
To repair the cluster configuration:
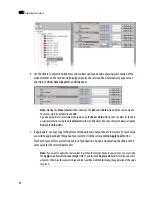
1. In XEdit, connect to
System B,
the multi-viewer that was unavailable when the change was made, once
it is available again.
Note:
Each layout must have a unique name across the cluster system. XEdit will not let you export a
layout to a cluster system if there is already a layout with this name associated with one of the multi-
viewers within the cluster. As a workaround, you could make a copy of one of the conflicting layouts under
a different name, and then delete the original before proceeding with the export (see “Copying layouts”
on page 181).
TIP:
Make a backup copy of the resolutions from the system with the custom settings, and then apply this
resolution backup to the other associated multi-viewers. To do so:
1. Use the create backup feature (see “Backing Up Resolutions” on page 75).
2. While working offline, import the database from one of the target multi-viewers to your
local workspace, and then use the retrieve backup feature to obtain the custom resolutions
(“Retrieving Resolutions or Audio Scales from a Backup” on page 76).
3. Export the updated database from your local workspace to the target multi-viewer.
4. Repeat until all multi-viewers have been updated with the complete set of resolutions.
Note:
In the procedure below,
System A
refers to the system whose name or IP address was changed
while another cluster member, referred to as
System B
, was unavailable.
Summary of Contents for Kaleido-X
Page 1: ...Kaleido X User s Manual Part Number M770 2800 111 1 June 2011 ...
Page 8: ...viii toc ...
Page 33: ...Loading a Layout 25 Kaleido X16 ...
Page 34: ...26 Getting Started 2 Kaleido X 4RU ...
Page 152: ...144 Creating Logical Sources 7 ...
Page 178: ...170 Setting Up Rooms 8 ...
Page 244: ...236 Creating Layouts 9 ...
Page 253: ...Detailed Directions 245 3 Under Properties General type a Friendly name for the Action ...
Page 256: ...248 Creating Actions 10 ...
Page 272: ...264 Managing Kaleido RCP2 Users 11 ...
Page 348: ...340 Tally Interface Devices 13 ...
Page 350: ......
Page 352: ...344 Using the Serial to TCP IP Dispatcher 15 ...
Page 406: ...398 Index ...

