background image

Ø


1400


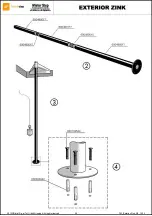
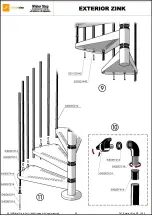
EXTERIOR


ZINK

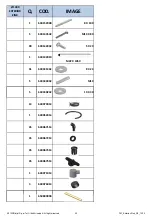
Q.


COD.

IMAGE

13

640043014

13

640045014

32

640067814

32

640067914

1

640081514

26

640065214

26

630109242

M6


X


6

26

630109142

M6

26

640400114

26

640400214

2012©Rintal S.p.a–Tutti i diritti riservati–All rights riserved

36

FM_Exterior-Zink_R2_12/12

Summary of Contents for EXTERIOR ZINK

Page 1: ...EXTERIOR ZINK ISTRUZIONI DI POSA ASSEMBLY INSTRUCTIONS INSTRUCTIONS DE MONTAGE INSTRUCCIONES PARA LA COLOCACION MONTAGEANLEITUNG INSTRUÇÕES DE INSTALAÇÃO ...

Page 2: ......

Page 3: ...aggior resistenza al calpestio Alzata Regolabile da minimo 21 cm a massimo 23 cm tramite i distanziali filettati in plastica Pedata Angolo gradini 30 Angolo sbarco 60 Sbarco Tipo di sbarco solo filo pavimento testa dritta Diametro scala 120 140 160 cm Gradini e struttura Nro di gradini 12 1 In lamiera stampata saldata al tubo distanziatore Altezza Totale HT da 273 a 299 cm Materiale gradino Fe P13...

Page 4: ...a fornitura una confezione di zinco spray applicabile a pennello per eventuali ritocchi dopo l assemblaggio Consigliamo di verificare periodicamente l integrità della scala ritoccando eventuali punti danneggiati con prodotti analoghi reperibili in commercio E caratteristica dei prodotti zincati a caldo diventare opachi col tempo per un normale processo d ossidazione dello zinco esposto agli agenti...

Page 5: ... serraggio di tutti i gradini N B Per la 1 alzata occorre tenere conto della piastra del palo centrale e dell interferenza dovuta alla saldatura piastra palo 6 Inserire gli elementi nel palo iniziando dal copri piastra e proseguendo con distanziali e gradini 7 Posizionare lo sbarco nel corretto punto di uscita e fissarlo al muro con gli appositi ancoraggi In caso di pavimenti travi in legno utiliz...

Page 6: ...passanti facendole scorrere in altezza 13 Disporre le colonne sul gradino di sbarco e inserirvi le cime in corrispondenza del foro con la boccola utilizzare la colonna da 964 mm fornita nel kit Assemblare i corrimani alle colonne fissando le cime con le apposite viti Il tratto di corrimano fornito nell imballo della scala è sufficiente per 2 gradini supplementari Il corrimano va fissato prima sull...

Page 7: ...ce to footfall Riser Adjustable from a minimum of 21 cm to a maximum of 23 cm using the plastic threaded spacers Tread Step angle 30 Landing angle 60 Landing Type of landing only flush to floor straight head Staircase diameter 120 140 160 cm Steps and structure No of steps 12 1 in printed sheet metal welded to the spacer tube Overall height HT from 273 to 299 cm Step material Fe P13 UNI 5867 EN111...

Page 8: ...product life a bottle of spray zinc is included and can be applied by brush to make small touch ups after assembly We recommend that you periodically check the integrity of the staircase touching up any damaged spots with similar products available on the market A feature of hot dip galvanised products is that they become dull over time due to a normal process of oxidation of the zinc exposed to t...

Page 9: ...exit point and secure it to the wall with wall anchors In the case of wooden floor slab use only screws for wood of the hanger bolt leg bolt type to replace those provided exclusively suited to reinforced concrete 8 Insert the terminal flange the threaded bar and the terminal in the pole then tighten using the nut in order to compress the staircase but leaving the steps free to rotate Railing Arra...

Page 10: ...ps with the relative screws The section of handrail supplied in the staircase package is enough for 2 additional steps For the platform railing in correspondence of the plastic bush us the baluster 964 mm long that is specially provided in the kit Fix the provided baluster floor fixing element to block the last passing baluster on the landing platform on the opposite side of the platform railing T...

Page 11: ...une rigidité plus élevée ainsi que des propriétés antiglisse et une résistance supérieures au piétinement Entremarche Réglable d un minimum de 21 cm au maximum de 23 cm au moyen d entretoises filetées en plastique Surface de marche Angle marches 30 Angle palier d arrivée 60 Palier d arrivée Type de palier d arrivée seulement à fleur du plancher tête droite Diamètre escalier 120 140 160 cm Marches ...

Page 12: ...ion de zinc n est pas parfaite Il est possible en outre que la surface zinguée puisse s endommager pendant le montage Comme garantie pour une longue durée du produit un récipient de zinc liquide est compris dans la fourniture applicable au pinceau pour des retouches éventuelles après l assemblage Nous conseillons de vérifier périodiquement l intégrité de l escalier en retouchant des points éventue...

Page 13: ...en vissant l embout fileté laisser entre les deux butées une distance égale à A 170 Se rappeler que A HT n de marches 6 Introduire les éléments dans le poteau en commençant du couvre plaque et en continuant avec les entretoises et les marches 7 Positionner le palier d arrivée dans le point correct de sortie et le fixer au mur avec les dispositifs de fixation relatifs 8 Introduire dans le poteau la...

Page 14: ...référant au schéma Hauteur de marche 210 faire coulisser les balustres centraux à travers la fente en les portant au maximum de la distance entre eux Hauteur de marche 220 maintenir les balustres centraux dans la ligne médiane de la fente en formant ainsi trois entraxes égaux V230 faire coulisser les balustres centraux à travers la fente en les portant à la distance minimum entre eux Régler par co...

Page 15: ...penblech auf den Trittflächen verleiht den Stufen mehr Härte man rutscht nicht und sie sind gegen Abnutzung widerstandsfähiger Abstand zwischen zwei Stufen Kann zwischen minimal 21 cm und maximal 23 cm mithilfe einer Distanzmutter aus Plastik eingestellt werden Tritt Stufenwinkel 30 Austrittswinkel 60 Austritt Typ des Austrittes eben zum Fußboden mit geradem Endstück Durchmesser Treppe 120 140 160...

Page 16: ...leinen Stellen Unebenheiten aufweist Außerdem kann die verzinkte Oberfläche während des Aufbaus beschädigt werden Damit eine lange Lebensdauer des Produktes garantiert werden kann liegt der Verpackung flüssiges Zink bei Damit können beschädigte Stellen nach dem Aufbau und mit dem Pinsel ausgebessert werden Es wird geraten regelmäßig die Unversehrtheit der Treppe zu überprüfen und eventuelle beschä...

Page 17: ...n 5 Die Plastikabstandshalter einstellen indem der Lagerring angeschraubt wird zwischen den beiden Anschlägen einen Abstand von A 170 lassen Darauf achten dass A HT Anzahl der Stufen 6 Die Teile in die Stange einfügen dafür mit der Plattenabdeckung beginnen und mit den Abstandshaltern und den Stufen fortfahren 7 Den Austritt an der richtigen Stelle des Ausganges platzieren und mit den extra dafür ...

Page 18: ...be des Geländers haben unterschiedliche Längen je nach Durchmesser der Treppe Gemäß der Zeichnung deren genaue Position prüfen Tritt 210 die Mittelstäbe durch die Öffnungen führen und diese dabei so weit wie möglich voneinander platzieren Tritt 220 die Mittelstäbe so in der Mitte der Öffnung platzieren dass sich drei gleiche Achsenabstände bilden Tritt 230 die Mittelstäbe durch die Öffnung führen ...

Page 19: ... las pasarelas otorga al peldaño una mayor rigidez propiedad antideslizamiento y mayor resistencia a las pisadas Contrahuella Regulable desde un mínimo de 21 cm a un máximo de 23 cm mediante distanciadores roscados de plástico Huella Ángulo peldaños 30 Ángulo egreso 60 Egreso Tipo de egreso sólo al ras del suelo cabeza recta Diámetro escalera 120 140 160 cm Peldaños y estructura Nº de peldaños 12 ...

Page 20: ...donde la adhesión del zinc es imperfecta Además puede dañarse la superficie galvanizada durante el montaje Como garantía de una larga vida útil del producto en el suministro incluimos una confección de zinc líquido aplicable con un pincel para realizar retoques después del ensamblado Aconsejamos controlar periódicamente la integridad de la escalera retocando los posibles puntos dañados con product...

Page 21: ...lo 4 Fijar la placa con tornillos y tarugos 5 Regular los distanciadores plásticos enroscando la abrazadera roscada dejando entre los dos topes una distancia equivalente a A 170 Recordar que A HT n peldaños 6 Introducir los elementos en el poste iniciando desde el cubre placa y continuando con los distanciadores y los peldaños 7 Posicionar el egreso en el punto correcto de salida y fijarlo a la pa...

Page 22: ...n diferentes alturas según el diámetro de la escalera Comprobar su posicionamiento exacto como se ilustra en el esquema Contrahuella 210 hacer deslizar los barrotes centrales a través de la ranura colocándolos a la distancia máxima entre sí Contrahuella 220 mantener los barrotes centrales en la medianera de la ranura formando tres distancias entre ejes iguales Contrahuella 230 hacer deslizar los b...

Page 23: ...mais rigidez propriedades anti derrapantes e maior resistência à transitabilidade Altura do degrau Regulável a partir de um mínimo de 21 cm a um máximo de 23 cm através dos espaçadores roscados em plástico Piso do degrau Ângulo degraus 30 Ângulo patamar 60 Patamar Tipo de patamar só nível pavimento reto Diâmetro escada 120 140 160 cm Degraus e estrutura Número de degraus 12 1 em chapa estampada em...

Page 24: ...uenas zonas onde a adesão de zinco não é perfeita É possível também que se danifique a superfície galvanizada durante a montagem Para garantir uma longa vida do produto no fornecimento está incluída uma embalagem de zinco líquido que é aplicado a pincel para pequenos retoques após a montagem Recomendamos que verifique periodicamente a integridade da escada retocando eventuais pontos danificados co...

Page 25: ... elementos entre eles elevando com um pino nos furos dos tubos 3 Coloque o poste em referência ao orifício colocando o degrau do patamar no lado de saída da escada Verificar a exata perpendicularidade ao pavimento 4 Fixar a placa com parafusos e cavilhas 5 Regule os espaçadores de plástico apertando a bucha roscada deixando entre os dois espaços uma distância igual a A 170 Lembre se que A HT n deg...

Page 26: ...posição exata tal como mostrado no esquema Altura do degrau 210 fazer deslizar as colunas centrais através da abertura levando as à distância máxima entre elas Altura do degrau 220 manter as colunas centrais na linha média da abertura formando três entre eixos iguais Altura do degrau 230 fazer deslizar as colunas centrais através da abertura levando as à distância mínima entre elas Regular as colu...

Page 27: ...2012 Rintal S p a Tutti i diritti riservati All rights riserved 25 FM_Exterior Zink_R2_12 12 ...

Page 28: ...2012 Rintal S p a Tutti i diritti riservati All rights riserved 26 FM_Exterior Zink_R2_12 12 ...

Page 29: ...2012 Rintal S p a Tutti i diritti riservati All rights riserved 27 FM_Exterior Zink_R2_12 12 ...

Page 30: ...2012 Rintal S p a Tutti i diritti riservati All rights riserved 28 FM_Exterior Zink_R2_12 12 ...

Page 31: ...2012 Rintal S p a Tutti i diritti riservati All rights riserved 29 FM_Exterior Zink_R2_12 12 ...

Page 32: ...2012 Rintal S p a Tutti i diritti riservati All rights riserved 30 FM_Exterior Zink_R2_12 12 ...

Page 33: ...510 1 600231510 12 600231710 12 600232510 13 600233010 1 600340010 1 600343010 1 600356010 2 600490010 1 600496017 1 600497017 1 600498017 1 630103542 M22 30 630132042 M8 X 40 2012 Rintal S p a Tutti i diritti riservati All rights riserved 31 FM_Exterior Zink_R2_12 12 ...

Page 34: ... X 20 1 630192010 M22 X 1050 30 630331442 8 X 24 5 630333042 M10 5 630330242 10 X 30 1 640052014 44 640067114 44 640067214 44 640067414 44 640067514 1 640071014 3 640076014 13 640079014 1 650800000 2012 Rintal S p a Tutti i diritti riservati All rights riserved 32 FM_Exterior Zink_R2_12 12 ...

Page 35: ...E 13 640043014 13 640045014 31 640067814 31 640067914 1 640081514 26 640065214 26 630109242 M6 X 6 26 630109142 M6 26 640400114 26 640400214 2012 Rintal S p a Tutti i diritti riservati All rights riserved 33 FM_Exterior Zink_R2_12 12 ...

Page 36: ...510 1 600231510 12 600231710 12 600232510 13 600233010 1 600340010 1 600343010 1 600356010 2 600490010 1 600496017 1 600497017 1 600498017 1 630103542 M22 31 630132042 M8 X 40 2012 Rintal S p a Tutti i diritti riservati All rights riserved 34 FM_Exterior Zink_R2_12 12 ...

Page 37: ... X 20 1 630192010 M22 X 1050 31 630331442 8 X 24 5 630333042 M10 5 630330242 10 X 30 13 640079014 1 640052014 45 640067114 45 640067214 45 640067414 45 640067514 1 640071014 3 640076014 1 650800000 2012 Rintal S p a Tutti i diritti riservati All rights riserved 35 FM_Exterior Zink_R2_12 12 ...

Page 38: ...E 13 640043014 13 640045014 32 640067814 32 640067914 1 640081514 26 640065214 26 630109242 M6 X 6 26 630109142 M6 26 640400114 26 640400214 2012 Rintal S p a Tutti i diritti riservati All rights riserved 36 FM_Exterior Zink_R2_12 12 ...

Page 39: ...510 13 600231510 12 600232110 12 600232710 13 600233010 1 600340010 1 600343010 1 600356010 2 600490010 1 600496017 1 600497017 1 600498017 1 630103542 M22 44 630132042 M8 X40 2012 Rintal S p a Tutti i diritti riservati All rights riserved 37 FM_Exterior Zink_R2_12 12 ...

Page 40: ...2 X 1050 44 630331442 8 X 24 3 630333042 M10 5 630330242 10 X 30 1 630152000 8 X 100 1 640052014 58 640067114 58 640067214 58 640067414 58 640067514 1 640071014 3 640076014 13 640079014 1 650800000 2012 Rintal S p a Tutti i diritti riservati All rights riserved 38 FM_Exterior Zink_R2_12 12 ...

Page 41: ...E 13 640043014 13 640045014 45 640067814 45 640067914 1 640081514 26 640065214 26 630109242 M6 X 6 26 630109142 M6 26 640400114 26 640400214 2012 Rintal S p a Tutti i diritti riservati All rights riserved 39 FM_Exterior Zink_R2_12 12 ...

Page 42: ......

Page 43: ......

Page 44: ...RINTAL S P A VIA TRAIANO IMPERATORE 6 47122 FORLI FC ITALY TEL 39 0543 791111 FAX 39 0543 722544 www rintal com info rintal it ...

Reviews: