CS450X / CS500X / CS560X PREMIUM
14
Original Instructions Version July 16
CS450X-CS500X-CS560X_190716
Installing the Guide Bar and Chain
Open the box and install the guide bar and the saw chain on the power unit as follows:
The saw chain has very sharp edges. Use thick protective gloves for safety.
1.
Pull the chain brake towards the front handle to check that the chain brake is not on.
2.
Loosen the nuts and remove the chain cover.
3.
Install the spike to the power unit (dependent on model).
4.
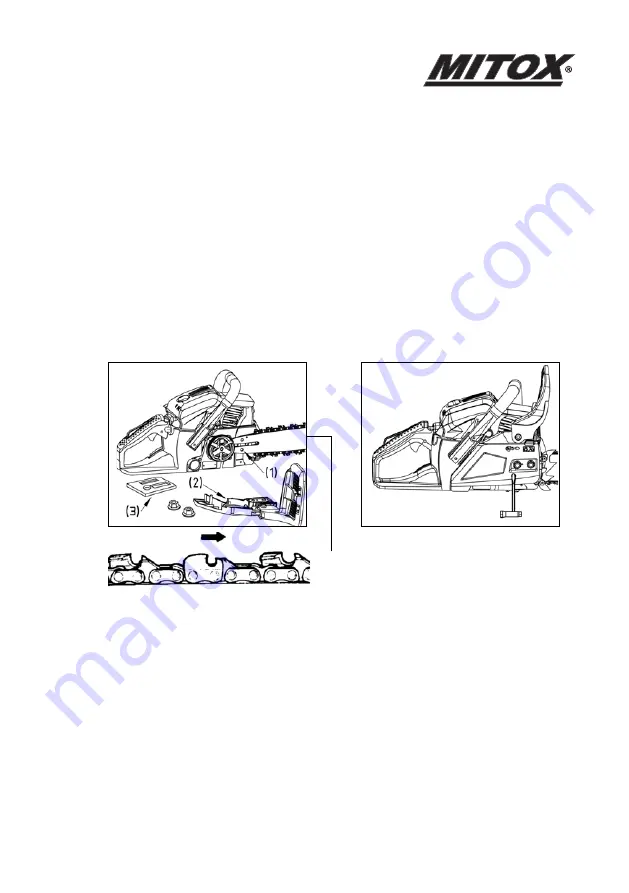
Remove and discard the plastic packer (3) located on the bar studs.
5
.
Fit the guide bar over the bar bolts.
Figure 1.
Figure 2.
Chain Direction
6.
Figure 1.
Fit the chain to the drive sprocket and while fitting the saw chain around the
guide bar, adjust the position of the chain tensioner located in the side cover (2) to fit
into the hole (1) in the guide bar.
7.
Fit the chain cover to the power unit and fasten the nuts finger tight.
8.
Figure 2.
While holding up the tip of the bar, adjust the chain tension by turning the
tensioner screw until the chain does not sag from the underside of the guide bar.
9.
Tighten the bar nuts securely with the bar held up to 12/15N.M, then check the chain
for smooth rotation and proper tension while moving the chain by hand.
Note: A new chain will expand in length at the beginning of use. Check and readjust
the tension frequently, as a loose chain can easily derail or cause rapid wear to itself
and the guide bar.


