9
GB
D
F
I
NL
E
SW
P
SDT-
1111SA-E
SDD-
50WSA-E
SDT-
111SA-E
SDT-
112SA-E
SDT-
122SA-E
6
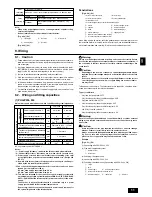
You must use one of the following (separately sold) junction pipe sets for the
junction area.
Junction-Set Type (multidistributor)
Outdoor-Unit Type
Twin
Triple
Four
PUH-P200, 250
7
When the diameter of the designated refrigerant piping is different from the
diameter of the branch piping, either cut the connecting portion off with a pipe
cutter, or use an adapter to match the diameters.
8
Use liquid refrigerant to fill the system.
9
Never use refrigerant to perform an air purge. Always evacuate using a vacuum
pump.
0
Always insulate the piping properly. Insufficient insulation will result in a de-
cline in heating/cooling performance, water drops from condensation and other
such problems.
A
When connecting the refrigerant piping, make sure the ball valve of the out-
door unit is completely closed (the factory setting) and do not operate it until
the refrigerant piping for the outdoor and indoor units has been connected, a
refrigerant leakage test has been performed and the evacuation process has
been completed.
B
Always use a non-oxidizing brazing material for brazing the parts. If a non-
oxidizing brazing material is not used, it could cause clogging or damage to
the compressor unit.
C
Never perform outdoor unit piping connection work when it is raining.
Warning:
When installing and moving the unit, do not charge it with refrigerant other
than the refrigerant specified on the unit.
- Mixing of a different refrigerant, air, etc. may cause the refrigerant cycle to mal-
function and result in severe damage.
Caution:
•
Use a vacuum pump with a reverse flow check valve.
- If the vacuum pump does not have a reverse flow check valve, the vacuum
pump oil may flow back into the refrigerant cycle and cause deterioration of
the refrigerator oil and other trouble.
•
Do not use the tools shown below used with conventional refrigerant.
(Gauge manifold, charge hose, gas leak detector, check valve, refriger-
ant charge base, vacuum gauge, refrigerant recovery equipment)
- Mixing of conventional refrigerant and refrigerator oil may cause the refrig-
erator oil to deteriorate.
- Mixing of water will cause the refrigerator oil to deteriorate.
- R407C refrigerant does not contain any chlorine. Therefore, gas leak detec-
tors for conventional refrigerants will not react to it.
•
Manage the tools more carefully than normal.
- If dust, dirt, or water gets in the refrigerant cycle, the refrigerator oil will
deteriorate.
•
Never use existing refrigerant piping.
- The large amount of chlorine in conventional refrigerant and refrigerator oil
in the existing piping will cause the new refrigerant to deteriorate.
•
Store the piping to be used during installation indoors and keep both
ends of the piping sealed until just before brazing.
- If dust, dirt, or water gets into the refrigerant cycle, the oil will deteriorate and
the compressor may fail.
•
Do not use a charging cylinder.
- Using a charging cylinder may cause the refrigerant to deteriorate.
•
Do not use special detergents for washing piping.
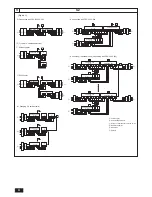
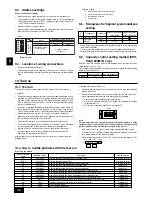
7.2. Refrigerant piping system
Connection Example
[Fig. 7.2.1] (P.2)
Å
Outdoor unit
(1) Single
ı
Gas pipe size
• Connecting with PEH-RP200, 250
Ç
Liquid pipe size
• Connecting with PEH-P400, 500
Î
Indoor unit
(2) Twin
(3) Triple
(4) Four
Caution:
•
Total bends are 15 units, and max. bends are 8 units within L+
R
R
R
R
R
a,
L+
R
R
R
R
R
b,
L+
R
R
R
R
R
c
and
L+
R
R
R
R
R
d.
25 : 25 : 25 : 25
50 : 50
33 : 33 : 33 25 : 25 : 50 20 : 40 : 40
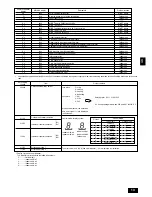
Model
Additional refrigerant charge
8. Additional refrigerant charge
8.1. Additional refrigerant charge
L: Main section actual length
R
a
+
R
b
+
R
c
+
R
d
: Join section actual length
The value of calculation result at the second decimal place must be rounded up to
the first decimal place.
(e.g. 2.22 kg must be rounded up to 2.3 kg)
*1: For amount of total indoor units
8.2. Caution for piping connection/valve
operation
•
Conduct piping connection and valve operation accurately.
•
The gas side connecting pipe is being assembled for shipment.
1
For brazing to the connecting pipe with flange, remove the connecting pipe
with flange from the ball valve, and braze it at the outside of the unit.
2
During the time when removing the connecting pipe with flange, seal the
flange surface of ball valve to prevent the entry of dust into the valve.
3
The refrigerant circuit is closed with a round, close-packed packing at the
shipment to prevent gas leak between flanges. As no operation can be
done under this state, be sure replace the packing with the hollow packing
attached at the piping connection.
4
At the mounting of the hollow packing, wipe off dust attached on the flange
sheet surface and the packing. Coat refrigerating machine oil (Ester oil,
ether oil or alkylbenzene [small amount]) onto both surfaces of the pack-
ing.
0.026
×
L + 0.014
×
(
R
a
+
R
b
+
R
c
+
R
d
) +
1.7 (kg) *1
0.026
×
L + 0.014
×
(
R
a
+
R
b
+
R
c
+
R
d
) +
1.7 (kg) *1
Amount of refrigerant
at ex-factory
R407C 6.0 kg
R407C 6.5 kg
PUH-P200
MYA
PUH-P250
MYA
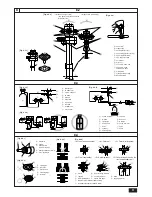
[Fig. 8.2.1] (P.3)
•
After evacuation and refrigerant charge, ensure that the handle is fully open. If
operating with the valve closed, abnormal pressure will be imparted to the
high- or low-pressure side of the refrigerant circuit, giving damage to the com-
pressor, four-way valve, etc.
•
Determine the amount of additional refrigerant charge by using the formula,
and charge refrigerant additionally through the service port after completing
piping connection work.
•
After completing work, tighten the service port and cap securely not to gener-
ate gas leak.
[Fig. 8.2.2] (P.3)
<A> [Ball valve (gas side)]
(This figure shows the valve in the fully open state.)
<B> [Ball valve (liquid side)]
A
Valve stem
[Fully closed at the factory, when connecting the piping, when evacuating, and
when charging additional refrigerant. Open fully after the operations above are
completed.]
B
Stopper pin [Prevents the valve stem from turning 90
°
or more.]
C
Packing (Accessory)
[Manufacturer: Nichiasu corporation]
[Type: T/#1991-NF]
D
Connecting pipe (Accessory)
[Use packing and securely install this pipe to the valve flange so that gas leakage
will not occur. (Tightening torque: 50 N·m (500 kg·cm)) Coat both surfaces of the
packing with refrigerator oil (Ester oil, ether oil or alkylbenzene [small amount]).]
E
Open (Operate slowly)
F
Cap, copper packing
[Remove the cap and operate the valve stem. Always reinstall the cap after op-
eration is completed. (Valve stem cap tightening torque: 25 N·m (250 kg·cm) or
more)]
G
Service port
[Use this port to evacuate the refrigerant piping and add an additional charge at
the site.
Open and close the port using a double-ended wrench.
Always reinstall the cap after operation is completed. (Service port cap tightening
torque: 14 N·m (140 kg·cm) or more)]


