background image

Contents

1. Safety precautions

  Before installing the unit, make sure you read all the “Safety precau-

tions”.

  Please report to or take consent by the supply authority before connec-

tion to the system.

After installation work has been completed, explain the “Safety Precautions,” use, 

and maintenance of the unit to the customer according to the information in the 

Operation Manual and perform the test run to ensure normal operation. Both the 

Installation Manual and Operation Manual must be given to the user for keeping. 

These manuals must be passed on to subsequent users.

 : Indicates a part which must be grounded.

 Warning:

Carefully read the labels affixed to the main unit.

 Warning:

Describes precautions that must be observed to prevent danger of injury or 

death to the user.

 Caution:

Describes precautions that must be observed to prevent damage to the unit.

This installation manual is only for the branch box installation. In installing the indoor units and outdoor units, refer to the installation manual attached to 

each unit.

 Warning:

•  Ask a dealer or an authorized technician to install the unit.

•  For installation work, follow the instructions in the Installation Manual and 

use tools and pipe components specifically made for use with refrigerant 

specified in the outdoor unit installation manual.

•  The unit must be installed according to the instructions in order to mini-

mize the risk of damage from earthquakes, typhoons, or strong winds. An 

incorrectly installed unit may fall down and cause damage or injuries.

•  The unit must be securely installed on a structure that can sustain its 

weight.

•  If the air conditioner is installed in a small room, measures must be taken 

to prevent the refrigerant concentration in the room from exceeding the 

safety limit in the event of refrigerant leakage. Should the refrigerant leak 

and cause the concentration limit to be exceeded, hazards due to lack of 

oxygen in the room may result.

•  Ventilate the room if refrigerant leaks during operation. If refrigerant comes 

into contact with a flame, poisonous gases will be released.

•  All electric work must be performed by a qualified technician according to 

local regulations and the instructions given in this manual.

•  Use only specified cables for wiring.

•  The terminal block cover panel of the unit must be firmly attached.

•  Use only authorized accessories and ask a dealer or an authorized techni-

cian to install them.

•  The user should never attempt to repair the unit or transfer it to another 

location.

•  After installation has been completed, check for refrigerant leaks. If refrig-

erant leaks into the room and comes into contact with the flame of a heater 

or portable cooking range, poisonous gases will be released.

•  Be sure to connect the power supply cords and the connecting wires for 

the indoor units, outdoor units, and branch boxes directly to the units (no 

inter-mediate connections).

Intermediate connections can lead to communication errors if water enters 

the cords or wires and causes insufficient insulation to ground or a poor 

electrical contact at the intermediate connection point.

(If an intermediate connection is necessary, be sure to take measures to 

prevent water from entering the cords and wires.)

 Caution:

•  Make sure that the refrigerant pipes are well insulated to prevent condensa-

tion.

Incomplete insulation may cause condensation on the surface of pipes, 

wetting of the ceiling, floor and other important properties.

•  Do not use the unit in an unusual environment. If the air conditioner is in-

stalled in areas exposed to steam, volatile oil (including machine oil), or sul

-

furic gas, areas exposed to high salt content such as the seaside, the perfor

-

mance can be significantly reduced and the internal parts can be damaged.

•  Do not install the unit where combustible gases may leak, be produced, 

flow, or accumulate. If combustible gas accumulates around the unit, fire or 

explosion may result.

•  When installing the unit in a hospital or communications office, be pre-

pared for noise and electronic interference. Inverters, home appliances, 

high-frequency medical equipment, and radio communications equipment 

can cause the air conditioner to malfunction or breakdown. The air con-

ditioner may also affect medical equipment, disturbing medical care, and 

communications equipment, harming the screen display quality.

•  Thermal insulation of the refrigerant pipe is necessary to prevent condensation. 

If the refrigerant pipe is not properly insulated, condensation will be formed.

•  Place thermal insulation on the pipes to prevent condensation. If the drain-

pipe is installed incorrectly, water leakage and damage to the ceiling, floor, 

furniture, or other possessions may result.

•  Do not clean the air conditioner unit with water. Electric shock may result.

•  Tighten all flare nuts to specification using a torque wrench. If tightened 

too much, the flare nut can break after an extended period.

•  Be sure to install circuit breakers, if not installed, electric shock may result.

•  For the power lines, use standard cables of sufficient capacity. Otherwise, 

a short circuit, overheating, or fire may result.

•  When installing the power lines, do not apply tension to the cables. If the 

connections are loosened, the cables can snap or break and overheating or 

fire may result.

•  Do not connect the ground wire to gas or water pipes, lighting rods, or  

telephone grounding lines. If the unit is not properly grounded, electric 

shock may result.

•  Do not turn off the breaker of M-NET Branch Box when installing the unit 

below -4°F, otherwise it may result in communication failure.

2. Selecting a location for installation

* The branch box is only indoor use. 

Please attach the special optional cover to install the branch box in the out

-

doors.

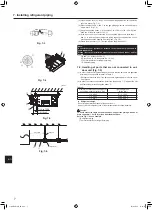
•  Ensure that the branch box is installed in a location which facilitates servicing 

and maintenance. (ensure that the required maintenance hole or service space 

is available).

•  Ensure that the branch box is installed above the ceiling of corridor, 

bath room, etc., where persons are not regularly there.

  Do not install near bed rooms, living rooms, etc. The sound of refriger-

ant flowing through the piping may sometimes be audible.

  Also, do not install where maintenance cannot be carried out.

•  Ensure that it is located where noise in operation will not be a problem.

After power is supplied or after an operation stop for a while, a small 

clicking noise may be heard from the inside of the branch box. The linear 

expansion valve is opening and closing. The unit is not faulty.

•  Determine the route of refrigerant piping, and electrical wiring beforehand.

•  Ensure that the location of the installation is such that the length of refrigerant 

piping is within the specified limits.

* Ensure that the unit is installed in a location able to support its weight.

 Warning:

Ensure that the unit is installed firmly in a location able to support its weight.

If the installation is of insufficient strength the unit may fall, resulting in in

-

jury.

•  Do not install in location that is hot or humid for long periods of time.

1. Safety precautions . . . . . . . . . . . . . . . . . . . . . . . . . . . . . . . . . . . . . . . . . . . . . . . . 1

2. Selecting a location for installation   . . . . . . . . . . . . . . . . . . . . . . . . . . . . . . . . . . . 1

3. Confirming supplied accessories

  . . . . . . . . . . . . . . . . . . . . . . . . . . . . . . . . . . . . . 2

4. Dimensions and required servicing space of Branch Box  . . . . . . . . . . . . . . . . . . 2

5. Refrigerant piping   . . . . . . . . . . . . . . . . . . . . . . . . . . . . . . . . . . . . . . . . . . . . . . . . 5

6. Mounting the Branch Box   . . . . . . . . . . . . . . . . . . . . . . . . . . . . . . . . . . . . . . . . . . 6

7. Installing refrigerant piping   . . . . . . . . . . . . . . . . . . . . . . . . . . . . . . . . . . . . . . . . . 6

8. Electrical work  . . . . . . . . . . . . . . . . . . . . . . . . . . . . . . . . . . . . . . . . . . . . . . . . . . . 8

9. Test run  . . . . . . . . . . . . . . . . . . . . . . . . . . . . . . . . . . . . . . . . . . . . . . . . . . . . . . . 12

en

1

01_WG79B721H01_EN.indd   1

2019/09/09   15:36:01

002

Summary of Contents for BRANCH BOX PAC-MKA32BC

Page 1: ...nstallation manual thoroughly before installing the air conditioner unit MANUEL D INSTALLATION Veuillez lire le manual d installation en entier avant d installer ce climatiseur pour éviter tout accident et vous assurer d une utilisation correcte MANUAL DE INSTALACIÓN Para un uso seguro y correcto lea detalladamente este manual de instalación antes de montar la unidad de aire acondicionado Français...

Page 2: ...e oil or sul furic gas areas exposed to high salt content such as the seaside the perfor mance can be significantly reduced and the internal parts can be damaged Do not install the unit where combustible gases may leak be produced flow or accumulate If combustible gas accumulates around the unit fire or explosion may result When installing the unit in a hospital or communications office be pre par...

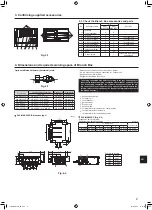
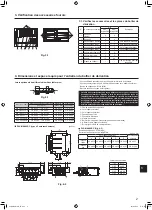
Page 3: ...Connect deformed joint directly to the branch box side A Suspension bolt pitch B To indoor unit C To outdoor unit D Service panel E Electric cover F Conduit plate G Terminal block to indoor unit on control board H Terminal block to outdoor unit J Terminal block for comunication cable PAC MKA52BC Fig 4 2 Suspension bolt W3 8 M10 Refrigerant pipe flared connection To indoor unit To outdoor unit A B ...

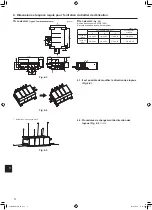
Page 4: ... 52 Gas pipe 3 8 ø9 52 3 8 ø9 52 3 8 ø9 52 5 8 ø15 88 A A G H E F J C B A C B A D B C 15 13 16 12 19 32 1 2 1 8 7 32 2 3 4 1 1 1 2 3 4 2 27 32 3 17 32 17 23 32 6 11 16 2 9 16 1 27 32 3 9 32 3 7 16 2 3 4 3 25 32 11 1 32 1 17 32 4 3 8 Fig 4 3 4 1 The direction of the piping can be changed Fig 4 4 Fig 4 4 1 Remove the screws in each part 4 2 Piping direction change work procedures Fig 4 5 1 8 inch Fi...

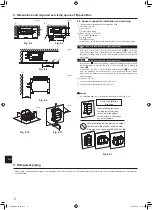
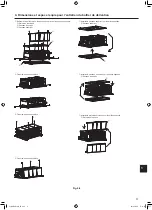
Page 5: ...nel B 7 Install the electric cover on the opposite surface A Electric cover A Fig 4 5 4 Dimensions and required servicing space of Branch Box 2 Remove the electric cover service panel and top panel A Electric cover B Service panel C Top panel B A C 3 Install the top panel on the opposite surface C Top panel C en 4 01_WG79B721H01_EN indd 4 2019 09 09 15 36 08 005 ...

Page 6: ...near expansion valve coils and sensors from a maintenance hole becomes difficult Only exchange work of a PCB is possible 3 Top View Fig 4 9 2 The space when installing on the floor Fig 4 10 3 The space when installing on a wall Fig 4 11 Warning The installation direction is limited when installing on a wall Fig 4 12 3 is 23 5 8 inch 600 mm recommendation 5 Refrigerant piping Always follow the spec...

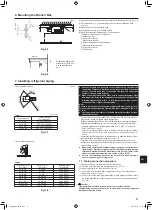
Page 7: ...is used in locations subject to high temperature and humidity such as in the attic further addition of insulation may be re quired Insulate the liquid and gas pipes of the branch box by attaching the heat resis tant polyethylene foam tightly around them Fig 7 4 Otherwise a burn during pipe connection work or water leakage due to con densation on pipes may result If connected to wrong end connectio...

Page 8: ...7 2 Handling of ports that are not connected to out door unit Fig 7 5 1 In order to prevent refrigerant leaks make sure that the flare nuts are tightened according to the specified torques in Table 3 Refrigerant may also leak if the flare nuts are tightened more than the speci fied torques 2 In order to prevent condensation install the pipe covers 7 8 against the unit and fasten them with the supp...

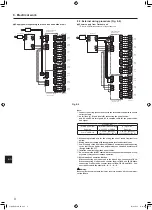
Page 9: ...ach wire to the appropriate terminal block Fig 8 9 5 Set dip sw Refer to 8 3 6 Replace the electric cover 8 1 When using wiring conduit Fig 8 5 8 6 8 7 Replace the electric cover when the wiring conduit has been fixed in place A Electric cover H Wiring conduit For TB5B B Wiring J Conduit plate 3 1 Accessories No 0 C Nut 1 2 procure locally K Conduit hole D Wiring conduit For TB3A TB3B L Conduit pi...

Page 10: ... connecting 3 indoor units connect them to TB3A TB3B and TB3C Con nect indoor units in the order of A B C D E Fig 8 9 Supply power separately to branch box and outdoor unit Power supply from Outdoor unit Refer to be installation manual of the outdoor unit 8 2 External wiring procedure Fig 8 9 C S1 S1 S2 S2 S3 S3 TB3A C S1 S1 S2 S2 S3 S3 TB3A C S1 S1 S2 S2 S3 S3 TB3B C S1 S1 S2 S2 S3 S3 TB3C C S1 S...

Page 11: ...nt sensitivity 3 F0 20A or less 2 3 3 12 3 3 12 3 3 12 20 20 20 20A current sensitivity 3 F0 30A or less 2 5 3 10 5 3 10 5 3 10 30 30 30 30A current sensitivity 3 Apply to IEC61000 3 3 about max permissive system impedance 1 The Ground fault interrupter should support inverter circuit The Ground fault interrupter should combine using of local switch or wiring breaker 2 Please take the larger of F1...

Page 12: ...xample When setting the address to 3 set the ones digit to 3 and the tens digit to 0 When setting the address to 25 set the ones digit to 5 and the tens digit to 2 Example When setting the address of the branch BOX to 3 an address is assigned to each indoor unit starting with Unit A as shown below no matter if each indoor unit is con nected SW1 1 5 ON Indoor Unit A Address 3 Indoor Unit B Address ...

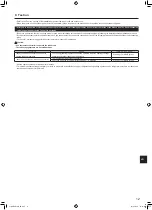
Page 13: ...tdoor unit connecting wires To check for improper wiring perform the test run for each indoor unit individually Caution Use the remote controller to operate the indoor unit The following symptoms are not malfunctions Symptom Cause Indoor unit LED display Indoor unit does not operate even if set to cooling heating operation The cooling heating operation cannot be operated when the heating cooling o...

Page 14: ...sation à la surface des tuyaux l apparition d humidité au niveau du plafond et du sol ainsi qu à d autres situations sérieuses N utilisez pas l appareil dans un environnement inhabituel Si le climatiseur est installé dans des endroits exposés à la vapeur à l huile volatile notamment l huile de machine au gaz sulfurique ou à une forte teneur en sel par exemple en bord de mer les performances peuven...

Page 15: ...ccordement du tuyau du boîtier de dérivation diffère de celle du raccordement du tuyau de l appareil intérieur utilisez des joints déformés d un diamètre différent disponibles en option au niveau du boîtier de dérivation Raccordez le joint déformé directement au niveau du boîtier de dérivation Nom du modèle Diamètre des tuyaux raccordés Diamètre A Diamètre B pouce mm pouce mm pouce mm MAC A454JP E...

Page 16: ...5 1 4 ø6 35 3 8 ø9 52 Tuyau de gaz 3 8 ø9 52 3 8 ø9 52 3 8 ø9 52 5 8 ø15 88 Fig 4 3 4 1 Il est possible de modifier la direction des tuyaux Fig 4 4 Fig 4 4 1 Retirer les vis de chaque pièce 4 2 Procédures de changement de direction des tuyaux Fig 4 5 1 8 pouce Fig 4 5 A A G H E F J C B A C B A D B C 15 13 16 12 19 32 1 2 1 8 7 32 2 3 4 1 1 1 2 3 4 2 27 32 3 17 32 17 23 32 6 11 16 2 9 16 1 27 32 3 ...

Page 17: ...que sur la surface opposée A Protection électrique A Fig 4 5 4 Dimensions et espace requis pour l entretien du boîtier de dérivation 2 Retirez le capot électrique le panneau de service et le panneau supérieur A Protection électrique B Panneau de service C Panneau supérieur B A C 3 Installez le panneau supérieur sur la surface opposée C Panneau supérieur C fr 4 02_WG79B721H01_FR indd 4 2019 09 04 1...

Page 18: ... pouces 100 mm le remplacement du boîtier de dérivation des bobines du détendeur linéaire et des capteurs à partir d un orifice d entretien devient difficile Seul le remplacement d une carte de circuits intégrés est possible 3 Vue de dessus Fig 4 9 2 Espace lors de l installation au sol Fig 4 10 3 Espace lors sur l installation sur un mur Fig 4 11 Avertissement Le sens d installation est limité lo...

Page 19: ...2 49 59 ø15 88 5 8 29 1 9 64 68 82 49 59 ø15 88 5 8 36 1 27 64 100 120 71 87 Dimensions de l évasement øA 45 2 Fig 7 2 Isolez et protégez efficacement le système contre la condensation de manière à empêcher tout écoulement d eau de la tuyauterie de réfrigérant Tuyau de liquide de gaz Augmentez l isolation en fonction de l environnement dans lequel la tuyaute rie de réfrigérant est installée sinon ...

Page 20: ... appareil extérieur Fig 7 5 1 Afin d éviter toute fuite de réfrigérant veillez à serrer les raccords coniques conformément aux couples de serrage indiqués dans le Tableau 3 Des fuites de réfrigérant peuvent également survenir si les écrous évasés sont serrés au delà des couples de serrage indiqués 2 Pour éviter la condensation mettez en place les cache tuyaux 7 8 contre l appareil et attachez les ...

Page 21: ...rie Reportez vous à 8 1 4 Raccordez fermement chaque fil sur le bornier approprié Fig 8 9 5 Réglez les commutateurs DIP Reportez vous à 8 3 6 Remettez en place le capot électrique 8 1 Lors de l utilisation d un conduit de câblage Fig 8 5 8 6 8 7 Remettez en place le capot électrique une fois le conduit de câblage installé A Protection électrique H Conduit de câblage pour TB5B B Câblage J Plaque de...

Page 22: ...z les sur TB3A et TB3B Lors du raccordement de 3 appareils intérieurs raccordez les sur TB3A TB3B et TB3C Raccordez les appareils intérieurs dans l ordre A B C D E Fig 8 9 Fournir l alimentation séparément au boîtier de dérivation et à l unité extérieure Alimentation pour appareil extérieur Reportez vous au manuel d installation de l appareil extérieur 8 2 Procédure de câblage externe Fig 8 9 C S1...

Page 23: ...e disjoncteur de fuite à la terre doit se combiner à l utilisation du commutateur local ou du disjoncteur 2 Prenez la plus grande des valeurs entre F1 et F2 comme valeur pour F0 F1 Courant total maximum de fonctionnement des appareils extérieurs 1 2 F2 V1 C Appareil intérieur V1 V2 Type 1 SEZ KD NA4 19 8 2 4 PLA A EA7 Type 2 PEAD A AA7 SVZ KP NA 26 9 Type 3 MSZ FE NA MLZ KP NA 9 9 Type 4 MSZ EF NA...

Page 24: ...dizaines sur 0 Lors du réglage des adresses sur 25 réglez le chiffre des unités sur 5 et celui des dizaines sur 2 Exemple Si vous régler l adresse du BOÎTIER de dérivation sur 3 une adresse est attribuée à chaque appareil intérieur en commençant par l appareil A comme indiqué ci dessous même si chaque appareil intérieur est raccordé SW1 1 5 MARCHE Appareil intérieur A Adresse 3 Appareil intérieur ...

Page 25: ...eurs Pour vérifier toute erreur de câblage effectuer un essai de fonctionnement pour chaque appareil intérieur individuellement Précaution Utilisez la télécommande pour actionner l appareil intérieur Les symptômes suivants ne sont pas des dysfonctionnements Symptôme Cause Affichage des LED de l appareil intérieur L appareil intérieur ne fonctionne pas même s il est réglé sur refroidissement chauff...

Page 26: ...elo y afectar a otros objetos No utilice la unidad en un ambiente enrarecido Si instala el aire acondicionado en áreas expuestas al vapor aceite volátil incluyendo el aceite para máquinas o gas sulfuroso o en áreas con alto contenido en sal como playas el rendimiento puede verse reducido significativamente y las piezas internas pueden dañarse No instale la unidad en un lugar donde se puedan verter...

Page 27: ... 52 5 8 ø15 88 3 8 ø9 52 5 8 ø15 88 PAC SG75RJ E 5 8 ø15 88 3 4 ø19 05 5 8 ø15 88 3 4 ø19 05 Fig 4 2 Conecte 2 unidades interiores o más con 1 sistema Se pueden conectar hasta 2 cajas de derivación a 1 unidad exterior Perno de suspensión W3 8 M10 Conexión abocardada del tubo de refrigerante El tamaño de la conexión de los tubos varía en función del tipo y la capacidad de las unidades interiores Ha...

Page 28: ... ø6 35 3 8 ø9 52 Tubo de gas 3 8 ø9 52 3 8 ø9 52 3 8 ø9 52 5 8 ø15 88 Fig 4 3 4 1 La dirección de los tubos puede cambiarse Fig 4 4 Fig 4 4 1 Retire los tornillos de cada una de las partes 4 2 Procedimientos de trabajo para el cambio de dirección de los tubos Fig 4 5 1 8 pulgadas Fig 4 5 A A G H E F J C B A C B A D B C 15 13 16 12 19 32 1 2 1 8 7 32 2 3 4 1 1 1 2 3 4 2 27 32 3 17 32 17 23 32 6 11 ...

Page 29: ...tale la cubierta eléctrica en la superficie opuesta A Cubierta eléctrica A Fig 4 5 4 Dimensiones y espacio requerido para mantenimiento y reparación de la caja de derivación 2 Retire la cubierta eléctrica el panel de servicio y el panel superior A Cubierta eléctrica B Panel de servicio C Panel superior B A C 3 Instale el panel superior en la superficie opuesta C Panel superior C es 4 03_WG79B721H0...

Page 30: ...de la caja de derivación bobinas de la válvula de expansión lineal y sensores desde el orificio de mante nimiento resultarán difíciles solo es posible realizar trabajos de intercambio de una PCB 3 Vista superior Fig 4 9 2 Espacio requerido al instalar en el suelo Fig 4 10 3 Espacio requerido al instalar en una pared Fig 4 11 Atención La dirección de instalación está limitada cuando se instala en u...

Page 31: ...iza en ubicaciones con temperaturas elevadas y altos niveles de humedad por ejemplo en áticos es posible que se requiera un mayor aislamiento Aísle los tubos de líquido y de gas de la caja de derivación aplicando alrededor de ellos espuma de polietileno resistente al calor Fig 7 4 Si no lo hace pueden producirse quemaduras durante los trabajos de conex ión de los tubos o fugas de agua debido a la ...

Page 32: ...o de refrigerante 7 2 Manejo de los puertos que no están conectados a la unidad exterior Fig 7 5 1 Para evitar fugas de refrigerante asegúrese de que las tuercas abocardadas están apretadas según los pares especificados en la Tabla 3 El refrigerante también puede salir si las tuercas se aprietan más de lo espe cificado en los pares 2 Para evitar la condensación instale las cubiertas de las tubería...

Page 33: ...sulte el apartado 8 1 4 Conecte firmemente cada cable al bloque de terminales pertinente Fig 8 9 5 Configure el interruptor DIP consulte el apartado 8 3 6 Vuelva a colocar la cubierta eléctrica 8 1 Cuando se utiliza un conducto de cableado Fig 8 5 8 6 8 7 Una vez instalado el conducto de cableado vuelva a colocar la cubierta eléctrica A Cubierta eléctrica B Cableado C Tuerca de 1 2 adquirida local...

Page 34: ... D E Atención Nunca empalme el cable ya que ello puede producir humo un incendio o un error de comunicación Suministre alimentación eléctrica de forma separada a la caja de derivación y a la unidad exterior Alimentación eléctrica de la unidad exterior Consulte el manual de instalación de la unidad exterior 8 2 Procedimiento de cableado exterior Fig 8 9 Fig 8 9 C S1 S1 S2 S2 S3 S3 TB3A C S1 S1 S2 S...

Page 35: ...A 2 3 3 12 3 3 12 3 3 12 20 20 20 Sensibilidad de corriente de 20 A 3 F0 máximo 30 A 2 5 3 10 5 3 10 5 3 10 30 30 30 Sensibilidad de corriente de 30 A 3 Aplíquese el IEC61000 3 3 para la impedancia máx admitida en el sistema 1 El interruptor por pérdida a tierra debe ser compatible con el circuito del inversor El interruptor por pérdida a tierra debe emplear un interruptor local o un disyuntor de ...

Page 36: ...cenas en 0 Para ajustar la dirección en 25 ajuste el dígito de las unidades en 5 y el dígito de las decenas en 2 Ejemplo Al ajustar la dirección de la caja de derivación en 3 se asigna una dirección a cada unidad interior empezando por la unidad A como se muestra a continuación sin importar si cada unidad interior está conectada Interruptores 1 1 a 5 encendidos Unidad interior A Dirección 3 Unidad...

Page 37: ...funcionamiento Síntoma Causa Indicador LED de la unidad interior La unidad interior no funciona cuando se ajusta en modo de refrigeración calefacción El funcionamiento en modo de refrigeración calefacción no está disponible cuando hay otra unidad interior funcionando en modo de calefacción refrigera ción En espera para sistema Multi El ventilador de la unidad interior se para du rante el funcionam...

Page 38: ...04_WG79B721H01_Cover4 indd 1 2019 07 23 11 33 49 038 ...

Page 39: ...04_WG79B721H01_Cover4 indd 2 2019 07 23 11 33 49 039 ...

Page 40: ... sure to put the contact address telephone number on this manual before handing it to the customer This product is designed and intended for use in the residential commercial and light industrial environment WG79B721H01 Printed in PRC 04_WG79B721H01_Cover4 indd 3 2019 07 23 11 33 49 040 ...

Reviews: