background image

iii

HWE19070

GB

searching for or detection of refrigerant leaks.
A halide torch (or any other detector using a naked flame) shall not be 
used.

(6) Leak Detection Methods

Electronic leak detectors may be used to detect refrigerant leaks but, in 
the case of flammable refrigerants, the sensitivity may not be adequate, 
or may need re-calibration. (Detection equipment shall be calibrated in a 
refrigerant-free area.)
Ensure that the detector is not a potential source of ignition and is suitable 
for the refrigerant used. Leak detection equipment shall be set at a per-
centage of the LFL of the refrigerant and shall be calibrated to the refrig-
erant employed, and the appropriate percentage of gas (25% maximum) 
is confirmed.
Leak detection fluids are suitable for use with most refrigerants but the 
use of detergents containing chlorine shall be avoided as the chlorine may 
react with the refrigerant and corrode the copper pipe-work.
If a leak is suspected, all naked flames shall be removed/extinguished.
If a leakage of refrigerant is found which requires brazing, all of the refrig-
erant shall be recovered from the system, or isolated (by means of shut off 
valves) in a part of the system remote from the leak. For appliances con-
taining flammable refrigerants, oxygen free nitrogen (OFN) shall then be 
purged through the system both before and during the brazing process.

(7) Removal and Evacuation

When breaking into the refrigerant circuit to make repairs – or for any other 
purpose conventional procedures shall be used. However, for flammable 
refrigerants it is important that best practice is followed since flammability 
is a consideration. The following procedure shall be adhered to:

• remove refrigerant
• purge the circuit with inert gas
• evacuate
• purge again with inert gas
• open the circuit by cutting or brazing.

The refrigerant charge shall be recovered into the correct recovery cylin-
ders. For appliances containing flammable refrigerants, the system shall 
be “flushed” with OFN to render the unit safe. This process may need to 
be repeated several times.
Compressed air or oxygen shall not be used for purging refrigerant systems.
For appliances containing flammable refrigerants, flushing shall be 
achieved by breaking the vacuum in the system with OFN and continuing 
to fill until the working pressure is achieved, then venting to atmosphere, 
and finally pulling down to a vacuum. This process shall be repeated until 
no refrigerant is within the system. When the final OFN charge is used, 
the system shall be vented down to atmospheric pressure to enable work 
to take place. This operation is absolutely vital if brazing operations on the 
pipe-work are to take place.
Ensure that the outlet for the vacuum pump is not close to any ignition 
sources and that ventilation is available.

(8) Charging Procedures

In addition to conventional charging procedures, the following require-
ments shall be followed:

• Ensure that contamination of different refrigerants does not occur 

when using charging equipment. Hoses or lines shall be as short as 
possible to minimize the amount of refrigerant contained in them.

• Cylinders shall be kept upright.
• Ensure that the refrigeration system is earthed prior to charging the 

system with refrigerant.

• Label the system when charging is complete (if not already).
• Extreme care shall be taken not to overfill the refrigeration system.

Prior to recharging the system, it shall be pressure-tested with the appro-
priate purging gas. The system shall be leak-tested on completion of 
charging but prior to commissioning. A follow up leak test shall be carried 
out prior to leaving the site.

(9) Decommissioning

Before carrying out this procedure, it is essential that the technician is 
completely familiar with the equipment and all its detail. It is recommend-
ed good practice that all refrigerants are recovered safely. Prior to the task 
being carried out, an oil and refrigerant sample shall be taken in case 
analysis is required prior to re-use of reclaimed refrigerant. It is essential 
that electrical power is available before the task is commenced.
a) Become familiar with the equipment and its operation.
b) Isolate system electrically.
c) Before attempting the procedure, ensure that:

• mechanical handling equipment is available, if required, for handling 

refrigerant cylinders;

• all personal protective equipment is available and being used correct-

ly;

• the recovery process is supervised at all times by a competent person;
• recovery equipment and cylinders conform to the appropriate stan-

dards.

d) Pump down refrigerant system, if possible.
e) If a vacuum is not possible, make a manifold so that refrigerant can be 

removed from various parts of the system.

f) Make sure that cylinder is situated on the scales before recovery takes 

place.

g) Start the recovery machine and operate in accordance with manufac-

turer’s instructions.

h) Do not overfill cylinders. (No more than 80 % volume liquid charge).
i) Do not exceed the maximum working pressure of the cylinder, even 

temporarily.

j) When the cylinders have been filled correctly and the process complet-

ed, make sure that the cylinders and the equipment are removed from 
site promptly and all isolation valves on the equipment are closed off.

k) Recovered refrigerant shall not be charged into another refrigeration 

system unless it has been cleaned and checked.

(10) Labelling

Equipment shall be labelled stating that it has been de-commissioned and 
emptied of refrigerant. The label shall be dated and signed. For applianc-
es containing flammable refrigerants, ensure that there are labels on the 
equipment stating the equipment contains flammable refrigerant.

(11) Recovery

When removing refrigerant from a system, either for servicing or decom-
missioning, it is recommended good practice that all refrigerants are re-
moved safely. When transferring refrigerant into cylinders, ensure that 
only appropriate refrigerant recovery cylinders are employed. Ensure that 
the correct number of cylinders for holding the total system charge are 
available. All cylinders to be used are designated for the recovered refrig-
erant and labelled for that refrigerant (i.e. special cylinders for the recov-
ery of refrigerant). Cylinders shall be complete with pressure-relief valve 
and associated shut-off valves in good working order. Empty recovery cyl-
inders are evacuated and, if possible, cooled before recovery occurs.
The recovery equipment shall be in good working order with a set of in-
structions concerning the equipment that is at hand and shall be suitable 
for the recovery of all appropriate refrigerants including, when applicable, 
flammable refrigerants. In addition, a set of calibrated weighing scales 
shall be available and in good working order. Hoses shall be complete 
with leak-free disconnect couplings and in good condition. Before using 
the recovery machine, check that it is in satisfactory working order, has 
been properly maintained and that any associated electrical components 
are sealed to prevent ignition in the event of a refrigerant release. Consult 
manufacturer if in doubt.
The recovered refrigerant shall be returned to the refrigerant supplier in 
the correct recovery cylinder, and the relevant waste transfer note ar-
ranged. Do not mix refrigerants in recovery units and especially not in cyl-
inders. If compressors or compressor oils are to be removed, ensure that 
they have been evacuated to an acceptable level to make certain that 
flammable refrigerant does not remain within the lubricant. The evacua-
tion process shall be carried out prior to returning the compressor to the 
suppliers. Only electric heating to the compressor body shall be employed 
to accelerate this process. When oil is drained from a system, it shall be 
carried out safely.

HWE19070.book  Page iii  Thursday, September 12, 2019  3:46 PM

Summary of Contents for City Multi PEFY-M100VMA-A

Page 1: ......

Page 2: ...t be tak en to prevent the refrigerant concentration from exceeding the safety limit even if the refrigerant should leak Consult the dealer regarding the appropriate measures to prevent the safety limit from being exceeded Should the refrigerant leak and cause the safety limit to be exceeded hazards due to lack of oxygen in the room could result When moving and reinstalling the air conditioner con...

Page 3: ...s including cigarette smoking should be kept suffi ciently far away from the site of installation repairing removing and disposal during which refrigerant can possibly be released to the sur rounding space Prior to work taking place the area around the equip ment is to be surveyed to make sure that there are no flammable hazards or ignition risks No Smoking signs shall be displayed 1 7 Ventilated ...

Page 4: ...ice that all refrigerants are recovered safely Prior to the task being carried out an oil and refrigerant sample shall be taken in case analysis is required prior to re use of reclaimed refrigerant It is essential that electrical power is available before the task is commenced a Become familiar with the equipment and its operation b Isolate system electrically c Before attempting the procedure ens...

Page 5: ...iv HWE19070 GB HWE19070 book Page iv Thursday September 12 2019 3 46 PM ...

Page 6: ...stem Diagram 1 Refrigerant system diagram 22 VII Troubleshooting 1 Troubleshooting 23 1 Check methods 23 2 DC fan motor fan motor indoor control board 27 3 Address switch setting 28 4 Voltage test points on the control board 29 5 Dipswitch setting Factory setting 30 VIII Disassembly Procedure 1 Disassembly Procedure 33 1 Control box 33 2 Thermistor Intake air 34 3 Drain pump 34 4 Drainpan 35 5 The...

Page 7: ...HWE19070 GB HWE19070 book 2 ページ 2019年9月17日 火曜日 午前9時38分 ...

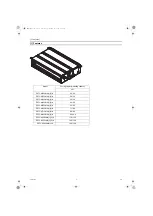
Page 8: ...FY M25VMA L 2 A 2 8 3 2 PEFY M32VMA L 2 A 3 6 4 0 PEFY M40VMA L 2 A 4 5 5 0 PEFY M50VMA L 2 A 5 6 6 3 PEFY M63VMA L 2 A 7 1 8 0 PEFY M71VMA L 2 A 8 0 9 0 PEFY M80VMA L 2 A 9 0 10 0 PEFY M100VMA L 2 A 11 2 12 5 PEFY M125VMA L 2 A 14 0 16 0 PEFY M140VMA L A 16 0 18 0 HWE19070 book Page 1 Thursday September 12 2019 3 46 PM ...

Page 9: ...HWE19070 GB II Components and Functions 1 Components and Functions 1 Indoor Main Unit 1 In case of rear inlet 2 In case of bottom inlet Air inlet Air outlet Air outlet Air inlet HWE19070 book Page 2 Thursday September 12 2019 3 46 PM ...

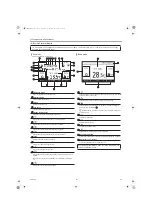
Page 10: ...inks while the remote controller is starting up or when there is an error The functions of the function buttons change depending on the screen Refer to the button function guide that appears at the bottom of the LCD for the functions they serve on a given screen When the system is centrally controlled the button function guide that corresponds to the locked button will not appear Main display Main...

Page 11: ...er function is enabled appears when the timer is disabled by the centralized control system Appears when the Weekly timer is enabled Appears while the units are operated in the energy save mode Will not appear on some models of indoor units Appears while the outdoor units are operated in the silent mode Appears when the built in thermistor on the remote controller is activated to monitor the room ...

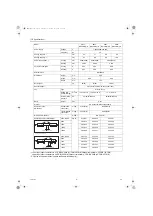
Page 12: ... 21 20 25 24 Heat exchanger Cross fin Aluminium fin and copper tube Fan Type Sirocco fan x 1 Sirocco fan x 2 Airflow rate Low Mid High m3 min 6 0 7 5 8 5 7 5 9 0 10 5 10 0 12 0 14 0 External static pressure Pa 35 50 70 100 150 Motor Output kW 0 085 0 121 Air filter PP Honeycomb fabric washable Refrigerant pipe dimensions Gas Brazed connection mm in ø12 7 ø1 2 Liquid Brazed connection mm in ø6 35 ø...

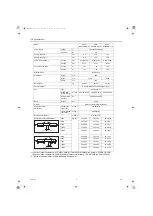
Page 13: ...luminium fin and copper tube Fan Type Sirocco fan x 2 Airflow rate Low Mid High m3 min 12 0 14 5 17 0 13 5 16 0 19 0 14 5 18 0 21 0 External static pressure Pa 35 50 70 100 150 40 50 70 100 150 Motor Output kW 0 121 Air filter PP Honeycomb fabric washable Refrigerant pipe dimensions Gas Brazed connection mm in ø12 7 ø1 2 ø15 88 ø5 8 Liquid Brazed connection mm in ø6 35 ø1 4 ø9 52 ø3 8 Drain pipe d...

Page 14: ...anger Cross fin Aluminium fin and copper tube Fan Type Sirocco fan x 3 Airflow rate Low Mid High m3 min 23 0 28 0 32 0 28 0 34 0 37 0 29 5 35 5 40 0 External static pressure Pa 40 50 70 100 150 Motor Output kW 0 300 Air filter PP Honeycomb fabric washable Refrigerant pipe dimensions Gas Brazed connection mm in ø15 88 ø5 8 Liquid Brazed connection mm in ø9 52 ø3 8 Drain pipe dimensions mm in O D 32...

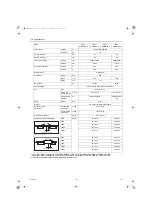
Page 15: ...kg 27 26 30 29 Heat exchanger Cross fin Aluminium fin and copper tube Fan Type Sirocco fan x 2 Airflow rate Low Mid High m3 min 13 5 16 0 19 0 14 5 18 0 21 0 External static pressure Pa 35 50 70 100 150 40 50 70 100 150 Motor Output kW 0 121 Air filter PP Honeycomb fabric washable Refrigerant pipe dimensions Gas Brazed connection mm in ø12 7 ø1 2 Liquid Brazed connection mm in ø6 35 ø1 4 Drain pip...

Page 16: ...00 Depth mm 732 Net weight 2 kg 42 41 Heat exchanger Cross fin Aluminium fin and copper tube Fan Type Sirocco fan x 3 Airflow rate Low Mid High m3 min 29 5 35 5 40 0 External static pressure Pa 40 50 70 100 150 Motor Output kW 0 300 Air filter PP Honeycomb fabric washable Refrigerant pipe dimensions Gas Brazed connection mm in ø12 7 ø1 2 ø15 88 ø5 8 Liquid Brazed connection mm in ø6 35 ø1 4 ø9 52 ...

Page 17: ...1600 Depth mm 732 Net weight 2 kg 42 41 Heat exchanger Cross fin Aluminium fin and copper tube Fan Type Sirocco fan x 3 Airflow rate Low Mid High m3 min 29 5 35 5 40 0 External static pressure Pa 40 50 70 100 150 Motor Output kW 0 300 Air filter PP Honeycomb fabric washable Refrigerant pipe dimensions Gas Brazed connection mm in ø15 88 ø5 8 Liquid Brazed connection mm in ø9 52 ø3 8 Drain pipe dime...

Page 18: ... 24L Hr Drain float switch FS Open short detection Initial contact resistance 500 mΩ or less Component Sym bol PEFY M40VMA L A PEFY M50VMA L A PEFY M63VMA L A PEFY M71VMA L A PEFY M80VMA L A Room temperature thermistor TH21 Resistance 0 C 15kΩ 10 C 9 6kΩ 20 C 6 3kΩ 25 C 5 4kΩ 30 C 4 3kΩ 40 C 3 0kΩ Liquid pipe thermistor TH22 Resistance 0 C 15kΩ 10 C 9 6kΩ 20 C 6 3kΩ 25 C 5 4kΩ 30 C 4 3kΩ 40 C 3 0k...

Page 19: ...r Drain float switch FS Open short detection Initial contact resistance 500 mΩ or less Component Sym bol PEFY M20VMA2 A PEFY M25VMA2 A PEFY M32VMA2 A PEFY M40VMA2 A Room temperature thermistor TH21 Resistance 0 C 15kΩ 10 C 9 6kΩ 20 C 6 3kΩ 25 C 5 4kΩ 30 C 4 3kΩ 40 C 3 0kΩ Liquid pipe thermistor TH22 Resistance 0 C 15kΩ 10 C 9 6kΩ 20 C 6 3kΩ 25 C 5 4kΩ 30 C 4 3kΩ 40 C 3 0kΩ Gas pipe thermistor TH23...

Page 20: ... Hr Drain float switch FS Open short detection Initial contact resistance 500 mΩ or less Component Sym bol PEFY M80VMA2 A PEFY M100VMA2 A PEFY M125VMA2 A Room temperature thermistor TH21 Resistance 0 C 15kΩ 10 C 9 6kΩ 20 C 6 3kΩ 25 C 5 4kΩ 30 C 4 3kΩ 40 C 3 0kΩ Liquid pipe thermistor TH22 Resistance 0 C 15kΩ 10 C 9 6kΩ 20 C 6 3kΩ 25 C 5 4kΩ 30 C 4 3kΩ 40 C 3 0kΩ Gas pipe thermistor TH23 Resistance...

Page 21: ...1 fan PEFY M40 50 63VWA A models have 2 fans PEFY M100 125 140VMA A models have 3 fans 4 In case of the inlet duct is used remove the air filter supply with the unit then install the filter field supply at suction side ø9 52 ø12 7 ø6 35 ø15 88 1558 1358 1500 1300 7 Model A 660 800 1200 700 754 900 954 860 9 E 11 D 1060 C 1100 B 1154 PEFY M140VMA A PEFY M100 125VMA A PEFY M71 80VMA A PEFY M40 50VMA...

Page 22: ... have 2 fans PEFY M100 125 140VMAL A models have 3 fans 4 In case of the inlet duct is used remove the air filter supply withthe unit then install the filter field supply at suction side ø9 52 ø12 7 ø6 35 ø15 88 2 Liquid pipe 1 Gas pipe 1558 1358 1500 1300 7 Model A 660 800 1200 700 754 900 954 860 9 E 11 D 1060 C 1100 B 1154 PEFY M140VMAL A PEFY M100 125VMAL A PEFY M71 80VMAL A PEFY M40 50VMAL A ...

Page 23: ... 2 fans PEFY M20 25 32VWA2 A models have 2 fans PEFY M50 63 71 80 100 125VMA A models have 3 fans 4 In case of the inlet duct is used remove the air filter supply with the unit then install the filter field supply at suction side ø9 52 ø15 88 2 Liquid pipe 1 Gas pipe 1558 1500 Model A 1200 E 11 D 1060 C 1100 B 1154 PEFY M50VMA2 A PEFY M40VMA2 A 1600 1654 1700 1560 16 1000 F G 1058 900 954 860 9 PE...

Page 24: ...of the motor fan drain pump heat exchanger and control box in one of the following ways Select an installation site for the indoor unit so that its maintenance access space will not be obstructed by beams or other objects 1 When a space of 300mm or more is available below the unit between the unit and the ceiling Fig 1 Create access door 1 and 2 450 450mm each as shown in Fig 2 Access door 2 is no...

Page 25: ...he motor fan heat exchanger and control box in one of the following ways Select an installation site for the indoor unit so that its maintenance access space will not be obstructed by beams or other objects 1 When a space of 300mm or more is available below the unit between the unit and the ceiling Fig 1 Create access door 1 and 2 450 450mm each as shown in Fig 2 Access door 2 is not required if e...

Page 26: ...maintenance inspection and replacement of the motor fan drain pump heat exchanger and control box in one of the following ways Select an installation site for the indoor unit so that its maintenance access space will not be obstructed by beams or other objects 1 When a space of 300mm or more is available below the unit between the unit and the ceiling Fig 1 Create access door 1 and 2 450 450mm eac...

Page 27: ...2 TB5 TB15 TH21 TH22 TH23 CN2A Connector 0 10V Analog input CN32 Connector Remote switch CN41 Connector HA terminal A CN51 Connector Centrally control CN52 Connector Remote indication CN90 Connector Wireless CN105 Connector IT terminal SW1 Switch for mode selection SW2 Switch for capacity code SW3 Switch for mode selection SW14 Switch BRANCH No SW21 Switch for static pressure selection SW22 Switch...

Page 28: ...V Analog input CN32 Connector Remote switch CN41 Connector HA terminal A CN51 Connector Centrally control CN52 Connector Remote indication CN90 Connector Wireless CN105 Connector IT terminal SW1 Switch for mode selection SW2 Switch for capacity code SW3 Switch for mode selection SW14 Switch BRANCH No SW21 Switch for static pressure selection SW22 Switch Wireless pair No SWE Connector emergency ope...

Page 29: ...tions E Strainer 100 mesh F Linear expansion valve G Liquid pipe thermistor TH22 H Heat exchanger I Room temperature thermistor TH21 H I F E E C G A D B Capacity PEFY M20 25 32 40 50VMA L 2 A PEFY M63 71 80 100 125 140VMA L A PEFY M63 71 80 100 125VMA2 A Gas pipe ø12 7 1 2 ø15 88 5 8 Liquid pipe ø6 35 1 4 ø9 52 3 8 HWE19070 book Page 22 Thursday September 12 2019 3 46 PM ...

Page 30: ...between terminals with a tester Refer to the next page for details Normal Abnormal 4 3kΩ 9 6kΩ Open or short Refer to the thermistor characteristic graph below Low temperature thermistor Room temperature thermistor TH21 Liquid pipe thermistor TH22 Gas pipe thermistor TH23 Drain sensor DS Thermistor R0 15 kΩ 3 Multiplier of B 3480 kΩ 2 0 C 15kΩ 10 C 9 6kΩ 20 C 6 3kΩ 25 C 5 2kΩ 30 C 4 3kΩ 40 C 3 0kΩ...

Page 31: ...order When the valve closes 1 2 3 4 1 When the valve opens 4 3 2 1 4 When the valve position remains the same all output signals will be OFF If any output signal is missing or if the signal remains ON the motor vibrates and makes clicking noise A Red G Control board C Blue H Connection CN60 D Orange I Drive circuit E Yellow J Linear expansion valve F White Phase number Output pulse 1 2 3 4 ø1 ON O...

Page 32: ...lure on the microcomputer Disconnect the connectors on the control board and connect LEDs to test the cir cuit as shown below Pulse signals are output for 10 seconds when the main power is turned on If there are LEDs that do not light up at all or remain lit after the pulses are turned off there is a problem with the driving circuit Replace the in door control board if driving circuit failure is d...

Page 33: ...ess it is causing a problem Misconnections of connectors or con tact failure Perform a visual check for disconnected connectors Perform a visual check of lead wire color Disconnect the connectors on the control board and perform a continuity test A LEV 1 Check if the drain float switch works properly 2 Check if the drain pump works and drains water properly in cooling operation 3 If no water drain...

Page 34: ...and the fuse F02 Replace the indoor controller board Wiring contact check Contact of fan motor connector CNMF Replace the drain pump Is there contact failure Wiring recovery Power supply check Remove the connector CNMF Measure the voltage in the indoor controller circuit board TEST POINT VDC between 1 and 4 of the fan connector VDC 310 340 V DC TEST POINT VCC between 5 and 4 of the fan connector V...

Page 35: ...door units to run 2 Address settings vary in different systems Refer to the section on address setting in the outdoor unit installation manual 3 Address is set with a combination of SW12 10 s digit and SW11 1 s digit To set the address to 3 set SW12 to 0 and SW11 to 3 To set the address to 25 set SW 12 to 2 and SW 11 to 5 SW22 0 1 2 3 4 5 6 7 8 9 A BCDE F 0 1 2 3 4 5 6 7 8 9 0 1 2 3 4 5 6 7 8 9 In...

Page 36: ...alized control CN41 JAMA standard HA terminal A CN44 Thermistor liquid gas temperature CN4F Float switch CN20 Thermistor Inlet temperature CNMF Fan motor output 1 4 310 340 VDC 5 4 15 VDC 6 4 0 6 5 VDC 7 4 Stop 0 or 15 VDC Run 7 5 VDC 0 15 pulse 1 VFG Voltage on the side of PC352 and C084 Same with the voltage between 7 and 4 of CNMF VCC Voltage between the C084 pins 15 VDC Same with the voltage b...

Page 37: ...w Very low 8 Fan speed at heating Thermo OFF Preset fan speed Follows the setting of SW1 7 9 Auto restart after power failure Enabled Disabled 10 Power start stop Enabled Disabled PEFY M VMA 2 A ON 1 2 3 4 5 6 7 8 9 10 PEFY M VMAL A ON 1 2 3 4 5 6 7 8 9 10 Switch position Function Switch setting ON OFF 1 Unit type Cooling only Heat pump 2 3 4 5 6 7 8 Heating 4 deg up Disabled Enabled 9 10 ON 1 2 3...

Page 38: ...e remote controller overrides the previous setting To check the latest static pressure setting check it on the remote controller not on the switch If the static pressure setting for the duct is lower than that for the unit the fan of the unit may repeat start stop and the outdoor unit may remain in a stopped state Match the static pressure settings for the unit to that for the duct Factory setting...

Page 39: ...ges to the dipswitches SW11 SW12 SW14 and SW15 must be made while the unit is stopped and the remote controller is OFF External static pressure SW21 1 SW21 2 SW21 5 Initial setting M20 M63VMA A 35 Pa M71 M140VMA A 40 Pa M20 M32VMA2 A 35 Pa M40 M125VMA2 A 40 Pa OFF OFF OFF only M20 M100VMA A M20 M40VMA2 A 50 Pa ON OFF OFF onlyM125 M140VMA A M50 125VMA2 A 70 Pa OFF ON ON 100 Pa OFF OFF ON 150 Pa ON ...

Page 40: ...ly Procedure 1 Disassembly Procedure 1 Control box Exercise caution when removing heavy parts 1 Removing the control box cover 1 Remove the three fixing screws on the cover A to re move it Fig 1 Fig 2 A HWE19070 book Page 33 Thursday September 12 2019 3 46 PM ...

Page 41: ...rding to the procedure in section 1 1 2 Remove the thermistor 1 Pull out the thermistor holder B and thermistor C on the control box Fig 3 D B C 1 Remove the control box cover according to the procedure in section 1 1 2 Remove the drain pump 1 Remove the drain pump from connector E in control box 2 Remove the cover D and the drain pump Fig 4 E HWE19070 book Page 34 Thursday September 12 2019 3 46 ...

Page 42: ...tab on the filter and pull out the filter in the direction of the arrow 1 2 Remove the fixing screws on the bottom plate F G to remove it Fig 5 2 Removing the drainpan 1 Pull out the drain pan in the direction of the arrow 2 Fig 6 Note Drain the water out of the drain pan before removing it G F 1 1 2 HWE19070 book Page 35 Thursday September 12 2019 3 46 PM ...

Page 43: ...rocedure in sec tion 1 4 2 Removing the Heat exchanger cover 1 Remove the three fixing screws on the heat exchanger cover H to remove it Fig 7 3 Removing the thermistor 1 Remove the thermistor J from the thermistor holder K on the copper tube Thermistor size Liquid pipe ø8mm Gas pipe ø6mm Fig 8 H HEX J K HWE19070 book Page 36 Thursday September 12 2019 3 46 PM ...

Page 44: ...ove it in the di rection of arrow 2 Fig 10 a Tab 3 Removing the motor cable 1 Remove the motor cable threw the rubber bush 4 Removing the fan motor and the Sirocco fan 1 Loosen either of the two rubber joint N fixing screws 2 To remove the Sirocco fans b and c of PEFY M100 125 140VMA L A PEFY M100 125VMA2 A loosen only the screw d on the bearing support P and re move the other screws on it Fig 11 ...

Page 45: ... 1 Remove the drain pan according to the procedure in section 1 4 2 Remove the heat exchanger cover according to the proce dure in section 1 5 2 3 Removing the cover 1 Remove the five fixing screws on the cover Q to remove it Fig 14 4 Removing the Heat exchanger 1 Remove the fixing screws on the heat exchanger R to re move it Fig 15 Q R HWE19070 book Page 38 Thursday September 12 2019 3 46 PM ...

Page 46: ......

Reviews: