background image

[

III

 Specfications ]

- 5 -

HWE08010

GB

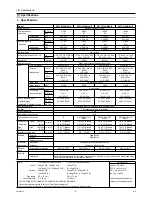
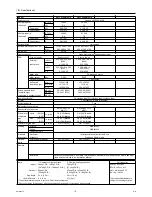
Model

PEFY-P18NMSU-E

PEFY-P24NMSU-E

Power source

1-phase  208/230V  60Hz

Cooling capacity

*1

BTU / h 

18,000 

24,000 

(Nominal)

*1

kW 5.3 

7.0 

Power input

kW 

0.09/0.09

0.12/0.12

Current input

0.74/0.70

0.98/0.93

Heating capacity

*2

BTU / h 

20,000 

27,000 

(Nominal)

*2

kW 5.9 

7.9 

Power input

kW 

0.07/0.07

0.10/0.10

Current input

0.64/0.60

0.88/0.83

External finish

Galvanized

External dimension H x W x D

in.

7-7/8 x 39 x 27-9/16

7-7/8 x 46-7/8 x 27-9/16

mm

200 x 990 x 700

200 x 1190 x 700

Net weight

lbs (kg)

54(24)

62(28)

Heat exchanger

Cross fin(Aluminium fin and copper tube)

FAN

Type x Quantity

Sirocco fan x 3

Sirocco fan x 4

External

in.WG

0.02-0.06-0.14-0.20 

(208V)

0.02-0.06-0.14-0.20 

(208V)

static press

Pa

5-15-35-50

5-15-35-50

in.WG

0.02-0.06-0.14-0.20 

(230V)

0.02-0.06-0.14-

0.20(230V)

Pa

5-15-35-50

5-15-35-50

Motor type

DC brushless motor

Motor output

kW 

0.096 

0.096 

Driving mechanism

Direct-driven

Airflow rate

cfm

353-441-529

423-565-706

(Low-Mid-High)

m3 / min

10-12.5-15

12-16-20

L / s

167-208-250

200-267-333

Sound pressure level

dB <A>

30-34-37 (208V)

30-35-40 (208V)

(Low-Mid-High)

dB <A>

30-34-37 (230V)

30-35-40 (230V)

(measured in anechoic room)

dB <A>

-

-

Insulation material

Polystyrene foam,Polyethylene foam,Urethane foam

Air filter 

PP Honeycomb fabric (washable)

Protection device 

Fuse

Refrigerant control device 

LEV

Connectable outdoor unit 

R410A,R22 CITY 

MULTI

R410A,R22 CITY 

MULTI

Diameter of

Liquid

(R410A)

in. (mm) 

1/4 (6.35) Brazed

3/8 (9.52) Brazed

refrigerant 

(R22 )

3/8 (9.52) Brazed

3/8 (9.52) Brazed

pipe

Gas

(R410A)

in. (mm)

1/2 (12.7) Brazed

5/8 (15.88) Brazed

(O.D.)

(R22 )

5/8 (15.88) Brazed

5/8 (15.88) Brazed

Diameter of drain pipe

in. (mm)  

O.D. 1-1/4(32)   

O.D. 1-1/4(32)   

Drawing

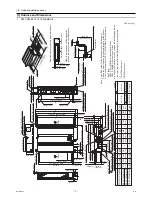
External WKB94L522

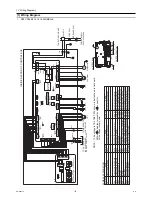
Wiring WKB94L523

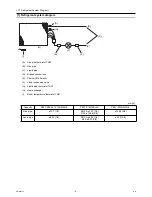
Refrigerant cycle 

-

Standard

Document 

Installation Manual, Instruction Book

attachment

Accessory 

Drain hose (flexible joint)

Optional External 

heater 

adaptor

PAC-YU25HT

PAC-YU25HT

parts

Remark

Installation

Details on foundation work, duct work, insulation work, electrical wiring, power source switch, and other 
items shall be referred to the Installation Manual.

Note :

*1 Nominal cooling conditions 

*2 Nominal heating conditions 

Unit convertor

Indoor :

80degF D.B. / 67degF W.B.

70degF D.B.

kcal/h = kW x 860 

(26.7degC D.B. / 19.4degC W.B.)

(21.1degC D.B.)

BTU/h = kW x 3,412 

Outdoor :

95degF D.B.

47degF D.B. / 43degF W.B.

cfm = m3/min x 35.31 

(35degC D.B.)

(8.3degC D.B. / 6.1degC W.B.)

lbs = kg / 0.4536

Pipe length :

25 ft. (7.6 m)

25 ft. (7.6 m)

Level difference :

0 ft. (0 m)

0 ft. (0 m)

*Above specification data is 

*The external static pressure is set to 15 Pa at factory shipment.

subject to rounding variation. 

*Due to continuing improvement, above specification may be subject to change without notice. 

Summary of Contents for City Multi PEFY-P06NMSU-E

Page 1: ...Air Conditioners TECHNICAL SERVICE MANUAL Models PEFY P06NMSU E PEFY P08NMSU E PEFY P12NMSU E PEFY P15NMSU E PEFY P18NMSU E PEFY P24NMSU E For use with R410A R22 2008 ...

Page 2: ...unit on a surface that can withstand its weight Unit installed on an unstable surface may fall and cause in jury Only use specified cables Securely connect each cable so that the terminals do not carry the weight of the cable Improperly connected cables may produce heat and start a fire Take appropriate safety measures against wind gusts and earthquakes to prevent the unit from toppling over Impro...

Page 3: ...ean and free of such contaminants as sulfur oxides dust dirt shaving particles oil and moisture Contaminants in the refrigerant piping may cause the refrig erator oil to deteriorate Store the piping materials indoors and keep both ends of the pipes sealed until immediately before brazing Keep el bows and other joints wrapped in plastic Infiltration of dust dirt or water into the refrigerant system...

Page 4: ...rform an interlocked operation do not use any other type of ca bles except this external heater adapter PAC YU25HT The use of any other type of cables may result in malfunc tions or fire Do not build a heater into the indoor unit Doing so may result in fire CAUTION Do not install in any place exposed to flammable gas leak age Flammable gases accumulated around the body of PAC YU25HT may cause an e...

Page 5: ...iv HWE08010 GB ...

Page 6: ...eration 10 2 Dry operation 11 3 Fan operation 12 4 Heat operation 13 5 Auto operation Automatic cool heat change over operation 14 6 When unit is stopped control mode 15 7 Heater control 15 VIII Troubleshooting 1 Troubleshooting 19 1 Check methods 19 2 DC fan motor fan motor indoor control board 23 3 Address switch setting 24 4 Voltage test points on the control board 25 5 Dipswitch setting Factor...

Page 7: ...HWE08010 GB ...
Page 8: ...del Cooling capacity Heating capacity BTU h kW PEFY P06NMSU E 6000 6700 1 8 2 0 PEFY P08NMSU E 8000 9000 2 3 2 6 PEFY P12NMSU E 12000 13500 3 5 4 0 PEFY P15NMSU E 15000 17000 4 4 5 0 PEFY P18NMSU E 18000 20000 5 3 5 9 PEFY P24NMSU E 24000 27000 7 0 7 9 ...

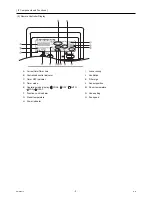
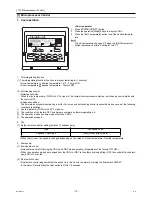
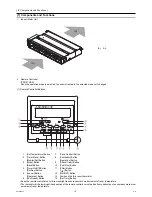
Page 9: ... temperature The thermistor at the lower right hand section of the remote controller must be free from obstructions to ensure accurate mea surement of room temperature A Air 1 Set Temperature Button 7 Vane Control Button 2 Timer Menu Button 8 Ventilation Button Monitor Set Button Operation Button 3 Mode Button 9 Check Clear Button Back Button 10 Test Run Button 4 Timer On Off Button 11 Filter Butt...

Page 10: ... time I Louver swing B Centralized control indicator J Ventilation C Timer OFF indicator K Filter sign D Timer mode L Sensor position E Operation mode display COOL DRY AUTO FAN HEAT M Room temperature F Function Lock indicator N Vane setting G Preset temperature O Fan speed H Power indicator ...

Page 11: ...8 30 33 208V Low Mid High dB A 22 24 28 230V 23 26 30 230V 23 28 35 230V 28 30 33 230V measured in anechoic room dB A Insulation material Polystyrene foam Polyethylene foam Urethane foam Air filter PP Honeycomb fabric washable Protection device Fuse Refrigerant control device LEV Connectable outdoor unit 3 R410A R22 CITY MULTI R410A R22 CITY MULTI R410A R22 CITY MULTI Diameter of Liquid R410A in m...

Page 12: ...rethane foam Air filter PP Honeycomb fabric washable Protection device Fuse Refrigerant control device LEV Connectable outdoor unit R410A R22 CITY MULTI R410A R22 CITY MULTI Diameter of Liquid R410A in mm 1 4 6 35 Brazed 3 8 9 52 Brazed refrigerant R22 3 8 9 52 Brazed 3 8 9 52 Brazed pipe Gas R410A in mm 1 2 12 7 Brazed 5 8 15 88 Brazed O D R22 5 8 15 88 Brazed 5 8 15 88 Brazed Diameter of drain p...

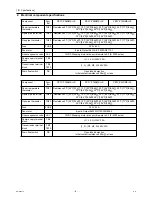
Page 13: ...mission terminal block TB5 TB15 1 2 M1 M2 S 250V 20A Drain float switch DS Open short detection Initial contact resistance 500 m or less Component Sym bol PEFY P15NMSU E PEFY P18NMSU E PEFY P24NMSU E Room temperature thermistor TH21 Resistance 0 C 32 F 15k 10 C 50 F 9 6k 20 C 68 F 6 3k 25 C 77 F 5 4k 30 C 86 F 4 3k 40 C 104 F 3 0k Liquid pipe thermistor TH22 Resistance 0 C 32 F 15k 10 C 50 F 9 6k ...

Page 14: ... 2 159 6 9 32 345 13 19 32 21 21 32 11 13 16 3 0 1 9 3 2 1 7 2 3 3 2 1 1 1 3 1 6 1 7 2 3 3 2 M o r e t h a n 3 0 0 13 16 13 32 3 9 16 5 29 32 2 25 32 4 19 32 70 10 13 32 3 15 16 1 15 16 24 5 8 4 5 0 37 1 15 32 200 7 7 8 H 20 13 16 157 5 6 7 32 20 13 16 100 3 15 16 37 1 15 32 12 1 2 12 1 2 88 3 15 32 100 3 15 16 xJ K 100 3 15 16 88 3 15 32 7 7 7 5 0 1 3 1 3 2 5 0 1 5 0 5 0 1 3 1 3 2 G 4 5 0 Less th...

Page 15: ...V 6 3A FUSE LEV Fan motor Float switch FS Connector Remote indication Connector Centrally control CN90 Connector Remote switch Connector Damper CN32 CN52 CN51 CN41 Transmission terminal bed TB15 TH21 Thermistor inlet air temp detection TH23 TH22 NAME SYMBOL SYMBOL I B A B Indoor controller board Address board Switch 1st digit address set SW2 I B SW5 A B SWB A B SWA A B SWC A B SWE I B SW3 I B SW11...

Page 16: ... Brazed connections E Strainer 100 mesh F Linear expansion valve G Liquid pipe thermistor TH22 H Heat exchanger I Room temperature thermistor TH21 H I F E E C G A D B mm in Capacity PEFY P06 08 12 15NMSU E PEFY P18NMSU E PEFY P24NMSU E Gas pipe ø12 7 1 2 R410A ø12 7 1 2 R22 ø15 88 5 8 ø15 88 5 8 Liquid pipe ø6 35 1 4 R410A ø6 35 1 4 R22 ø9 52 3 8 ø9 52 3 8 ...

Page 17: ...s Auto When Auto is set fan speed is changed depending on the value of Room temperature Desired temperature 3 Drain pump 1 Drain pump control Always drain pump ON during the COOL and DRY mode operation Regardless of the thermo ON OFF When the operation mode has changed from the COOL or DRY to the others including Stop OFF the control after the drain pump ON for 3 minutes 2 Float switch control Flo...

Page 18: ...rature button to set the desired tempera ture The set temperature changes 2 F when the Set Temperature button is pressed one time Dry 67 to 87 F Room temperature 3 min passed since starting operation Dry thermo ON time min Dry thermo OFF time min Thermo regulating signal Room temperature T1 Over 64 F ON T1 83 F 9 3 83 F T1 79 F 7 3 79 F T1 75 F 5 3 75 F T1 3 3 OFF Unconditional 3 10 Less than 64 F...

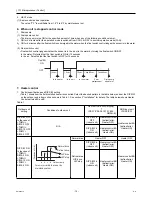
Page 19: ...in the water 2 Float switch control Float switch control judges whether the sensor is in the air or in the water by turning the float switch ON OFF In the water Detected that the float switch is ON for 15 seconds In the air Detected that the float switch is OFF for 15 seconds How to operate 1 Press POWER ON OFF button 2 Press the operation Mode button to display FAN Type Fan speed notch 3 speeds A...

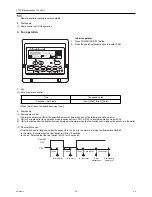
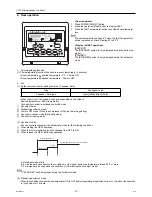
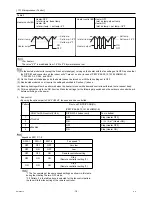
Page 20: ... A or the indoor liquid pipe temperature turned 95 F or more C 2 minutes have passed since the condition A Terminating the hot adjust mode 1 STAND BY will be displayed during the hot adjust mode 3 Preheating exclusion mode When the condition changes the auxiliary heater ON to OFF thermoregulating or operation stop etc the indoor fan operates in Low mode for 1 minute How to operate 1 Press POWER ON...

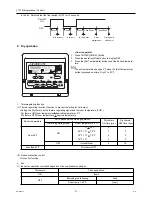
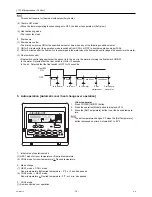
Page 21: ...is OFF for 15 seconds 5 Auto operation Automatic cool heat change over operation 1 Initial value of operation mode 1 HEAT mode for room temperature Desired temperature 2 COOL mode for room temperature Desired temperature 2 Mode change 1 HEAT mode COOL mode Room temperature Desired temperature 3 F or 3 min has passed 2 COOL mode HEAT mode Room temperature Desired temperature 3 F or 3 min has passed...

Page 22: ...pattern in the table below and set the DIP S W on the outdoor and indoor units as shown in Table 1 See section 3 Installation for details The table below shows Heater Control patterns A and B ON OFF 15sec 15sec 15sec 1min 30sec 1min 30sec Float SW In the water In the air In the water Error postponement Drain pump abnormal Table 1 Outdoor unit setting Condition of outdoor unit Duct unit PE PD PF NR...

Page 23: ...8 Table 2 Heater control A Heater OFF Inlet air temp set temp Heater ON Inlet air temp set temp 4 F Heater control B Heater OFF Inlet air temp set temp Heater ON Inlet air temp set temp 1 8 F For heater The value 4 F is modifiable from 1 8 F to 9 F by maintenance tool Pattern Duct unit PE PD PF NR NL Î PEFY P06 08 12 15 18 24NMSU E CN4Y for FAN control YU25 DIP S W3 4 Indoor unit Fan in defrost 1 ...

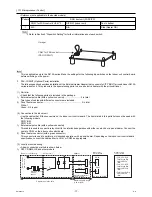
Page 24: ... is used to connect a relay circuit for an interlocked operation with either an electric or a panel heater Connect the cable to CN24 on the indoor unit control board 2 Panel heater connector with a green connector This connector is used to perform an interlocked operation with a panel heater Depending on the indoor unit control board specification connect the cable either to CN4Y or CN22 as approp...

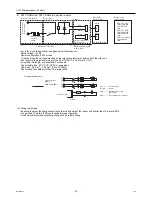
Page 25: ...er than 10 meters 32ft Longer than 10 meters 32ft could cause improper operation Use a transit relay when extending wiring such as remote wiring CN24 CN22 X X Remote control board Relay circuit Adapter Indoor unit control board Outdoor unit control board r e t a e H c i r t c e l E e c r u o s r e w o p Red 1 White 2 PUHY PURY P TGMU type Dip switch SW5 2 ON PUHY PURY P YHMU type Dip switch SW5 10...

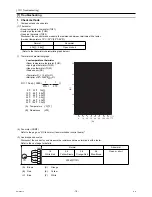
Page 26: ...e between terminals with a tester Refer to the next page for details Normal Abnormal 4 3k 9 6k Open or short Refer to the thermistor characteristic graph below Low temperature thermistor Room temperature thermistor TH21 Liquid pipe thermistor TH22 Gas pipe thermistor TH23 Drain sensor DS Thermistor R0 15 k 3 Multiplier of B 3480 k 2 0 C 32 F 15k 10 C 50 F 9 6k 20 C 68 F 6 3k 25 C 77 F 5 2k 30 C 86...

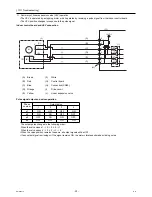
Page 27: ...hanges in the following order When the valve closes 1 2 3 4 1 When the valve opens 4 3 2 1 4 When the valve position remains the same all output signals will be OFF If any output signal is missing or if the signal remains ON the motor vibrates and makes clicking noise A Brown F White B Red G Control board C Blue H Connection CN60 D Orange I Drive circuit E Yellow J Linear expansion valve Phase num...

Page 28: ...ria Remedy Circuit failure on the microcomputer Disconnect the connectors on the control board and connect LEDs to test the cir cuit as shown below Pulse signals are output for 10 seconds when the main power is turned on If there are LEDs that do not light up at all or remain lit after the pulses are turned off there is a problem with the driving circuit Replace the in door control board if drivin...

Page 29: ...22 Normally the LEV is fully closed while the unit is in the FAN mode If the valve is leaky liquid pipe thermistor reading will be lower than normal If it is significantly lower than the inlet temperature on the remote controller valve closure failure is suspected If the amount of leakage is insignificant replacement of LEV is unnec essary unless it is causing a problem Misconnections of connector...

Page 30: ...o make a full rotation or more and measure the voltage at the test point VFG same with the voltage between fan connector 7 and 4 Is the fan motor connector CNMF fully inserted Is the voltage within the normal range Replace the motor Are 0VDC and 15VDC displayed alternately Check the power supply Measure the voltage at the indoor control board 294 340VDC same with the voltage between fan connector ...

Page 31: ...er is used On site address setting is required for the indoor units to run 2 Address settings vary in different systems Refer to the section on address setting in the outdoor unit installation manual 3 Address is set with a combination of SW12 10 s digit and SW11 1 s digit To set the address to 3 set SW12 to 0 and SW11 to 3 To set the address to 25 set SW 12 to 2 and SW 11 to 5 A Indoor unit contr...

Page 32: ... terminal A CN44 Thermistor liquid gas tempera ture CN4F Float thermistor CN24 For heater control CN20 Thermistor Inlet temperature CN3C Indoor outdoor transmission 0 24VDC CNMF Fan motor output 1 4 310 340 VDC 5 4 15 VDC 6 4 0 6 5 VDC 7 4 Stop 0 or 15 VDC Run 7 5 VDC 0 15 pulse CNP Drain up mechanism output 200VAC 1 VFG Voltage on the side of PC941 and C25 Same with the voltage between 7 and 4 of...

Page 33: ...Outdoor air intake Enabled Disabled 5 Remote display Thermo ON signal Fan output 6 Humidifier operation During heating mode During heating operation 7 Fan speed Low Very low 8 Fan speed at heating Thermo OFF Preset fan speed Follows the setting of SW1 7 9 Auto restart after power failure Enabled Disabled 10 Power start stop Enabled Disabled Factory setting Switch position Function Switch setting O...

Page 34: ... pressure 1 SWA SWC 1 Address board Note Changes that are made to the dipswitches SWA and SWC immediately become effective regardless of the unit s operation status RUN STOP or the remote controller status ON OFF 5 1 s and 10 s digits 1 SW11 SW12 Rotary switch The use of a network remote controller PAR F27MEA requires address setting 1 Address board Address settings must be made while the unit is ...

Page 35: ...ng 1 SW14 Rotary switch This switch is used when the unit connected to an R2 series of outdoor unit 1 Address board Note Changes to the dipswitches SW11 SW12 SW14 and SW15 must be made while the unit is stopped and the remote controller is OFF Factory setting ...

Page 36: ... 29 HWE08010 GB IX Disassembly Procedure 1 Disassembly Procedure 1 Control box Exercise caution when removing heavy parts 1 Removing the control box cover 1 Remove the two fixing screws on the cover A to remove it Fig 1 Fig 2 A ...

Page 37: ...tion when removing heavy parts 1 Remove the control box cover according to the procedure in section 1 2 Remove the thermistor 1 Remove the two fixing screws on the metal base B to re move it Fig 3 2 Pull out the thermistor holder C and thermistor D on the control box Fig 4 B C D ...

Page 38: ...ilter in the direction of the arrow 1 2 Remove the fixing screws on the bottom plate D E to remove it Fig 5 2 Removing the drainpan 1 Pull out the drain pan in the direction of the arrow 1 Fig 6 Note Drain the water out of the drain pan before removing it To avoid dew condensation use insulated screws in the places marked with circles in Figure 7 Fig 7 a Insulation material D a a a a E a E ...

Page 39: ... drain pan according to the procedure in sec tion 1 2 Removing the Heat exchanger cover 1 Remove the four fixing screws on the heat exchanger cov er F to remove it Fig 8 3 Removing the thermistor 1 Remove the thermistor G from the thermistor holder H on the copper tube Thermistor size Liquid pipe ø8mm Gas pipe ø6mm Fig 9 HEX F G H ...

Page 40: ...ng metal 1 Remove the two fixing screws on the punching metal K to remove it Fig 11 3 Removing the fan casing bottom half 1 Squeeze the tabs on the fan casing to remove it in the di rection of arrow 2 4 Removing the motor cable 1 Remove the motor cable threw the rubber bush 5 Removing the fan motor and the Sirocco fan 1 Remove the two motor fixing screws to remove the motor and the Sirocco fan in ...

Page 41: ...Bearing P15 P18 P24 models only Exercise caution when removing heavy parts 1 Removeing the bearing 1 Remove the two fixing screws on the bearing cover M to remove it Fig 14 2 Remove the two bearing retainer screws to remove the bearing Fig 15 M ...

Page 42: ...cording to the procedure in section 1 2 Remove the heat exchanger cover according to the proce dure in section 4 2 3 Removing the cover 1 Remove the two fixing screws on the cover T to remove it Fig 16 T Pipe support plate 4 Removing the Heat exchanger 1 Remove the fixing screws on the heat exchanger S to re move it Fig 17 T S ...

Page 43: ...Jul 2008 HWE08010 Printed in Japan New publication effective Jul 2008 Specifications subject to change without notice ...

Reviews: