background image

12

GB

9.2. Connecting remote controller, indoor 

and outdoor transmission cables

Connect indoor unit TB5 and outdoor unit TB3. (Non-polarized 2-wire)
The “S” on indoor unit TB5 is a shielding wire connection. For specifications
about the connecting cables, refer to the outdoor unit installation manual.

Install a remote controller following the manual supplied with the remote control-
ler.

Connect the “1” and “2” on indoor unit TB15 to a MA remote controller. (Non-
polarized 2-wire)

Connect the “M1” and “M2” on indoor unit TB5 to a M-NET remote controller.
(Non-polarized 2-wire)

Connect the remote controller’s transmission cable within 10 m using a 0.75 mm

2

core cable. If the distance is more than 10 m, use a 1.25 mm

2

 junction cable.

[Fig. 9.2.1] (P.4) MA Remote controller
[Fig. 9.2.2] (P.4) M-NET Remote controller

DC 9 to 13 V between 1 and 2 (MA remote controller)

DC 24 to 30 V between M1 and M2 (M-NET remote controller)

[Fig. 9.2.3] (P.5) MA Remote controller
[Fig. 9.2.4] (P.5) M-NET Remote controller

The MA remote controller and the M-NET remote controller cannot be used at
the same time or interchangeably.

Caution:

Install wiring so that it is not tight and under tension. Wiring under tension
may break, or overheat and burn.

9.3. Connecting electrical connections

Please identify the model name of the operation manual attached on the terminal box
cover with that shown on the rating name plate.

1. Remove the screw (1pc) holding the cover to dismount the cover.

[Fig. 9.3.1] (P.5)

2. Open knockout holes

(Recommend to use a screwdriver or the like for this work.)

[Fig. 9.3.2] (P.5)

3. Fix power source wiring to terminal box by using buffer bushing for tensile force.

(PG connection or the like.) Connect transmission wiring to transmission terminal
block through the knockout hole of terminal box using ordinary bushing.

[Fig. 9.3.3] (P.5)

4. Connect the power source, Earth, transmission and remote controller wiring. The

dismounting of the terminal box is not needed.

[Fig. 9.3.4] (P.5)

[Shield wire connection]

[Fig. 9.3.5] (P.5)

5. After wiring is complete, make sure again that there is no slack on the connec-

tions, and attach the cover onto the terminal box in the reverse order of removal.

Notes:

Do not pinch the cables or wires when attaching the terminal box cover.
Doing so may cause a risk of disconnection.

When accommodating the terminal box, make sure that the connectors on
the box side are not removed. If removed, it cannot operate normally.

9.4. External I/O specifications

Caution:

1. Wiring should be covered by insulation tube with supplementary insula-

tion.

2. Use relays or switches with IEC or equivalent standard.
3. The electric strength between accessible parts and control circuit should

have 2750 V or more.

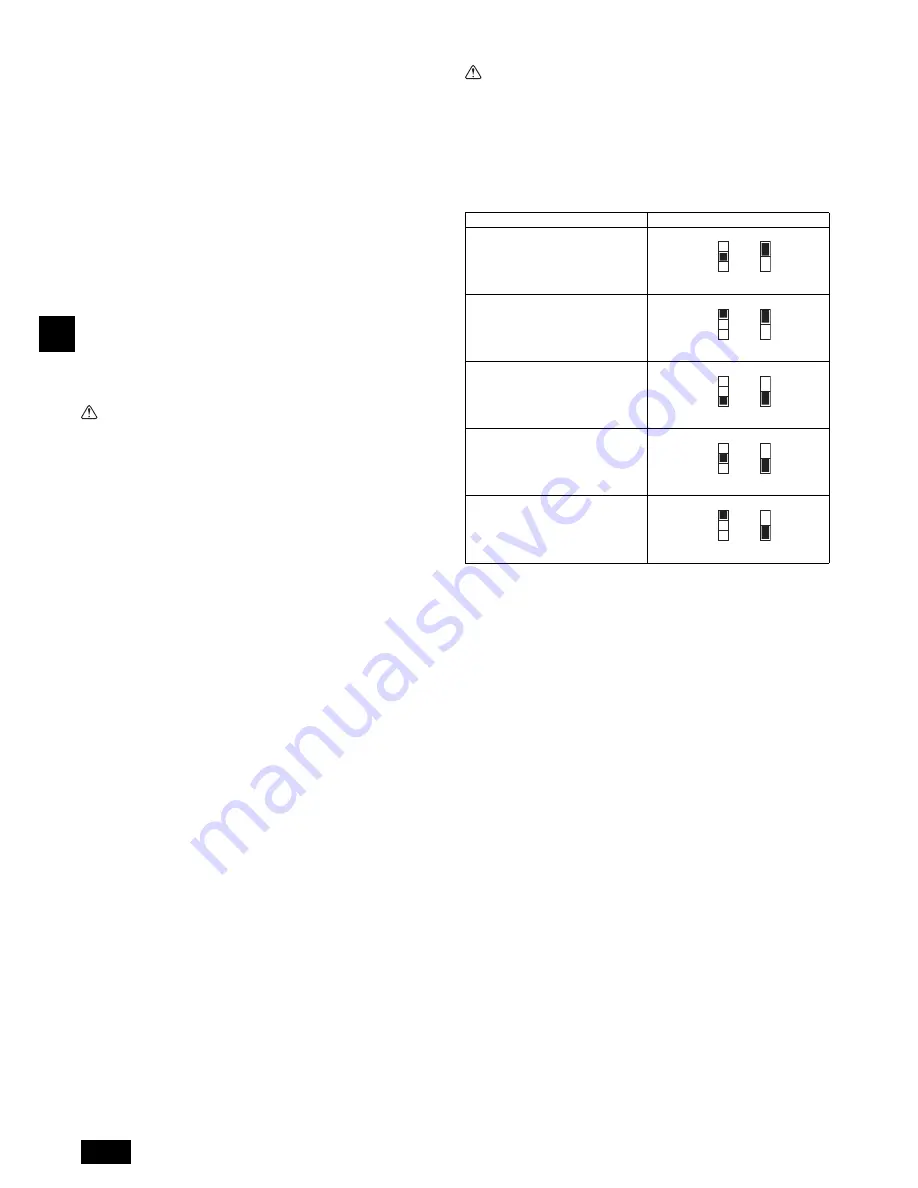
9.5.  Selecting the external static pressure

As the factory setting is for use under an external static pressure of 50 Pa, no switch
operation is needed when using under the standard condition.

[Fig. 9.5.1] (P.5)

9.6. Setting addresses

(Be sure to operate with the main power turned OFF.)

[Fig. 9.5.1] (P.5)

There are two types of rotary switch setting available: setting addresses 1 to 9
and over 10, and setting branch numbers.

The rotary switches are all set to “0” when shipped from the factory. These
switches can be used to set unit addresses and branch numbers at will.

The determination of indoor unit addresses varies with the system at site. Set
them referring to the Data Book.

9.7.  Sensing room temperature with the 

built-in sensor in a remote controller

If you want to sense room temperature with the built-in sensor in a remote controller,
set SW1-1 on the control board to “ON”. The setting of SW1-7 and SW1-8 as neces-
sary also makes it possible to adjust the air flow at a time when the heating thermom-
eter is OFF.

9.8. Changing the power voltage setting

(Be sure to operate with the main power turned OFF.)

[Fig. 9.5.1] (P.5)

Please set the switch SW5 according to the power voltage.

Set SW5 to 240V side when the power supply is 240 volts.

When the power supply is 220 and 230 volts, set SW5 to 220V side.

A

Terminal block for indoor transmission cable

B

Terminal block for outdoor transmission cable

C

Remote controller

A

Non-polarized

B

TB15

C

Remote Controller

D

TB5

A

Screw holding cover (1pc)

B

Cover

C

Terminal box

D

Knockout hole

E

Remove

F

Use PG bushing to keep the weight of the cable and external force from being applied 
to the power supply terminal connector. Use a cable tie to secure the cable.

G

Power source wiring

H

Use ordinary bushing

I

Transmission wiring

J

Terminal block for power source

K

Terminal block for indoor transmission

L

Terminal block for remote controller

A

Terminal block

B

Round terminal

C

Shield wire

D

The earth wire from two cables are connected together to the S terminal. (Dead-end 
connection)

E

Insulation tape (To keep the earth wire of the shielded cable from coming in contact 
with the transmission terminal)

External static pressure

Switch operation

35 Pa

50 Pa

70 Pa

100 Pa

150 Pa

<Indoor controller board>

<Indoor controller board>

1

How to set addresses
Example: If Address is “3”, remain SW12 (for over 10) at “0”, and match
SW11(for 1 to 9) with “3”.

2

How to set branch numbers SW14 (Series R2 only)
The branch number assigned to each indoor unit is the port number of the
HBC controller to which the indoor unit is connected.
Leave it to “0” on the non-R2 series of units.

SWA

SWC

3
2
1

1
2

SWA

SWC

3
2
1

1
2

SWA

SWC

3
2
1

1
2

SWA

SWC

3
2
1

1
2

SWA

SWC

3
2
1

1
2

02_WT06410_GB.fm  Page 12  Friday, November 25, 2011  3:59 PM

Summary of Contents for City Multi PEFY-WP20

Page 1: ...Air Conditioners INDOOR UNIT PEFY WP20 25 32 40 50VMA E GB INSTALLATION MANUAL For safe and correct use please read this installation manual thoroughly before installing the air conditioner unit ...

Page 2: ...re E Ceiling surface 4 300 mm or more F Service space viewed from the side G Service space viewed from the direction of arrow mm Model A B C D E PEFY WP20VMA E 700 754 800 660 800 PEFY WP25 32VMA E 900 954 1000 860 1000 PEFY WP40 50VMA E 1100 1154 1200 1060 1200 Y X L W A Z A Center of gravity B A A Unit body B Lifting machine C D C E D C Nuts field supply D Washers field supply E M10 hanging bolt...

Page 3: ... cm B Remove the water supply port C About 2500 cc D Water E Filling port F Screw SWE Indoor controller board F E D C B A D D D D D F D A B E 1 C A B 117 87 64 91 A Locally procured insulating material for pipes B Bind here using band or tape C Do not leave any opening D Lap margin more than 40 mm E Insulating material field supply F Unit side insulating material A To outdoor unit B End connection...

Page 4: ... distance enough to prevent short cycle A In case of rear inlet A B G C E A F D B In case of bottom inlet A B A Filter B Bottom plate C D C Nail for the bottom inlet D Nail for the rear inlet A B C C C C D C 220V A Ground fault interrupter B Local switch Wiring breaker C Indoor unit D Pull box TB5 TB15 TB5 TB15 S M1M2 S M1M2 TB3 M1M2 2 1 2 1 A A B C C Fig 9 2 1 TB5 TB5 S M1M2 S M1M2 TB3 M1M2 A A B...

Page 5: ...ower source wiring H Use ordinary bushing I Transmission wiring Fig 9 3 3 C D E C Terminal box D Knockout hole E Remove Fig 9 3 2 J L K J Terminal block for power source K Terminal block for indoor transmission L Terminal block for remote controller Fig 9 3 4 M2 S M1 A B C E D A Terminal block B Round terminal C Shield wire D The earth wire from two cables are connected together to the S terminal ...

Page 6: ...eat exchanger fins Improper handling may result in injury When handling this product always wear protective equipment EG Gloves full arm protection namely boiler suit and safety glasses Improper handling may result in injury If refrigerant gas leaks during installation work ventilate the room If the refrigerant gas comes into contact with a flame poisonous gases will be released Install the air co...

Page 7: ... may occur When water has been supplied to the water pipework purge the system of air The details of air purging can be found separately in the water circuit mainte nance manual 2 Indoor unit accessories The unit is provided with the following accessories 3 Selecting an installation site Select a site with sturdy fixed surface sufficiently durable against the weight of unit Before installing unit ...

Page 8: ...ain may be ejected Use a hard vinyl chloride pipe VP 25 with an external diameter of 32 mm for drain piping Ensure that collected pipes are 10 cm lower than the unit body s drain port Do not provide any odor trap at the drain discharge port Put the end of the drain piping in a position where no odor is generated Do not put the end of the drain piping in any drain where ionic gases are gener ated F...

Page 9: ...k purge the system of air The details of air purging can be found separately in the water circuit mainte nance manual 7 2 Water pipe insulation 1 Connect the water pipes of each indoor unit to the same correct end connection numbers as indicated on the indoor unit connection section of each HBC control ler If connected to wrong end connection numbers there will be no normal oper ation 2 List indoo...

Page 10: ...tion forming on outlet duct flanges and outlet ducts Keep the distance between the inlet grille and the fan over 850 mm If it is less than 850 mm install a safety guard not to touch the fan To avoid electrical noise interference do not run transmission lines at the bottom of the unit ATo outdoor unit BEnd connection brazing CHBC controller DIndoor unit ETwinning pipe field supply FUp to three unit...

Page 11: ...or F0 F1 Total operating maximum current of the indoor units 1 2 F2 V1 Quantity of Type1 C V1 Quantity of Type2 C V1 Quantity of Type3 C V1 Quantity of Others C C Multiple of tripping current at tripping time 0 01s Please pick up C from the tripping characteristic of the breaker Example of F2 calculation Condition PEFY VMA 3 C 8 refer to right sample chart F2 38 3 8 14 25 16 A breaker Tripping cur...

Page 12: ...andard 3 The electric strength between accessible parts and control circuit should have 2750 V or more 9 5 Selecting the external static pressure As the factory setting is for use under an external static pressure of 50 Pa no switch operation is needed when using under the standard condition Fig 9 5 1 P 5 9 6 Setting addresses Be sure to operate with the main power turned OFF Fig 9 5 1 P 5 There a...

Page 13: ...tor Output Fan motor rated output PEFY P VMA E TW Power supply IFM Volts Hz Range 10 MCA A Output kW FLA A PEFY WP20VMA E 220 240 V 50 Hz 220 240 V 60 Hz Max 264 V Min 198 V 1 18 0 085 0 95 PEFY WP25VMA E 1 43 0 085 1 14 PEFY WP32VMA E 1 54 0 085 1 23 PEFY WP40VMA E 2 47 0 121 1 98 PEFY WP50VMA E 2 47 0 121 1 98 ...

Page 14: ......

Page 15: ......

Page 16: ...ive 2006 95 EC Electromagnetic Compatibility Directive 2004 108 EC Machinery Directive 2006 42 EC Please be sure to put the contact address telephone number on this manual before handing it to the customer HEAD OFFICE TOKYO BLDG 2 7 3 MARUNOUCHI CHIYODA KU TOKYO 100 8310 JAPAN Authorized representative in EU MITSUBISHI ELECTRIC EUROPE B V HARMAN HOUSE 1 GEORGE STREET UXBRIDGE MIDDLESEX UB8 1QQ U K...

Reviews: