GB
6
5. Drainage piping work
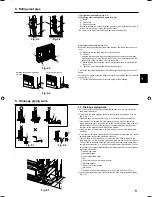
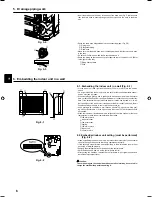
• Insert the drain hose all the way to the base of the drain pan. (Fig. 5-4) Make sure
that the drain hose is securely caught on the projection in the hole in the drain
pan.
Fig. 5-4
Fig. 5-5
• Route the drain hose diagonally below the connecting pipes. (Fig. 5-5)
A
Piping tape
B
Refrigerant piping
C
Drain hose
• Make sure that the drain hose is not routed upward and that there are no waves
in the hose.
• Do not pull the drain hose, and then wrap tape around it.
• Route the piping so that it does not project past the rear of the indoor unit. (Refer
to the figure to the left.)
D
Piping bent outward
E
Push
6. Embedding the indoor unit in a wall
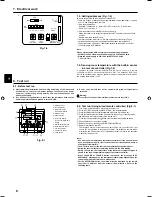
6.1. Embedding the indoor unit in a wall (Fig. 6-1)
• On the indoor unit and right and left space (100 mm or more) are the service
space.
• On a right side of the indoor unit, there is a hole for the room temperature sensor,
and do not close it, please.
• When installing a grating, use a grating with narrow upper and lower horizontal
bars so that the airflow from the upper and lower air outlets does not contact the
bars. If the horizontal bars will block the lower air outlet, use a stand, etc., to ad-
just the height of the indoor unit. If the upper or lower air outlet is blocked, the air
conditioner will not be able to cool or warm the room well.
• Use a grating with vertical bars, etc., that has at least 75% open area. If the grat-
ing has horizontal bars or if the open area is less than 75%, performance could
be reduced.
• When the indoor unit is embedded in a wall (built-in), the time it takes for the room
temperature to reach the set temperature will increase.
A
100 mm or more
B
Upper air outlet
C
Lower air outlet
D
Grating
E
100 mm or more
F
Indoor unit
G
35 mm or more
6.2. Embedded indoor unit setting (must be performed)
(Fig. 6-2)
• When embedding the indoor unit in a wall, restrict the movement of the horizontal
vane for the upper air outlet so that it only operates horizontally.
• If this setting is not performed, heat will build up in the wall and the room will not
be cooled or warmed properly.
• Remove the electrical part cover and pull out the control board.
• Set DIP switches 3-5 and 3-6 on the control board to ON.
• After setting the switches, reinstall the control board in its original position and
install the electrical part cover.
Caution:
To avoid damage to the control board due to static electricity, be sure to dis-
charge the static buildup before handling it.
Fig. 6-1
65
52
475
Fig. 6-2
ON
SW3
1 2 3 4 5 6 7 8 9 10


