GB
7
M1M2 S
TB2
TB5
L N
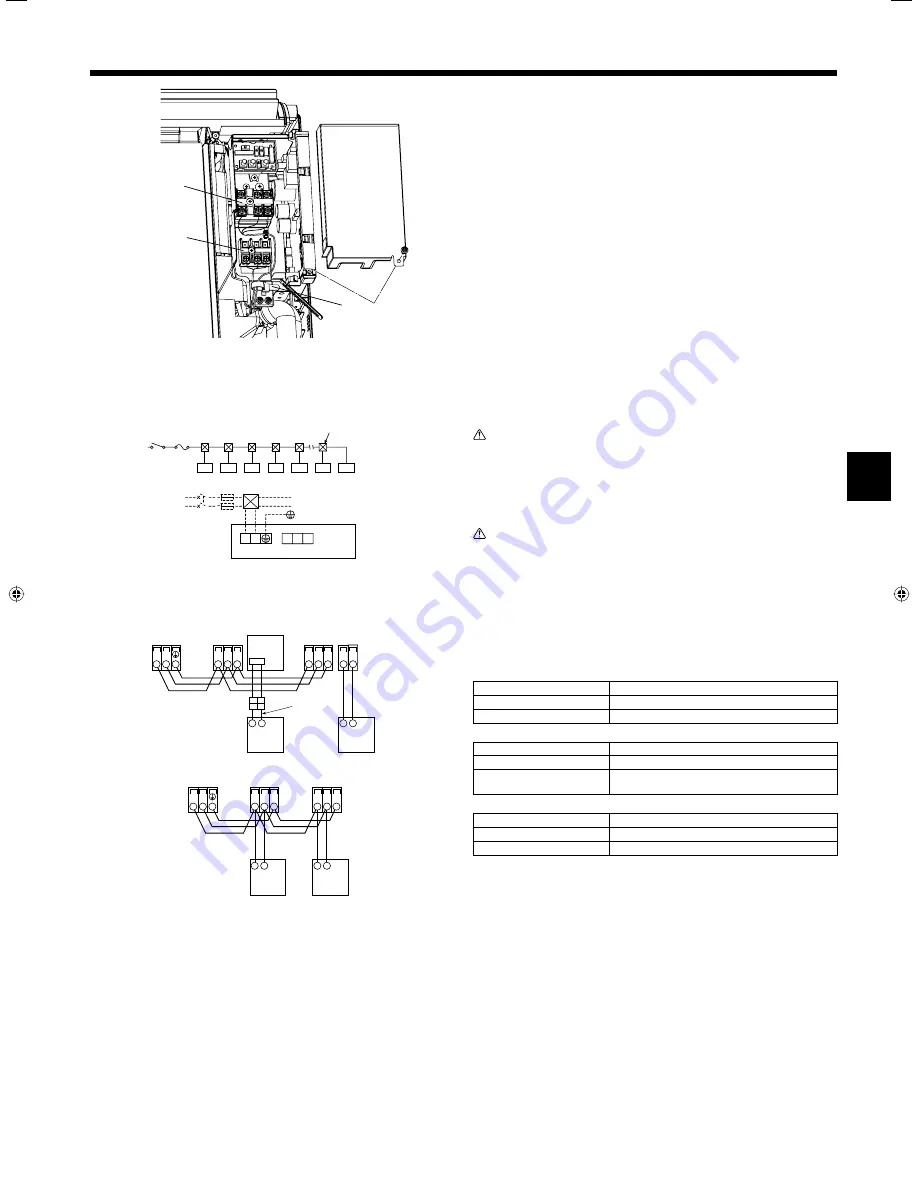
7. Electrical work
7.2. Power supply wiring
• Wiring size must comply with the applicable local and national codes.
• Install an earth line longer than other cables.
• Power supply codes of appliance shall not be lighter than design 60245 IEC 53
or 60227 IEC 53.
• A switch with at least 3 mm contact separation in each pole shall be provided by
the air conditioner installation.
Power cable size : more than 1.5mm² (3-core)
Warning:
Never splice the power cable or the indoor-outdoor connection cable, otherwise it
may result in a smoke, a fire or communication failure.
►
Use earth leakage breaker (NV).
For breaker, means shall be provided to ensure disconnection of all active phase
conductors of the supply.
[Fig. 7-2]
A
Switch 16 A
D
Total operating current be less than 16 A
B
Overcurrent protection 16 A
E
Pull box
C
Indoor unit
7.3. Types of control cables
1. Wiring transmission cables
Types of transmission cable
Shielding wire CVVS or CPEVS
Cable diameter
More than 1.25 mm²
Length
Less than 200m
2. M-NET Remote control cables
Types of remote control cable Shielding wire MVVS
Cable diameter
0.5 to 1.25 mm²
Length
Add any portion in excess of 10m to within the
longest allowable transmission cable length 200m
3. MA Remote control cables
Types of remote control cable 2-core cable (unshielded)
Cable diameter
0.3 to 1.25 mm²
Length
Less than 200m
7.4. Connecting remote controller, indoor and outdoor
transmission cables (Fig. 7-3)
• Connect indoor unit TB5 and outdoor unit TB3. (Non-polarized 2-wire)
The “S” on indoor unit TB5 is a shielding wire connection. For specifications about
the connecting cables, refer to the outdoor unit installation manual.
• Install a remote controller following the manual supplied with the remote control-
ler.
• Connect the remote controller’s transmission cable within 10 m using a 0.75 mm
2
core cable. If the distance is more than 10 m, use a 1.25 mm
2
junction cable.
1
MA Remote controller
• Connect the connector for MA remote controller. (Non-polarized 2-wire)
• DC 9 to 13 V between 1 and 2 (MA remote controller)
a
MA remote controller cable (ACCESSORY
9
)
2
M-NET Remote controller
• Connect the “M1” and “M2” on indoor unit TB5 to a M-NET remote controller. (Non
-polarized 2-wire)
• DC 24 to 30 V between M1 and M2 (M-NET remote controller)
A
Terminal block for indoor transmission cable
B
Terminal block for outdoor transmission cable
C
Remote controller
Fig. 7-2
7.1. Indoor unit (Fig. 7-1)
1
Remove the electrical cover.
• Remove 1 screw holding the electrical cover, then move the cover.
• Remove 1 screw holding the cord clamp, then move the clamp.
2
Connect the power line, control line from the outdoor unit, and remote
control lines.
After connecting, secure the wires with the cord clamp.
►
Fix power source wiring to control box using buffer bushing for tensile
force. (PG connection or the like.)
• Since the electric box may need to be pulled out for servicing or other occasions,
wires must have enough slack.
• Class 3 grounding work must be conducted (grounding wire diameter: 1.6 mm or
more)
After wiring is completed, reinstall the parts in the reverse order of removal.
Power supply terminal block (TB2)
Transmission terminal block (TB5)
Wiring clamp
Fig. 7-1
Fig. 7-3
TB5
TB5
S
M1 M2
S
M1 M2
TB3
M1 M2
/
5
1
B
T
5
B
T
5
B
T
S
M1 M2
S
M1 M2
TB3
M1 M2
CN3A
2
1
Indoor controller board
Warning:
Wiring should be done so that the power lines are not subject to tension.
Otherwise, heat may be generated or fire may occur.


