PHOTOS & ILLUSTRATIONS
OPERATION PROCEDURE
21
21
DISASSEMBLY PROCEDURE
8
PKFY-P24NKMU-E.TH PKFY-P30NKMU-E.TH
Be careful when removing heavy parts.
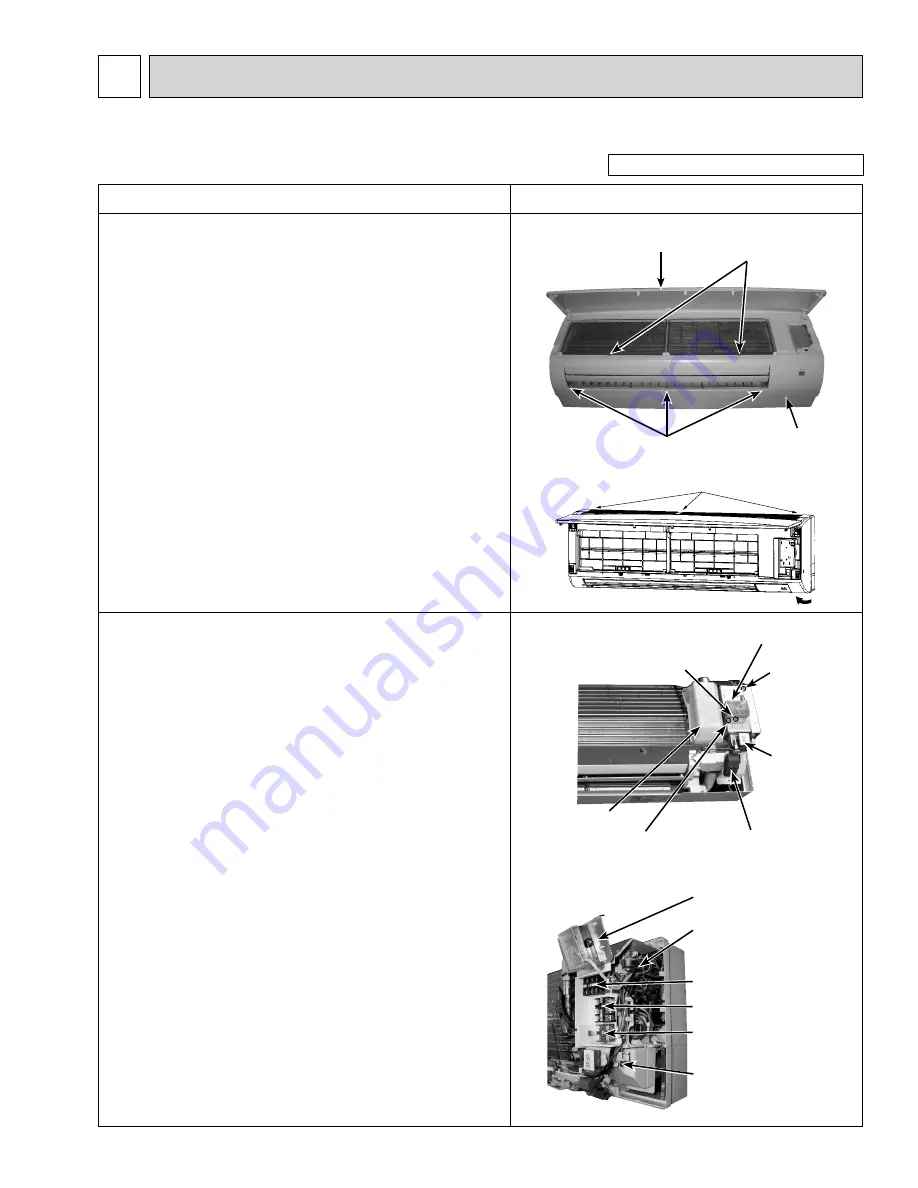
1. REMOVING THE PANEL
(1) Press and unlock the knobs on both sides of the front
grille and lift the front grille until it is level. Pull the hinges
forward to remove the front grille. (See Photo 1)
(2) Remove 3 screw caps of the panel. Remove 5 screws.
(See Photo 1)
(3) Unfix 3 hooks. (See Figure 1)
(4) Hold the lower part of both ends of the panel and pull it
slightly toward you, and then remove the panel by pushing
it upward.
(5) Remove the screw of the corner box. (See Photo 1)
Remove the corner box.
Figure 1
2. REMOVING THE ADDRESS BOARD, THE INDOOR
CONTROLLER BOARD, THE WIRELESS
CONTROLLER
BOARD
(1) Remove the panel and the corner box. (Refer to 1.)
(2) Remove the screw and hook of address board case. (See
Photo 2)
(3) Disconnect the connectors of address board.
(4) Remove the front and side electrical box covers (each 1
screw).
(5) Disconnect the connectors on the indoor controller board.
(See Photo 3)
(6) Remove the switch board holder and open the cover.
(7) Pull out the indoor controller board toward you then remove
the indoor controller board and switch board. (See Photo 3)
(8) Remove the holder of wireless remote controller board.
(9)
Disconnect the connector of wireless remote controller
board and remove the wireless remote controller board
from the holder.
Photo 2
Photo 1
Screws and screw caps
Screw of the
corner box
Front grille
Hooks
Photo 3
Screw of address board case
Water cut
Screw of
electrical box
cover (side)
Screw of electrical
box cover (Front)
Switch board
holder
Holder of wireless remote
controller board
Electrical box cover
(Front)
Indoor controller board
Terminal block (TB2)
Terminal block (TB5)
Terminal block (TB15)
Room temp. thermistor (TH21)
Hook
Screws


