background image

12

13

°F°C

°F°C

ERROR CODE

AFTER

TIMER

TIME SUN MON TUE WED THU FRI SAT

ON
OFF

Hr
AFTER

FILTER

FUNCTION

ONLY1Hr.

WEEKLY

SIMPLE

AUTO OFF

PAR-21MAA

ON/OFF 

FILTER

CHECK

OPERATION

CLEAR

TEST

TEMP.

MENU

BACK

DAY

MONITOR/SET

CLOCK

ON/OFF

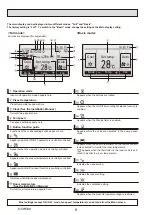
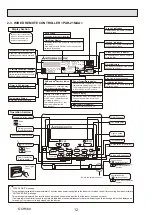
Display Section

For the purpose of explanation,
all parts of the display are shown.

During actual operation, only

the relevant items will be lit.

Identifies the current operation

 Shows the operating mode, etc.

*Multilanguage display is available.

“Centrally Controlled” indicator

Indicates that operation from the 

remote controller has been prohib-

ited by a master controller.

“Timer is Off” indicator

Indicates that the timer is off.

Temperature Setting

Shows the target temperature.

Day-of-Week

Shows the current day of the week.

Time/Timer Display

Shows the current time, unless the simple or Auto Off

timer is set.

If the simple or Auto Off timer is set, the time to be 

switched off is shown.

“Sensor” indication

Displays when the remote controller

sensor is used.

“Locked” indicator

Indicates that remote controller but-

tons have been locked.

“Clean The Filter” indicator

To be displayed on when it is time to 

clean the filter.

Timer indicators

The indicator comes on if the corre-

sponding timer is set.

Up/Down Air Direction indica-

tor

The indicator      shows the direc-

tion of the outcoming airflow.

“One Hour Only” indicator

Room Temperature display

Shows the room temperature. The room

temperature display range is 8 – 39

:

.

The display blinks if the temperature

is less than 8

:

 or 39

:

 or more.

Louver display

Indicates the action of the swing louver.

Does not appear if the louver is not

running.

 (Power On indicator)

Indicates that the power is on.

Fan Speed indicator

Shows the selected fan speed.

Ventilation indicator

Appears when the unit is running in

Ventilation mode.

Operation Section

Temperature setting buttons

Down
Up

Timer Menu button

(Monitor/Set button)

Mode button (Return button)

Set Time buttons

Back

Ahead

Timer On/Off button

(Set Day button)

Opening the

cover

ON/OFF button

Fan Speed button

Filter      button

(<Enter> button)

Test Run button

Check button (Clear button)

Airflow Up/Down button

Louver button

(      Operation button)

To return operation

number

Ventilation button

(     Operation button)

To go to next operation

number

Note:

“PLEASE WAIT” message

This message is displayed for approximately 3 minutes when power is supplied to the indoor unit or when the unit is recovering from a power failure.

“NOT AVAILABLE” message

This message is displayed if an invalid button is pressed (to operate a function that the indoor unit does not have).

If a single remote controller is used to operate multiple indoor units simultaneously that are different types, this message will not be displayed as

far as any of the indoor units is equipped with the function.

Built-in temperature sensor

Displays if the airflow is set to

low or downward during COOL

or DRY mode. (Operation varies

according to model.)

The indicator goes off in 1 hour,

when the airflow direction 

also changes.

2-3. WIRED


REMOTE CONTROLLER <PAR-21MAA>

OCH569

Summary of Contents for City Multi PLFY-P15VCM-E3

Page 1: ... FLOW SYSTEM 16 5 OUTLINES AND DIMENSIONS 18 6 WIRING DIAGRAM 19 7 REFRIGERANT SYSTEM DIAGRAM 20 8 TROUBLESHOOTING 21 9 DISASSEMBLY PROCEDURE 29 SPLIT TYPE HEAT PUMP AIR CONDITIONERS Model name indication No OCH569 PLFY P15VCM E3 PLFY P20VCM E3 PLFY P25VCM E3 PLFY P32VCM E3 PLFY P40VCM E3 June 2014 Note This manual describes service data of the indoor units only RoHS compliant products have G mark...

Page 2: ...gerant may cause the lubricant deterioration Use a vacuum pump with a reverse flow check valve The vacuum pump oil may flow back into the refrigerant cycle and cause the lubricant deterioration If dust dirt or water enters the refrigerant cycle deterioration of the oil and compressor trouble may result Store the piping indoors and both ends of the piping sealed until just before brazing Leave elbo...

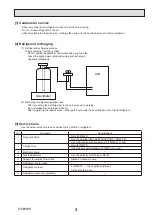
Page 3: ...igerant Gravimeter Unit 1 Cautions for service After recovering the all refrigerant in the unit proceed to working Do not release refrigerant in the air After completing the repair service recharge the cycle with the specified amount of liquid refrigerant No Tool name Specifications 1 Gauge manifold Only for R407C Use the existing fitting SPECIFICATIONS UNF7 16 Use high tension side pressure of 3 ...

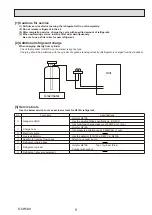
Page 4: ...efrigerant cycle that can cause deterioration of refrigerant oil or malfunction of com pressor If large amount of mineral oil enters that can cause deterio ration of refrigerant oil etc Do not use the existing refrigerant piping The old refrigerant and lubricant in the existing piping contains a large amount of chlorine which may cause the lubricant deterioration of the new unit Use low residual o...

Page 5: ...the cylinder of syphon standing vertically Refrigerant is charged from liquid phase Gravimeter Unit 3 Service tools Use the below service tools as exclusive tools for R410A refrigerant No Tool name Specifications 1 Gauge manifold Only for R410A Use the existing fitting specifications UNF1 2 Use high tension side pressure of 5 3MPa G or over 2 Charge hose Only for R410A Use pressure performance of ...

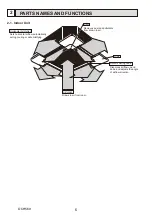
Page 6: ...he angle of airflow direction Grille Filter Removes dust and pollutants from drawn in air Horizontal Air Outlet Sets horizontal airflow automatically during cooling or dehumidifying Air Intake Draws in air from room 2 PARTS NAMES AND FUNCTIONS 2 1 Indoor Unit OCH569 ...

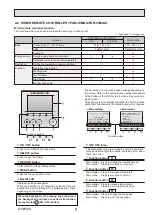
Page 7: ... error ON OFF lamp Main display Press to change the operation mode Main menu Press to move the cursor down Function button F1 Main display Press to decrease temperature Main menu Press to move the cursor up Function button F2 Main display Press to increase temperature Main menu Press to go to the previous page Function button F3 Main display Press to change the fan speed Main menu Press to go to t...

Page 8: ...Button function guide Appears when the ON OFF operation is centrally controlled Appears when the operation mode is centrally controlled Appears when the preset temperature is centrally controlled Appears when the filter reset function is centrally controlled Indicates when filter needs maintenance Current room temperature appears here Room temperature See the Installation Manual Appears when the b...

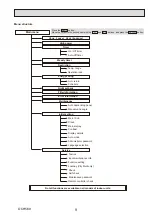
Page 9: ... power Weekly timer Restriction Maintenance Initial setting On Off timer Auto Off timer Temp range Operation lock Manual vane angle Main Sub Timer Main display Contrast Display details Auto mode Administrator password Language selection Service Input maintenance info Function setting Lossnay City Multi only Check Self check Maintenance password Remote controller check Test run Clock Auto descendin...

Page 10: ...m 30 and 120 in 10 minute increments This function will not be valid when the preset temperature ranges are restricted Schedule Set the start stop times to operate the units in the energy save mode for each day of the week and set the energy saving rate Up to four energy save operation patterns can be set for each day Time can be set in 5 minute increments Energy saving rate can be set to a value ...

Page 11: ...s setting is required only when the operation of City Multi units is interlocked with LOSSNAY units Check Error history Display the error history and execute delete error history Refrigerant leak check Refrigerant leaks can be judged Smooth maintenance The indoor and outdoor maintenance data can be displayed Request cord Details of the operation data including each thermistor temperature and error...

Page 12: ...ture display range is 8 39 The display blinks if the temperature is less than 8 or 39 or more Louver display Indicates the action of the swing louver Does not appear if the louver is not running Power On indicator Indicates that the power is on Fan Speed indicator Shows the selected fan speed Ventilation indicator Appears when the unit is running in Ventilation mode Operation Section Temperature s...

Page 13: ...urrent time display Displays the order of timer operation display Displays whether timer is on or off In case the outdoor unit is cool only type the heating and auto mode are not available Buttons used to set the hour and minute of the current time and timer settings h and min buttons display display FAN SPEED display indicates which fan speed has been selected display The vertical direction of ai...

Page 14: ...ion manual Instruction book Drain hose I D 32mm 1 1 4 Wireless junction cable Decoration panel SLP 2AAW or SLP 2ALW PLFY P VCM E3 should use together with Decoration panel 2 2 1 900 7 500 2 000 0 04 0 31 2 5 2 200 8 500 0 02 0 20 208 570 570 8 1 4 22 1 2 22 1 2 15 33 SLP 2AAW or SLP 2ALW 20 650 650 13 16 25 5 8 25 5 8 3 7 0 015 8 9 10 133 150 167 283 318 353 28 31 35 ø6 35 ø1 4 Flare ø12 7 ø1 2 Fl...

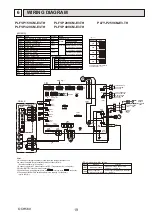
Page 15: ...Thermistor Pipe temperature detection Gas Fuse Indoor controller board Fan motor Electric heater Condensation proof Power supply terminal block Transmission terminal block MA remote controller terminal block OUTPUT 50 W MSBPC20M13 DC12V 300 phase PLD 12230ME 1 INPUT 12 10 8W 24R Hr Thermistor resistance 0 6k 10 3 9k 20 2 6k 25 2 2k 30 1 8k 40 1 3k DC12V Stepping motor drive Port dimension 5 2 0 20...

Page 16: ...pressure at air condi tioner inlet with air flow amount Q Pa C Static pressure of booster fan with air flow amount Q Pa D Static pressure loss increase amount of fresh air intake duct sys tem for air flow amount Q Pa E Static pressure of indoor unit with air flow amount Q Pa Qa Estimated amount of fresh air intake without D m3 min Multiple remote controller adapter PAC SA88HA E Indoor controller b...

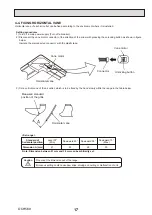
Page 17: ...e plastic tape Vane motor Horizontal vane Connector Unlocking button Vane motor 3 Set a vertical vane of the air outlet which is to be fixed by the hand slowly within the range in the table below Measured standard position of the grille Horizontal vane Standard of horizontal position Dimension A mm 21 25 28 30 Level 30 Min Downward 45 Downward 55 Downward 70 Max Note Dimension between 21 mm and 30...

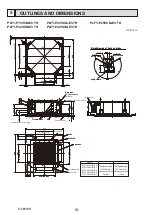
Page 18: ...Air intake hole Air outlet hole 301 Detail drawing of fresh air intake Ceiling surface Cut out hole Burring hole 118 25 377 377 650 182 48 Terminal block 235 208 27 5 193 20 93 66 121 87 31 15 37 570 335 199 352 335 570 Grille Drain pipe Drain hole 55 35 35 55 Auto vane Grille Air intake hole Air outlet hole 301 Detail drawing of fresh air intake Ceiling surface Cut out hole Burring hole 118 25 37...

Page 19: ...s in the capacity For the detail refer to the fig 1 Mark Meaning Function Power supply for MA Remote controller Main power supply Indoor unit Power on Iamp is lit LED on indoor board for service LED1 Main power supply Power supply for MA Remote controller on Iamp is lit LED2 MODELS P20 SW2 123456 ON OFF P15 123456 ON OFF P25 123456 ON OFF P32 123456 ON OFF P40 123456 ON OFF LED1 12345 SW4 ON OFF 1...

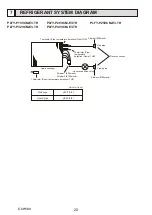
Page 20: ...rmistor Room temparature detection TH21 Thermistor Pipe temperature detection Gas TH23 Thermistor Pipe temperature detection Liquid TH22 Linear expansion valve Gas pipe Liquid pipe Flare connection Gas pipe Liquid pipe 12 7 1 2 6 35 1 4 PLFY P15VCM E3 TH PLFY P20VCM E3 TH PLFY P25VCM E3 TH PLFY P32VCM E3 TH PLFY P40VCM E3 TH OCH569 ...

Page 21: ...pe temperature thermistor trouble TH22 Suction pipe temperature thermistor TH6 open short Check delay code 1211 5103 Gas pipe temperature thermistor trouble TH23 5105 Outdoor liquid pipe temperature thermistor TH3 open short Check delay code 1205 5106 Ambient thermistor TH7 open short Check delay code 1221 5109 HIC pipe temperature thermistor TH2 open short Check delay code 1222 5110 Heat Sink tem...

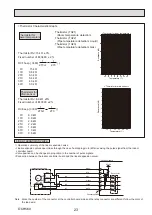
Page 22: ...LEV Drain pump DP Drain sensor DS Refer to the next page for the details Refer to Thermistor characteristic graph Thermistor TH21 Room temperature detection Thermistor TH22 Pipe temperature detection Liqid Thermistor TH23 Pipe temperature detection Gas 1 3 Yellow Relay connector Yellow 1 2 3 Normal 4 3 to 9 6 k Abnormal Open or short Abnormal Open or short Normal 0 6 to 6 0k Abnormal Open or short...

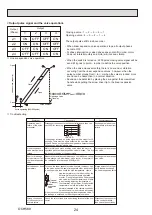
Page 23: ... DC12V Brown Red Blue Orange Yellow White M 4 6 2 3 5 1 Blue Brown Yellow Orange Red White Linear expansion valve 1 Operation summary of the linear expansion valve Linear expansion valves open close through the use of a stepping motor after receiving the pulse signal from the indoor controller board Valve position can be changed in proportion to the number of pulse signals Connection between the i...

Page 24: ...light while the signals are output or keeps lighting even after the signals stop Countermeasures Exchange the indoor con troller board at drive circuit failure Linear expansion valve mechanism is locked Valve does not close completely Wrong connection of the connector or contact failure To check the linear expansion valve operate the indoor unit in fan mode and at the same time operate other indoo...

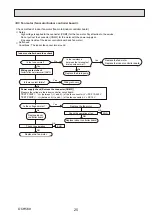
Page 25: ...ove the connector CNMF Measure the voltage in the indoor controller circuit board TEST POINT 1 VDC between 1 and 4 of the fan connector VDC DC 310 340 V TEST POINT 2 VCC between 5 and 4 of the fan connector VCC DC 15 V Wiring recovery Replace the drain pump Replace indoor controller board Replace the fan motor Replace indoor controller board Replace the fan motor Is the voltage normal Is there con...

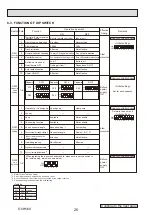
Page 26: ...emperature 3 Heat pump Not available Not available First setting Down A B C D Not effective Effective 1 2 3 4 5 6 7 8 9 10 1 2 3 4 5 6 7 8 9 10 SW2 Capacity code setting 1 6 1 5 SW3 Function setting Thermistor Room temperature detection position Initial setting ON OFF 1 2 3 4 5 6 7 8 9 10 Indoor controller board Indoor controller board Initial setting Set while the unit is off Set for each capacit...

Page 27: ...OUVER TEST RUN AUTO STOP AUTO START h min RESET SET CLOCK MODEL SELECT Model No Temperature button SET button Pair No Minute button To operate each indoor unit by each remote controller when installed 2 indoor units or more are near Pair No setting is necessary Pair No setting is available with the 4 patterns Setting patterns A to D Make setting for J41 J42 of indoor controller board and the Pair ...

Page 28: ... 12VDC 1 When only demand input is used 1 5 Demand input ON OFF input 1 CN6V Vane motor output MV CN32 Connector Remote switch CN25 Connecter Humidifier CN27 Connector Damper 12VDC 1 SW14 Branch No CN90 Connect to the wireless junction cable SW1 Model selection Jumper wire J41 J42 Pair No setting for wireless remote controller CN51 Centrally control 1 2 Control signal 12VDC pulse input 1 3 4 Opera...

Page 29: ...ntake grille knob 3 Removing the panel 1 Remove the air intake grille Refer to procedure 1 Corner panel See Figure 2 2 Remove the screw of the corner 3 Slide the corner panel to the direction of the arrow 3 and remove the corner panel Panel See Photo 2 2 Disconnect the connector that connects with the unit 3 Remove the 2 screws from the panel and loose other 2 screws fixed to the oval hole have di...

Page 30: ... of the FAN from the indoor con troller board 6 Remove the 3 screws fixed to the piping cover and remove the piping cover See Photo 9 7 Remove the 6 screws fixed to the flat plate and remove the flat plate 8 Disconnect the lead wires to the direction of the fan motor and remove the 3 nuts of the fan motor Photo 5 6 Removing the drain pan 1 Remove the panel Refer to procedure 3 2 Remove the room te...

Page 31: ... See Photo 9 from the heat exchanger and remove the heat exchanger 9 Removing the drain pump DP and drain sensor DS 1 Remove the panel Refer to procedure 3 2 Remove the drain pan Refer to procedure 6 3 Remove the 2 screws fixed to the control box cover and remove the control box cover 4 Remove the connectors of the CNP and the CN31 from the indoor controller board 5 Remove the 1 screw fixed to the...

Page 32: ...LECTRIC CORPORATION Distributed in Jun 2014 No OCH569 Made in Japan New publication effective Jun 2014 Specifications are subject to change without notice HEAD OFFICE TOKYO BLDG 2 7 3 MARUNOUCHI CHIYODA KU TOKYO 100 8310 JAPAN TM ...

Reviews: