••••••••••••••••••••••••••••••••••••••••••••••••••••••••••••••••••••••••••••••••••••••••••••••••••••••••••••••••••••••••••••••••••••••••••••••••
10
Flowchart
■
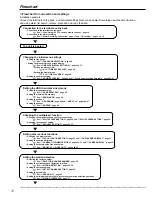
Flowchart for connection and settings
Installation example :
Connect the terminals on the back ; and set initial settings. Next, make an alarm recording using the timer function,
and using alarm list search, retrieve, playback, and copy the data.
Connection to the terminals on the back
• Connection to the terminals on the back.
See “
■
Connecting to CCTV camera, monitor, sensor”, page 16.
• Connection to the alarm recording.
See “
■
Alarm Recording Connection”, page 17 and “
■
Rear View” , pages 14, 15.
The unit is booted
Changing the initial menu settings
• Setting the language.
See “
■
LANGUAGE SELECTION”, page 24.
• Setting the present time and screen display.
See “<TIME DATE/DISPLAY SETTINGS>”, pages 30, 31.
• Setting the present time.
See “
♦
TIME DATE ADJUST”, page 20.
• Setting the display mode.
See “
■
DISPLAY MODE”, page 30.
• Setting the audio recording.
See “
■
AUDIO RECORDING”, page 44 and “
■
Continuous recording time table”, pages 66, 67.
Setting the HDD (hard disk drive) mode
• Setting the repeat recording.
See “
■
HDD REPEAT REC”, page 43.
• Setting the remain HDD capacity.
See “
■
REMAIN HDD”, page 46.
• Setting the call out.
See “• HDD REMAIN”, page 46 and “• HDD FULL”, pages 46, 47.
• Setting the buzzer.
See “
■
BUZZER”, page 45.
Changing the multiplexer function
• Changing the split4 screen and split9 screen settings.
See “
■
SPLIT4 SCREEN SETTING”, page 34 and “
■
SPLIT9 SCREEN SETTING”, page 34.
• Changing the sequence setting.
See “
■
SEQUENCE SETTING”, pages 34, 35.
Setting other various functions
• Changing the display mode.
See “
■
CLOCK LOCATION SETTING”, page 30 and “
■
DUPLEX MODE DISPLAY”, page 31.
• Setting the camera title/memo.
See “
■
CAMERA TITLE/MEMO SETTING”, pages 30, 31 and “
■
CAMERA DISPLAY”, page 30.
• Setting to output signals of the unit status.
See “
♦
MODE OUT 1 - MODE OUT 4”, pages 44, 45.
Setting the motion detection
• Selecting the camera number.
See “
■
SELECTION CAMERA NUMBER”, page 35.
• Setting the active/inactive of detection function.
See “
■
MOTION DETECTION”, pages 35, 36.
• Setting the detection areas.
See “
■
DETECTION MASK SETTING”, page 36.
• Setting the sensitivity.
See “
■
SENSITIVITY”, page 36.
• Setting the minimum number of dots for starting the motion detection operation.
See “
■
MOTION THRESHOLD”, page 37.
Summary of Contents for DX-TL900U
Page 75: ...75 Specifications ...
Page 76: ...872C276A8 PRINTED IN MALAYSIA ...


