Graphic Operation Terminal GOT-F900
Alarm Mode 12
12-9
12.3.2
Alarm list
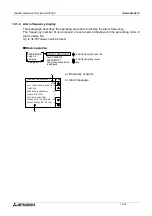
This paragraph describes the operating procedure to display the alarm list.
In alarm status, devices with ON status are displayed together with corresponding alarm
messages. Alarms can be confirmed (using the ACK key) and alarm devices reset.
The alarm list is displayed in ascending order of alarm device No.
u
u
u
u
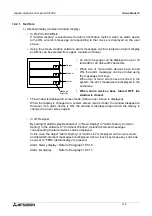
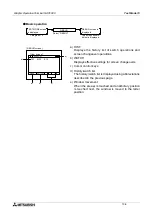
Basic operation
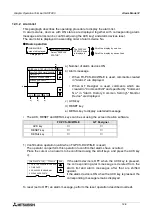
a) Number of alarm devices ON
b) Alarm message
•
When FX-PCS-DU/WIN-E is used, comments created
in "Alarms" are displayed.
•
When GT Designer is used, comments which are
created in "Comment Edit" and specified by "Comment
No." in "Alarm History Common Setting"-"Monitor
Device" are displayed.
c) ACK key
d) RESET key
e) DETAIL key to display a detailed message
•
The ACK, RESET and DETAIL keys can be set using the screen creation software.
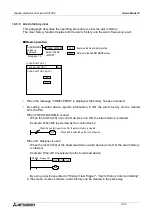
1) Confirmation operation (valid when FX-PCS-DU/WIN-E is used)
The operator can perform this operation to confirm that alarms have occurred.
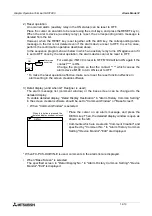
Place the cursor on an alarm to be confirmed using the scroll keys, and press the ACK key
c).
If the alarm device is OFF when the ACK key is pressed,
the corresponding alarm message is deleted from the
alar m list and alarm messages after that are shifted
upward.
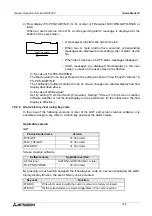
If the alarm device is ON when the ACK key is pressed, the
corresponding message remains displayed.
To reset (set to OFF) an alarm message, perform the reset operation described overleaf.
FX-PCS-DU/WIN-E
GT Designer
ACK key
✔
✘
RESET key
✔
✔
DETAIL key
✔
✔
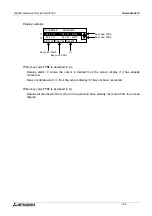
: Scroll the display by one line.
: Scroll the display by seven lines.
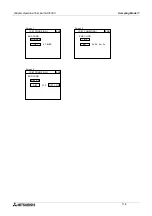
ALARM MODE
screen is displayed.
DISPLAY STATUS
Paragraph 7.3
Select "DISPLAY
STATUS".
The DISPLAY
STATUS screen
is displayed.
[ DISPLAY STATUS ] TOTAL=4 END
CALL THE PERSON IN CHARGE
PLEASE ADD PARTS
TIME OVER
PRESSURE IS ABNORMAL
b)
ACK
DETAIL
RESET
c)
d)
e)
a)
[ DISPLAY STATUS ] TOTAL=4
END
CALL THE PERSON IN CHARGE
PLEASE ADD PARTS
TIME OVER
PRESSURE IS ABNORMAL
1
6
2
5
Summary of Contents for F930GOT-BWD
Page 1: ...OPERATION MANUAL GOT F900 ...
Page 4: ...Graphic Operation Terminal GOT F900 ii ...
Page 6: ...Graphic Operation Terminal GOT F900 iv ...
Page 14: ...Graphic Operation Terminal GOT F900 Contents xii ...
Page 16: ...Graphic Operation Terminal GOT F900 Manual configuration and various data 2 MEMO ...
Page 30: ...Graphic Operation Terminal GOT F900 Introduction 1 1 14 MEMO ...
Page 34: ...Graphic Operation Terminal GOT F900 Outside dimensions 3 3 2 MEMO ...
Page 38: ...Graphic Operation Terminal GOT F900 Part names 4 4 4 MEMO ...
Page 42: ...Graphic Operation Terminal GOT F900 Installation 5 5 4 MEMO ...
Page 90: ...Graphic Operation Terminal GOT F900 Creation of Display Screens 8 8 32 MEMO ...
Page 154: ...Graphic Operation Terminal GOT F900 Alarm Mode 12 12 14 MEMO ...
Page 164: ...Graphic Operation Terminal GOT F900 Test Mode 13 13 10 MEMO ...
Page 174: ...Graphic Operation Terminal GOT F900 Connection to Bar Code Reader 15 15 2 MEMO ...
Page 180: ...Graphic Operation Terminal GOT F900 Screen Hard Copy Function 16 16 6 MEMO ...
Page 320: ...Graphic Operation Terminal GOT F900 Creation of Display Screen GT Designer 20 20 46 MEMO ...
Page 341: ......


