−
5
−
54
169
A
B
437
40
10
60
143
7
R3.5
140
40
160
Installation conditions
■
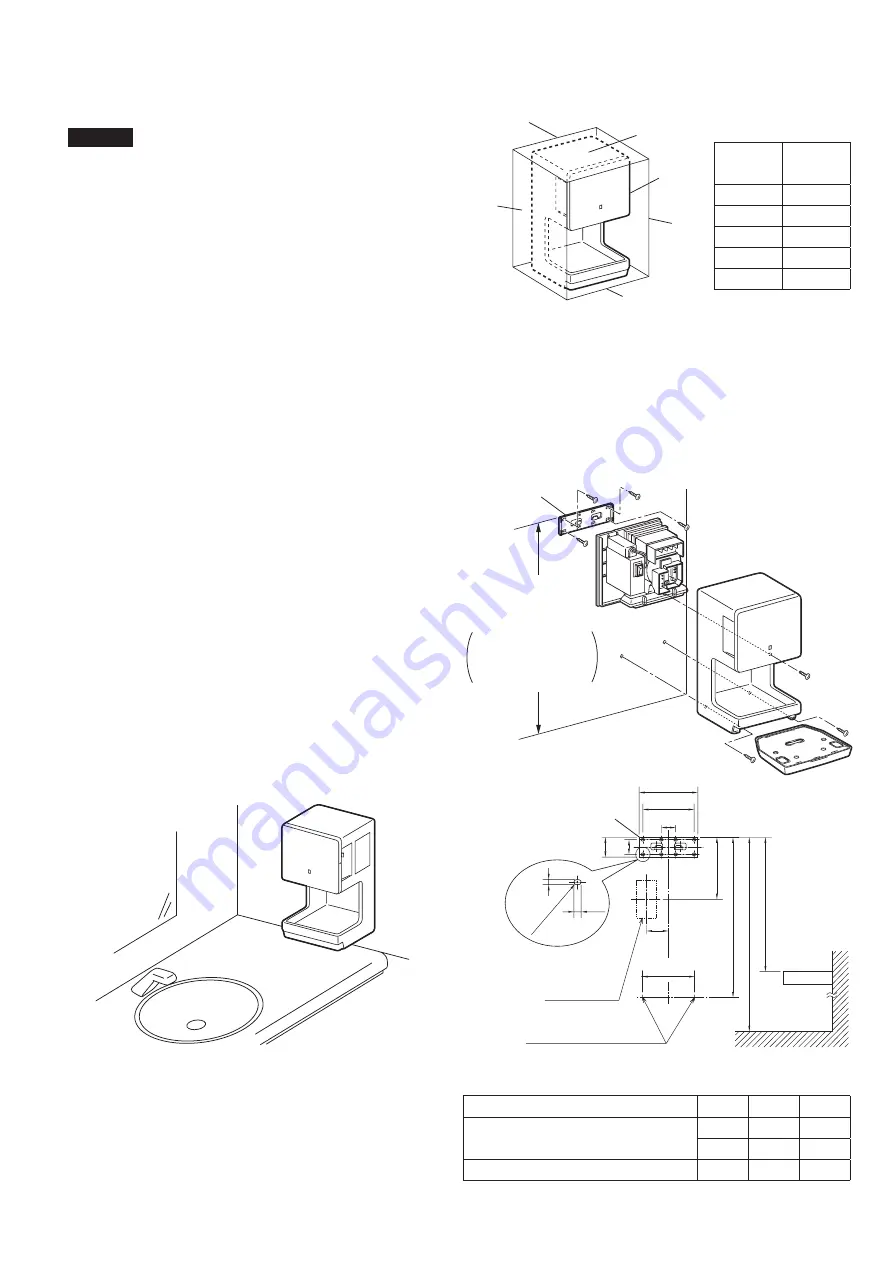
Required space for installation
Caution
Be sure to secure at least the
distances listed in the right-
hand table from walls, fl ammable
(combustible) materials and so
on.
■
Suitable walls
When installing on a wall, select a wall with a fl at
and even surface.
When installing on a concrete wall, use commercially
available metal screw plugs.
Reinforce any walls made with materials other than
concrete before installation.
■
Making the unit easier to use
Refer to the "Installation position guide" and
"Installation diagram" while installing the unit in order
to make it easier to use.
If it is installed at a low position, it may become wet
when the sink is being washed. If water enters the
unit, it may cause damage or cause the acoustic
materials to absorb water and allow bacteria to grow.
Do not install the main unit in locations such as
those near mirrors or walls. This may lead to water
drops fl ying to undesirable areas during the drying
of the hands.
Do not install the main unit in locations such as
those near food or eating utensils. This may lead to
water drops fl ying to undesirable areas during the
drying of the hands.
Avoid locations where people or doors might bump
into the unit.
※
When installed above a sink
Rear side
Top side
Left side
Main
unit
Right
side
Bottom side
Unit (mm)
Location
Isolation
distance
Above
150
Left
100
Right
150
Front
Open
Below
50
■
Installation position guide
Installation
panel
Guide from fl oor to
installation position
Men : 1290
Women: 1190
When there is a sink,
570 from the top of
the sink should be the
approximate distance.
Unit (mm)
■
Installation diagram
Installation panel
Installation hole in detail
Top side of
sink, etc.
Floor surface
Mounting hole position
below the unit
Conduit box
Recommended A and B measurements during installation
Unit (mm)
Space below the unit
A
B
When there are no objects below
Men
1290
−
Women
1190
−
When there is an object such as a sink
−
−
570
Unit (mm)


