174
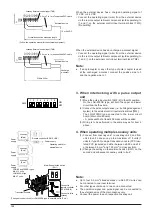
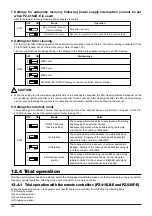
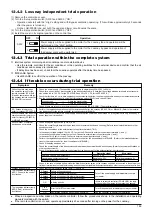
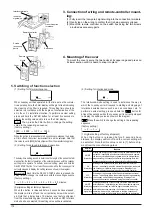
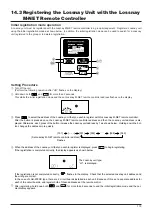
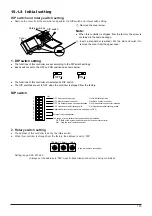
5. Switching of function selection
(1) Setting for filter maintenance
When Lossnay unit has operated for the time set as the cumula-
tive-operation time, the Filter display will begin to flash indicating
the cleaning of the filter is required. This setting time should be
selected in accordance with the degree of contamination of the
air in the unit's installation location. To perform an actual setting,
press and hold the FILTER button for at least five seconds to
display the setting value and to turn on the Filter display.
Then, press the Filter button to change the setting
value in the repeating sequence
(factory setting)
3000
→
4500
→
OFF
→
1500
↑
When the button is released before 5 seconds have elapsed, the display
will turn off and the current replacement time will be selected. Note that
this value is set to [3000] before shipment from the manufacturing plant.
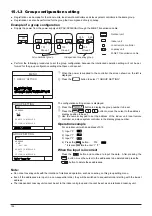
(2) Setting for delayed interlocked operation
The delay-time setting is used to determine the length of the period that will
elapse after the start of operation of the external devices until the Lossnay
unit begins to operate. To perform an actual setting, press and hold the
DELAY START button for at least five seconds while the Lossnay unit is
currently stopped to display the setting value as shown in the diagram.
Each time the DELAY START button is pressed, the
delay time will change in accordance with the repeating sequence
(factory setting)
0
→
10
→
20
→
30
→
40
→
50
→
60 minutes.
↑
(0:original setting at factory shipment)
When the button is released before 5 seconds have elapsed,
the display will turn off and the current delay time will be select-
ed. Note that a delay time of 0 minutes is set before shipment
from the manufacturing plant. Note also that when OFF Interlock
mode has been selected, this setting value will be invalidated.
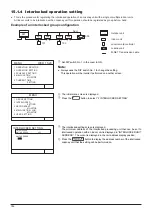
(3) Setting for interlocked mode
The Interlocked-mode setting is used to determine the way in
which the Lossnay unit will respond to starting and stopping of
interlocked external device such as an air conditioner, etc. To
perform an actual setting, press and hold the
button for
at least five seconds while the Lossnay unit is currently stopped
to display the setting value as shown in the diagram.
Press the switch to change the setting in the repeating
sequence
(factory setting)
1
→
2
→
3
→
4
↑
(1:original setting at factory shipment)
When the button is released before 5 seconds have
elapsed, the display will turn off and the current setting will
be selected. Note that this value is set to [1] before ship-
ment from the manufacturing plant.
DELAY START
FILTER
1
2
3
4
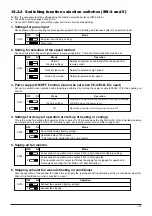
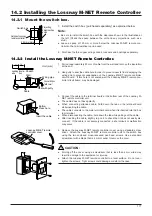
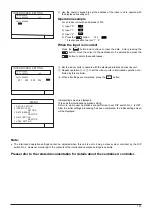
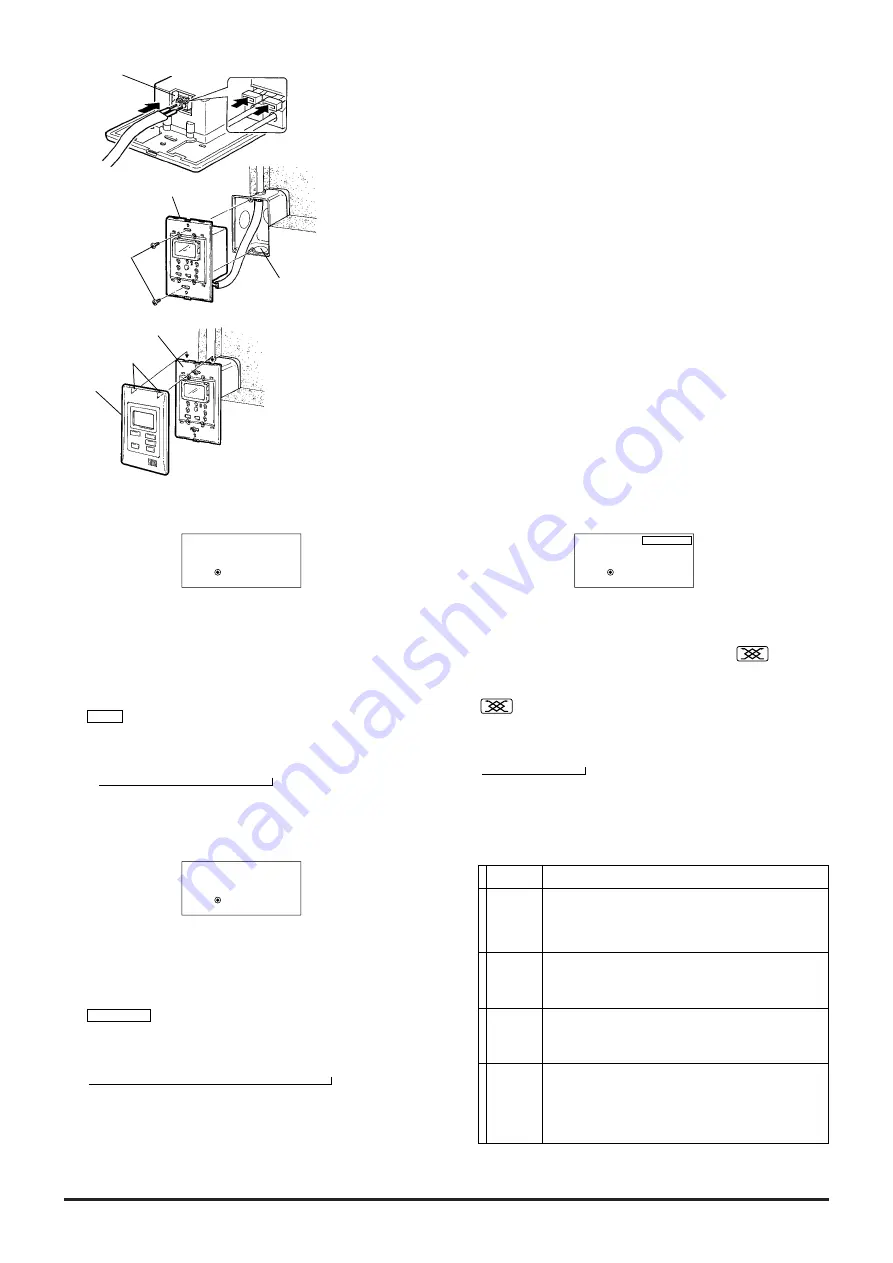
3. Connection of wiring and remote-controller mount-
ing:
(1) Fully insert the (non-polar) signal wiring into the connection terminals.
(2) Gently tug on the wiring to confirm that it is being securely gripped.
(3) Mount the remote controller on the switch box using the two screws
provided as accessory parts.
Press this button
to release.
Interlock terminals
Insert the
signal wire.
Remote controller
Screws
(accessory
parts)
Switch box
4. Mounting of the cover
To mount the cover, secure the two hooks at its upper edge and press on
its lower section until it is heard to snap into place.
Remote controller
Cover
Hooks
SETTING
3000
FILTER
SETTING
1
INTERLOCKED
SETTING
0
MIN.DELAYED
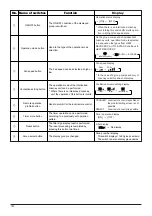
Interlocked
Operation mode
ON/OFF
Interlocking
ON
Interlocking
OFF
Interlocking
ON/OFF
Interlocking
(with external-
signal priority)
Action
Starting and stopping of the Lossnay unit will be performed from exter-
nal device -- specifically, when the external device begins to operate,
the Lossnay unit will also begin to operate; when the external device
stops operating, the Lossnay unit will also stop operating. Note that
subsequent operation using the remote controller will be possible.
Starting of the Lossnay unit will be performed from external
device -- specifically, when the external device begins to operate,
the Lossnay unit will also begin to operate. Stopping of the
Lossnay unit must be performed using the remote controller.
Stopping of the Lossnay unit will be performed from external
device -- specifically, when the external device stops operating,
the Lossnay unit will also stop operating. Starting of the
Lossnay unit must be performed using the remote controller.
Starting and stopping of the Lossnay unit will be performed from
external device -- specifically, when the external device begins to
operate, the Lossnay unit will also begin to operate; when the
external device stops operating, the Lossnay unit will also stop
operating. However, it is not possible to stop the Lossnay unit
using the remote controller while the external device is operating.
Summary of Contents for Lossnay PZ-41SLB-E
Page 4: ...CHAPTER 1 Ventilation for Healthy Living Lossnay Unit ...
Page 17: ......
Page 18: ...CHAPTER 2 Lossnay Construction and Principle ...
Page 24: ...CHAPTER 3 General Technical Considerations ...
Page 41: ......
Page 42: ...CHAPTER 4 Characteristics ...
Page 56: ...53 CHAPTER 4 Characteristics ...
Page 57: ...54 CHAPTER 4 Characteristics ...
Page 59: ......
Page 60: ...CHAPTER 5 System Design Recommendations ...
Page 68: ...CHAPTER 6 Examples of Lossnay Applications ...
Page 83: ......
Page 84: ...CHAPTER 7 Installation Considerations ...
Page 88: ...CHAPTER 8 Filtering for Freshness ...
Page 96: ...CHAPTER 9 Service Life and Maintenance ...
Page 98: ...CHAPTER 10 Ventilation Standards in Each Country ...
Page 101: ......
Page 102: ...CHAPTER 11 Lossnay Q and A ...
Page 108: ...Lossnay Remote Controller ...
Page 109: ......
Page 197: ...MEMO ...
Page 198: ...Y04 002 Jul 2004 MEE ...

