background image

Summary of Contents for M900

Page 1: ......

Page 2: ..._______________ 20 Page 33 Multimedia messages Reading a received MMS message ______________ 31 Saving received multimedia message content _____ 31 Writing and sending a multimedia message _______ 32 Filling in the multimedia message card fields ______ 32 Preparing the phone to send MMS messages _____ 34 Sending messages from the outbox _____________ 36 Editing multimedia messages from the drafts ...

Page 3: ...____________________________________51 Page 54 Camera The Camera screen and the related icons _________ 52 Closed clamshell scenery shots ________________53 Open clamshell self portraits ___________________57 Page 63 Video Video display _______________________________ 61 Closed clamshell scenery shots ________________62 Open clamshell self filming ____________________ 66 Page 71 Fun media box Pict...

Page 4: ..._________________________ 100 Security features ___________________________ 104 Certificates ________________________________ 105 WIM manager _____________________________ 105 Privacy ___________________________________ 106 miniSD Card _____________________________ 106 Page 109 Appendix Glossary _________________________________ 107 Troubleshooting ____________________________ 108 Error messages _...

Page 5: ...mitting at its highest certified power level in all tested frequency bands3 Although the SAR is determined at the highest certified power level the actual SAR level of the phone while operating can be well below the maximum value This is because the phone is designed to operate at multiple power levels so as to use only the power required to reach the network In general the closer you are to a bas...

Page 6: ...efore using your phone Please ensure that you are fully aware of the laws in your country regarding the use of hand held mobile devices whilst driving If incorrectly installed in a vehicle mobile telephones can interfere with the proper operation of the vehicle electronics such as ABS anti lock brakes or air bags To avoid such problems ensure that only qualified personnel carry out the installatio...

Page 7: ...d party equipment or accessories not made or authorised by Mitsubishi Electric invalidates the warranty of your phone and may be a safety risk Do not remove the labels The serial numbers on it are important for aftersales service and other related purposes Contact an authorised service centre if help is needed AC DC adaptor charger This mobile phone was designed to be used only with the supplied A...

Page 8: ... the SIM card and the message SIM Blocked is then displayed Enter your PUK code when Enter PUK appears PUK and PUK2 codes 8 digits Please contact your service provider for your PUK code Use it to unblock a disabled SIM card see Security features on page 104 The PUK2 code is required to unblock the PIN2 code see above Call barring password 4 digits This password is used to bar various types of call...

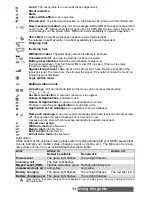
Page 9: ...dle of the cursor key to validate OK on the display and to get direct access to the Camera short press and Video long press applications Right softkey to validate the action above usually Exit and and give direct access to the menu displayed above short press and to the softkey function list long press from the standby display Menu T9 key to access the nine icons Main menu to switch from the T9 mo...

Page 10: ...croll up down left or right to the required menu item and validate by pressing OK E g Select Camera Video scroll to the Camera Video menu item with the navigation keys Up Down Left Right and press the OK key to validate your selection Insert The indicates that more options or sub menus are available when pressing OK The at the beginning or at the end of an Options menu indicates that more options ...

Page 11: ...trength levels These show the strength of the received signal The more bars the stronger the signal If the network cannot be found no strength level is displayed Tegic edition mode Multitap edition mode Arrow keys Indicate that more items in the menu can be accessed by pressing or Secured connection A secured connection is in progress Games Applications software in use Games Applications A game or...

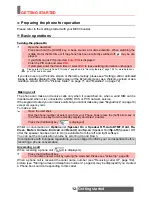
Page 12: ...call When receiving a phone call is displayed When a phone call is received the caller name number see Receiving caller ID page 102 picture see Storing names and telephone numbers page 44 may be displayed if you created a Phone book card corresponding to this caller 1 Open the clamshell 2 Press and hold the On Off key A beep sounds at mobile activation When switching the mobile On for the first ti...

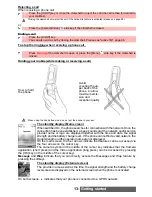
Page 13: ...the OK key in the middle of the cursor key Message and Wap indicate that you can directly access the Messages and Wap feature by pressing the softkeys The standby display External screen The provider name as well as the time the signal strength and the battery charge levels are also displayed on the external screen when the phone is activated On both screens indicates that your phone is connected ...

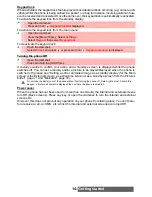
Page 14: ...a Welcome screen or as a Goodbye screen from the Pictures folder page 71 and Melodies page 72 Power saver When the phone has not been used for more than one minute the internal and external screens turn Off black screens Press any key or open the clamshell to turn the internal and external screens On However this does not prevent any operation on your phone from taking place You can there fore rec...

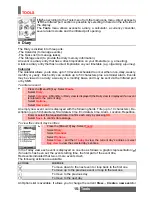
Page 15: ... fields Title up to 10 characters De scription up to 50 characters Start date time End date time Alarm Location Repetition To view the current day s entries In the Today view each event is displayed on one line as follows a graphic representation if an alarm has been set the event starting time the first part of the event title Red events indicated that two or more events clash The following actio...

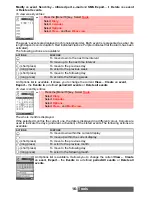
Page 16: ...he following actions are available An Options list is available It allows you to change the current View Create an event Export the Events in a defined period All events or Delete all events 1 Press the Menu T9 key Select Tools 2 Select Diary 3 Select Calendar 4 Select Options 5 Select View and then Week view ACTIONS PURPOSE To move down to the next time interval To move up to the next time interv...

Page 17: ...ing after 60 seconds It automatically restarts after a snooze time until it is stopped or up to the start finish time and date of the event task If the phone is off at alarm time it automatically switches on If the phone is locked or if the PIN setting is on the phone returns to this locked state after the alarm has rung until you use it 1 Press the Menu T9 key Select Tools 2 Select Diary 3 Select...

Page 18: ...verter on the same page for details Currency converter This feature allows currency conversion The currencies and exchange rates must be entered prior to use The conversion is calculated on the per unit exchange rate of the second selected currency ACTIONS PURPOSE Delete events To delete the events of the defined time period Delete tasks To delete the tasks of the defined time period Delete all ev...

Page 19: ...ter a decimal point 5 Press OK to validate the entry Press Save to confirm data storage 1 Press the Menu T9 key Select Tools 2 Select Currency converter 3 Select the pre defined currencies from the list 4 Enter the amount to be converted Press to insert a decimal point if needed 5 Press OK The converted amount and the exchange rate information are displayed 1 Press the Menu T9 key Select Tools 2 S...

Page 20: ...ccessing the Camera or Video applications 1 Place your phone directly opposite the infrared port of the other device 2 Open the infrared port of the other device 3 Select the card you wish to transfer as explained in the section Viewing and calling Phone book numbers page 50 4 Select Options Select Send by Infrared port The infrared port opens and the transfer is performed 1 Install the PC cable o...

Page 21: ... have already been read are indicated by Moving messages to SIM It is possible to move a message from the Inbox or the Outbox to the SIM memory However according to the message size the message may be truncated the 160 first characters only are moved to the SIM memory The sending date for sent messages and the Copy to addressees are lost when moving the message to the SIM memory 1 Press the Menu T...

Page 22: ...want to send your message to another mobile number Press OK to validate 7 In the Text field enter the message text see Entering text Edition mode page 24 or select one of the models Models and press OK 8 If you want to send the message to several addressees enter one or several phone numbers names in the Copy to list up to 4 more addressees and press OK then Valid to return to the previous screen ...

Page 23: ...bers To select an edition mode or When in T9 mode is displayed on the upper part of the display to indicate that T9 is the current mode When on Multitap mode is displayed on the upper part of the display to in dicate that Multitap is the current mode 1 Press the Menu T9 key Select Messages 2 Select SMS 3 Select Settings 4 Select Sending profile 5 Enter the message centre number or select a templat...

Page 24: ...RACTER Lower case Upper case _1 a b c 2 A B C 2 d e f 3 D E F 3 g h i 4 G H I 4 j k l 5 J K L 5 m n o 6 M N O 6 p q r s 7 P Q R S 7 t u v 8 T U V 8 w x y z 9 W X Y Z 9 0 0 Short press Swap between the Lower case and the next character toggle mode Long press Swap between the Upper case Lower case Short press to enter a space Long press to access special characters Short press moves the cursor throu...

Page 25: ...ress Swap between the Lower case and the next character toggle mode Long press Swap between the Upper case Lower case Swap between the Multitap Multipress method and the T9 text input Clear or backspace Short press to enter a space Long press to access special characters Another matching word Smart punctuation Short press moves the cursor to the beginning or end of each word Long press moves the c...

Page 26: ... selected text is displayed in blue colour Select Copy press OK or press the Up side key The selected text is copied into the phone memory 1 The Copy option is not available in numeric edition modes It is however available while using the numeric mode in an alpha numeric edition context 2 The Copy all option only is available in numeric edition mode It therefore copies the full displayed number 1 ...

Page 27: ...s in the Copy to list up to 4 more addressees and press OK then Valid to return to the previous screen 7 Select Options 8 Select Send Store send or Store 9 A warning message displays the number of SMS needed to send the message if it is more than one Select Go on if you want to send the message or select Cancel if you do not want to send it or if you want to amend your message 1 If you have regist...

Page 28: ... a status request is sent to the network must be network supported If the status is requested on a delivered message the date and time of de livery may be shown The network then answers by sending a status report SR back to the phone Press OK to acknowledge it 1 Press the Menu T9 key Select Messages 2 Select SMS 3 Select Settings 4 Select Signature 5 Select Insert in message Select Yes 6 Select Te...

Page 29: ...ct your service provider for further details Storing a voice mail centre number If your SIM card does not contain the Voice Mail centre number you must store it manually Activating deactivating the voice mail alert tone If you wish to be advised by a tone when receiving a new Voice Mail message 1 Press the Menu T9 key Select Messages 2 Select Parameters 2 Select Voice Mail 3 Select Number Enter th...

Page 30: ...al available space on the Phone memory and on the SIM card 1 Press the Menu T9 key Select Messages 2 Select SMS 3 Select Storage used The SMS memory used is displayed Scroll down to access the SIM archive 4 Select Details for more information on the Phone and SIM stored messages use up and down arrow keys to scroll to the required information ...

Page 31: ...e delivered The notification and the retrieved message are automatically stored in the Inbox Unread messages are shown by and the text is bold Messages that have been already read are shown by Multimedia message notifications are shown by and delivery messages by The reception quality of a Multimedia message content may vary depends on the addressee s mobile phone 1 Press Read to read your new mes...

Page 32: ...e a delivery report a read reply report to add a priority level or a delivery time to your message only apply to the edited message before they are sent The Message config parame ters are the default settings see Setting multimedia messages characteristics page 35 1 Selecting OK gives direct access to the phonebook 2 Choose one of the displayed names or select New if you want to send your message ...

Page 33: ...essage sending is displayed on image selection if its size exceeds the message sending capacity 1 When on the picture field or on the text field select Options 2 Select Add sound then select Melodies Music or Speech notes Select the required melo dies or speech note in the displayed list The selected melody music or speech note is attached to the message 1 You can send any of the Melodies or Speec...

Page 34: ...t available when you only have one empty page in your Content field 3 The contents of this Options menu depends on the contents of the current page Do not forget to check the message size before sending it see the estimated size in the right upper corner of the screen 2 Select Exit to come back to the composition of the MMS or select Validate to come back to the card fields 1 Press the right arrow...

Page 35: ...er page 101 Select Save to store the data 9 Select Gateway settings and type in the IP address The sending and receiving of MMS is now possible 10 Select Advanced settings and fill in the required fields 1 All the requested parameters are obtainable from your network operator and or Wap provider 2 The phone number or access point name the login and the password are to be stored in the Connection M...

Page 36: ...Menu T9 key Select Messages 2 Select Multimedia messages 3 Select Settings 4 Select Auto retrieval 5 Choose the required retrieval mode and press OK 1 The availability of this menu is operator dependent 2 Even if the Auto retrieval mode is On the message are not automatically retrieved if your phone is on roaming mode or if it cannot attach the network 3 A message can be retrieved automatically Au...

Page 37: ... 3 Select Retrieve e mails to get your new messages 1 Press the Menu T9 key Select Messages 2 Select e mail 3 Select Inbox press Retrieve to get your new messages 1 Press the Menu T9 key Select Messages 2 Select e mail 3 Select Inbox to display the e mails list Select Options and select Retrieve e mails to get your new messages 1 Press the Menu T9 key Select Messages 2 Select e mail 3 Select Inbox...

Page 38: ... the displayed list or select New then type the required e mail address Press Valid 5 Highlight the Subject field Press OK and type in the e mail header text 40 characters maxi mum Press OK 6 Highlight the Text field Press OK and type in the e mail text maximum 1530 characters Press OK 7 Highlight the Attached files field if you want to add a melody a music an image a video a phone card a diary ev...

Page 39: ...a 8 Select Server settings Enter the requested information POP3 server POP3 port number SMTP server SMTP port number and Let e mail on server Select Save to store the data 9 Select Account Information Enter your e mail address mailer login and mailer password Select Save to store the data 1 All the requested parameters are obtainable from your e mail service provider 2 The phone number or access p...

Page 40: ...on Please see Storage consumption page 32 1 Press the Menu T9 key Select Messages 2 Select e mail 3 Select Drafts and use up or down arrow key to scroll to the required message 4 Press Options to View Delete Delete all Send Edit Edit a copy Numbers addresses to store the e mail address contained in the e mail header and Details Once you have sent one of the Draft messages this message is automatic...

Page 41: ...s The voice Modem and GPRS call information for Line 1 and Line 2 is stored in theCall timers menu The call type and the accumulated times of outgoing and incoming calls are dis played Selecting Details displays information on calls made on your home network on National roaming and on International roaming 1 Press the Menu T9 key Select Calls Times 2 Select Call logs 3 Use the Up or Down arrow key...

Page 42: ...he total calls cost and the remaining balance on your account once a credit limit has been set To display these you must first set a currency value and enter an average cost per unit only calls units are displayed if the cost information is not stored To set a currency value per Unit To set the call cost type to Units 1 Press the Menu T9 key Select Calls Times 2 Select Call timers 3 Select Balance...

Page 43: ...n a credit limit has been set the selection from the Credit limit display is Edit or Set no limit 1 Press the Menu T9 key Select Calls Times 2 Select Call costs 3 Select Show 4 Use Up and Down arrow keys to display the Last Call and All Calls and show the Remaining credits The remaining credit is shown in either units or currency as set by Cost Type menu above 1 Press the Menu T9 key Select Calls ...

Page 44: ...one numbers Names and numbers can be stored directly in the Phone book or copied from different sources such as SMS messages last dialled number list etc There are several ways to store numbers in the Phone books Phone names card From the standby display Via the menu SIM names card From the standby display Press the Phone book key or the left arrow to directly access the Phone book from the standb...

Page 45: ...ber from the standby display When calling a number containing wild card spaces select the number from the Phone book select Options or press on the Call Send key and enter the number corresponding to the wild card spaces missing figures 3 The p pause and _ characters which are accessible by pressing and holding the key when regis tering a number can be stored as part of numbers 4 If the SIM card o...

Page 46: ...estination directories Phone names SIM names SIM fixed My card The card content is then automatically moved to the required location 1 Press the Menu T9 key Select Phone book 2 Select Add name 3 Scroll down and select Picture Press OK to display the Picture folder content 4 Select the required icon or select to display the pictures list then select the required pic ture 5 Select Save to store your...

Page 47: ...ook key to access the Phone book 2 Scroll down to the card you want to access and select OK 3 Scroll down to the field s you want to modify and amend it them Select Save to store the changes 1 Press the Menu T9 key Select Phone book 2 Select Read 3 Select one of the stored cards 4 Select Options 5 Select View 6 Scroll down to the field s you want to modify and amend it them Select Save to store th...

Page 48: ...up is then displayed when next reading the Phone book contents 2 Selecting Options displays the following menu choice View Call Add name Delete Delete all Phone names or SIM names Copy Copy all Move Group folder selection to select All names the Phone names only the SIM names only or the groups members Send by e mail MMS SMS or Infrared port Send a message e_mail MMS or SMS Some of these options m...

Page 49: ... key Select Phone book 2 Select Storage used to get to the Phone names Storage used press the Down arrow key to get to the SIM card Storage used If available the free memories in the FDN list are also displayed Please see Fixed dialling numbers page 50 for more information on FDN numbers 1 Press the Menu T9 key Select Phone book 2 Select Groups 3 Select any blank template and select OK The followi...

Page 50: ...elect Members The group members list is displayed Please use the same procedure as when in the phone book to reach the required name 1 Press the Menu T9 key Select Phone book 2 Select My card 3 Select View and enter the requested information as for a Phone book card validate each entry by selecting OK 4 Select Save to store your card 1 Press the Menu T9 key Select Phonebook 2 Select My card 3 Sele...

Page 51: ... copy or move numbers to the phone or SIM card memory but also to send these numbers by Infrared port or SMS or send a message an SMS a Mail or an MMS 1 Press the Menu T9 key Select Phone book 2 Select Fixed dialling 3 Select Add new 4 Enter your PIN2 code and press OK 5 Fill in the displayed fields as in any SIM name card then select Save to store your settings 1 Wild card spaces can be used with...

Page 52: ...ot below is a preview example the Camera related icons described in the table below are the ones which can be displayed while using the Camera features The features described in this table are further explained in the chapter Camera related icons The use of the camera and the sending forwarding and reproduction of the pictures taken are subject to property and privacy rights Do not take a picture ...

Page 53: ......

Page 54: ...a Video side key then open the lens cover 2 Choose a subject 3 Press the Camera Video side key to take your picture The shutter sound is played and the red light blinks 1 You cannot take a picture while a voice communication is in progress 2 The Shutter sound is a Camera like sound that is heard when a picture is captured 3 You may not be able to deactivate nor mute the shutter sound option on you...

Page 55: ...election 1 Press the Menu side key Select Contrast 2 Select one of the seven contrast levels 3 Press the Camera Video side key to confirm your selection 1 Press the Menu side key Select Sharpness 2 Select Normal Soft or Sharp 3 Press the Camera Video side key to confirm your selection 1 Press the Up or Down side key Select Zoom 2 Select one of the zoom levels by scrolling left or right 3 Press the...

Page 56: ...l screen 1 Press the Menu side key Select Compact light 2 Select On or Off 3 Press the Camera Video side key to confirm your selection 1 Press the Menu side key Select Self timer 2 Select On 3 Press the Camera Video side key to launch the countdown The 10 seconds countdown is displayed on the external screen The cap ture is automatically performed when the countdown is over If an event occurs Mail...

Page 57: ...use the keypad as follows How to hold your mobile KEYS DESCRIPTION Up side key To access the Zoom panel Down side key To access the Zoom panel OK key To capture your image Up navigation key To access the Zoom panel and to scroll to the next one Down navigation key To access the Quality panel and to scroll to the next one Left navigation key To access the Brightness panel Right navigation key To ac...

Page 58: ... picture is taken the shutter sound is played and the red light flashes 2 You may not be able to deactivate nor mute the shutter sound option on your mobile 3 The Shutter sound is a Camera like sound that is heard when a picture is captured 4 You cannot take a picture while a communication is in progress 1 Select OK to store the picture or select Clear to erase it OPTIONS DESCRIPTION Camera To get...

Page 59: ...e light Select the High the Medium or the Low mode Info To display conceal the information icons on top of the dispaly Storage To select either the phone memory or the memory card to store your picture 1 From the preview screen select Options 2 Select Settings 3 Fill in the available entries and select OK to validate your entries 4 Select Save to store the changes You cannot deactivate or mute the...

Page 60: ...te new Scroll down to the Content field press OK and scroll to the Pictures field Press OK and select Picture 2 Or select e mail Select Write new Scroll down to the Attached files field press OK and select Picture 3 From the pictures browser select Options 4 Select Camera If a call is in progress access to the camera is not possible ...

Page 61: ... the table be low are the ones which can be displayed while using the Video features The features described in this table are further explained in the chapter Video recorder icons The use of the video recorder and the sending forwarding and reproducing of the videos are subject to property and privacy rights Do not make videos unless authorized ICONS EXPLANATION Upper part Video application activa...

Page 62: ......

Page 63: ... 1 Open the lens cover see the drawings above then press and hold the Menu side key or 1 Press and hold the Camera Video side key then open the lens cover or 1 Open the lens cover then press on the Menu side key and select Video recorder 2 Choose a subject 3 Press the Camera Video side key to launch the Recording The shutter sound is played and the red light is activated 4 Press the Menu side key ...

Page 64: ...lity level for your video The better the quality the bigger the file size If you wish to send your video by Mail or by MMS we advise you choose the Eco nomic mode To select the brightness To select the zoom setting 1 During the recording press the Camera Video key and the recorded sequence is paused 2 Press the Camera Video key to restart the Recording The red light is deactivated during the Pause...

Page 65: ... Press the Menu side key Select Video size limit 2 Select Short mail Long mail or Maximum size 3 Press the Camera Video side key to confirm your selection The Fit to mail value depends on your operator min 100 KB max 300 KB 1 Press the Menu side key Select Storage 2 Select Phone memory or Memory card 3 Press the Camera Video side key to confirm your selection 1 Press the Menu side key Select Compa...

Page 66: ...e videos Subject in front of the phone for self filming KEYS DESCRIPTION Up side key To zoom out Down side key To zoom in OK key To launch the Recording in Preview or Pause mode To launch the Pause mode in Recording Up navigation key To access the Zoom panel and to scroll to the next one Down navigation key To access the Quality panel and to scroll to the next one Left navigation key To access the...

Page 67: ...nt of the mobile so that your image is displayed on the main screen 2 Adjust the required settings see Adjusting the preview page 67 3 Press OK to launch the recording 4 Select Stop right softkey to stop the recording OPTIONS DESCRIPTION Play To play the recorded video please see How to play your video page 70 for full details on the Options submenu Send by To send the video by Mail by MMS or via ...

Page 68: ...ect Super fine Fine or Economic Storage To set the Phone memory or the miniSD Card as the storage memory space Shutter sound level To select the shutter sound volume level Compact light intensity To select the intensity level of the compact white light Select High Medium or Low Info To display conceal the pictographs preview mode only Video size limit To display the maximum allowed video size Sele...

Page 69: ...d external screens a Welcome screen or a Goodbye screen Your phone allows you to set one Standby display for your internal screen one Standby display for your external screen still pictures only one Welcome screen or one Goodbye screen from the downloaded and or stored images to download and store images see the following sec tions Pictures browser The Pictures browser allows you to display the st...

Page 70: ... status of the current file My preferences To sort the stored images by date name size and select a view mode List Thumbnails 4 to display a 4 picture mosaic or Thumbnails 9 to display a 9 picture mosaïc and to change the Picture browser mode 1 If the selection is a sub folder an Options list is available View Delete New folder and My preferences 2 The sending of an image may not be allowed if it ...

Page 71: ...n screen Set as External screen Set as Welcome screen or Set as Goodbye screen 1 Select Set as then select Standby display If the image is too big the crop screen is displayed 2 Use the cursor key to move the image up down left or right the availability of the four arrows depends on the image size 3 Select OK Stored is then displayed 1 Open the infrared port see Infrared port page 19 and make sure...

Page 72: ...alert melody or as a Welcome melody or a Goodbye melody Send by To send the selected melody by Mail by MMS or via the Infrared port Delete To delete the current melody Delete all To delete all the melodies of the current folder Multiple selection To select several melodies by pressing OK Press OK to unselect a ticked melody Select Options to access Send by Infrared port Delete Move to a folder of ...

Page 73: ...Press the Menu T9 key Select Fun Media box 2 Select Melodies then Memory card this item is only displayed when a miniSD Card is inserted 3 Scroll up or down to select the required melody or choose a folder press OK to view its con tent then select a melody 4 The melody is played within 2 seconds 1 Press the Menu T9 key Select Fun Media box 2 Select Video 3 Scroll up and down to select the required...

Page 74: ...o via the infrared port by an MMS or by a Mail Details To display information about the file Name the Title the Author the device name the Resolution width height in pixels the Duration of the video the Size the Storage date the File protection status the Description if a text is attached to the video file the Copyright of the recorded video the Restriction status The empty fields are not displaye...

Page 75: ...Wel come or a Goodbye melody Music To display the Music file contents 1 Open the clamshell 2 Press the Menu T9 key Select Fun Media box 3 Select Videos then select the required video 4 Press OK or select Options then Play 5 Close the clamshell The video is paused 6 Press the Camera Video side key to start the Play mode You cannot play a video while a communication is in progress 1 Make sure the in...

Page 76: ...niSD Card Select all to select all the files of the current folder Unselect all to unselect all the ticked files Move to To move the selected file to the miniSD Card or to one of the Music sub folders Copy to To copy the selected file in the miniSD Card or to one of the Music sub folders New folder To create a new sub folder in the Music folder only applicable to music selection Rename To rename t...

Page 77: ... DESCRIPTION Play To play the selected speech note s Record new To record a new speech note Set as To set the selected speech note as a ring tone for Line1 or Line2 as an alarm melody as a message alert melody or as a Welcome or a Goodbye melody Send by To send the speech note via the Infrared port by MMS or Mail Delete To delete the current speech note Delete all To delete all the speech notes of...

Page 78: ...elect Speech notes then Memory card this item is only displayed when a miniSD Card is inserted 3 Scroll up or down to select the required speech notes or choose a folder press OK to view its content then select speech note 4 Press OK or select Options then select Play It is not possible to add a frame to a video OPTIONS DESCRIPTION View To view the frame and its name Delete To delete the current f...

Page 79: ...ctures folder as a jpg file 2 When taking a picture the preview size is automatically adapted to the selected frame size Modifying the preview size removes the frame 1 From the standby display press the OK key to access the Camera application 2 Select Options then Frames The frames list or mosaic is displayed 3 Scroll down the frames list or mosaic Select the required frame or select a folder then...

Page 80: ...ed on your phone see To download a java application page 83 or Default apps to launch a pre embedded game or application 4 Select one of the available games and applications or select Options and then select Run OPTIONS DESCRIPTION View To view the application detailed content Run To launch the game or the application Delete To delete a game or an application Delete all To delete the stored games ...

Page 81: ...wload 2 Select Retrieve Left softkey to download the game application on your phone 1 Games and applications download may require a delivery charge Please check downloading and billing conditions with your service provider 2 You cannot install a Java game application that was received by e mail MMS or via the infrared port Java games applications are copyright protected 1 Press the Menu T9 key Sel...

Page 82: ...er Copy to To copy the selected file to the miniSD Card or to an Others sub folder New folder To create a new folder in the Others folder only available if the selected file is not a folder already Rename To rename the selected file Details To view the current file name size storage date and file protection status information My preferences To sort the stored files by date name size 1 You can only...

Page 83: ...e vCard or the vCalendar or select a name from the Names list 1 Press the Menu T9 key Select Fun Media box 2 Select Others then Memory card this item is only displayed when a miniSD Card is inserted 3 Scroll up or down to select the required file or choose the required folder press OK to view its content then select a file 4 Select Options then select View 1 Press the Menu T9 key Select Fun Media ...

Page 84: ...al terminals with your hands or metal objects Do not allow dust garbage etc to get in the Adapter s slot Do not attach other labels or stickers Do not use or store in locations that may be affected by static electricity or electric noise Do not user or store in locations directly exposed to sunlight a heat vent or a heating appliance Do not use or store in humid or dusty locations or in locations ...

Page 85: ... your miniSD Card page 73 To access videos See To access videos stored on your miniSD Card page 75 To access music See To access music on your miniSD Card page 77 The miniSD Card must be formatted in your phone before its first use please see How to configure your miniSD Card page 86 If the formatting is done via another device e g a PC you may not be able to use your miniSD Card on your M900 The ...

Page 86: ...les from your phone to your miniSD Card or other devices 4 The miniSD Card content is not accessible if the battery level is too low Not allowed battery too low appears and if the storage space is full Not enough space 1 Insert the miniSD Card in the phone 2 The Format card screen is displayed Select Yes to format your miniSD Card If you select No your miniSD Card is not formatted and cannot be us...

Page 87: ...M card and appear on the phone menu as they are accessible from the Network serv menu Please contact your service provider for further details Some operators may provide up to two services on the same SIM card The dis played sub menus in the Network serv menu may then be named Applica tions Services or Information Three kinds of services can be registered in this menu SIM application tool kit An a...

Page 88: ...ect one of the available home page addresses or the http and https root addresses or type in the url address 7 Select Connection profiles Enter the requested information the GSM connection and GPRS connection fields are linked to the Connection manager and thus allow to pick one from the displayed list see Connection manager page 101 Select Save to store the data 8 Select Gateway settings and type...

Page 89: ...ption does not allow you to reach the selected Wap site the Not available then Connection failure messages are displayed During a WAP session if a page contains more information than it can be displayed in the application part a scroll bar is displayed on the right part of the screen ITEM ACTION Back To go back to the previous page Reload To reload the current Wap page Save To access the Save page...

Page 90: ...ect GSM or GPRS as a default bearer when defining mixed based GSM GPRS profiles If an error is detected the other bearer is then proposed and may be used Use alternate connection mode is displayed My preferences To configure the browser and allow it to display the pages in large or normal fonts to allow or forbid pictures download and script execution in Wap pages to accept or forbid cookies Push ...

Page 91: ...e options menu 2 Select Bookmarks 3 Select one of the bookmark names to access the required Wap site 1 Selecting OK directly tries to reach the bookmarked page 2 On an existing Bookmark entry the options Go to Bookmark View Delete Send and Export all are availa ble 1 Press the Menu T9 key Select Wap 2 Select Go to site 3 A list allows to freely enter or select Wap sites addresses OPTION ACTION Las...

Page 92: ...oning see information above about Accept push info To allow forbid or filter messages bearing connection profiles to connect to Wap sites 1 Press the Menu T9 key Select Wap 2 Select Push inbox Summaries of all push messages are displayed according to their reception date and time 3 Press Options then select Read text to display the selected message text in full screen mode OPTIONS PURPOSE Read tex...

Page 93: ...ol to enable the download of large data Encoding version To display the possible encoding versions Select 1 1 1 2 1 3 or 1 4 Normal port To edit the port address for non secure connections Secure port To edit the port address for secure connections Use download fun To activate or deactivate the use of the OpenwaveTM solution to manage the download of large data Use range To activate or deactivate ...

Page 94: ...tor the vibrator mode selection is temporarily inhibited and the phone rings instead of vibrating 1 From the standby display press the Up arrow key 2 Select one of the available settings Ring Silent Vibrate Vibrate ring or Vibrate then ring and press OK to validate 1 Press the Menu T9 key Select Settings 2 Select Tones 3 Select Ringtones 4 Select Incoming call Incoming call L2 Alarm then select Me...

Page 95: ...d volume level or the Down side key to decrease the sound volume level 1 Press the Menu T9 key Select Settings 2 Select Tones 3 Select Volume 4 Select Ramping 5 Select On 6 Select Save to store your setting 1 Press the Menu T9 key Select Settings 2 Select Display 3 Select Main screen 4 Select Pictures see Pictures page 69 to select one the stored images or select one of the five available backgrou...

Page 96: ...r the Main screen or the External screen as a Welcome screen or as a Goodbye screen from the Pictures folder page 71 1 Press the Menu T9 key Select Settings 2 Select Display 3 Select Goodbye screen 4 Select Default to set the default image as standby screen for your Goodbye screen or select Pictures see Pictures page 69 to select one of the stored pictures 5 Select Save to store your setting You c...

Page 97: ...ad lock 4 To unlock the keypad press Unlock then 1 From the Standby display press and hold to activate the keypad lock 2 Press and hold to de activate the keypad lock 1 Press the Menu T9 key Select Settings 2 Select Keypad 3 Select Any key answer and select On 1 Press the Menu T9 key Select Settings 2 Select Keypad 3 Select Softkeys functions and select left softkey or right softkey 4 The list of ...

Page 98: ...ns off Active flip This feature allows you to answer end a call automatically on opening closing the phone 1 Press the Menu T9 key Select Settings 2 Select Phone settings 3 Select Edit mode 4 Select Multilingual or Standard 1 Press the Menu T9 key Select Settings 2 Select Phone settings 3 Select Auto features 4 Select Auto answer and select On 5 Select Save to store your setting This feature is in...

Page 99: ... Scroll through the panels and fill in the required information 5 Select Save to store the data 6 Select the Secondary clock or select Options then choose Edit second ary Scroll through the panels and enter the required information 7 Select Save to store the data OPTIONS ACTION Edit origin To edit the origin clock panel in order to modify its contents Edit secondary To edit the secondary clock pan...

Page 100: ...Select Operation mode 4 Select Modem 1 Press the Menu T9 key Select Settings 2 Select GSM Services 3 Select Call diverting The following sub menu is displayed the contents of this menu may vary according to your service provider DIVERT OPTIONS ACTION Always To divert all incoming voice calls When not reachable To divert all voice calls when the phone cannot be reached out of service On no reply To...

Page 101: ...played You can also cancel or check the service status 1 Whilst a call is in progress a beep sounds to indicate a second incoming call Select Replace to take Call 2 and end Call 1 select Reject to refuse Call 2 or press the Call Send key to put Call 1 on hold and take Call 2 Press the End Off key to end Call 1 and press the Call Send key to take Call 2 2 Select Options then select Swap to get back...

Page 102: ...your network or subscription Private with To have a private conversation with one of the participants During a private conversation the conference call is put on hold Hold To put the conference call on hold Retrieve To retrieve the conference call if it is put on hold Mute Unmute To mute unmute the microphone End one To end one call End all To end the conference call Record To record the conferenc...

Page 103: ...ired network Press OK to select one of the following Options if you want to amend the list OPTION DESCRIPTION Modify by list To display the list of all networks stored in the phone Modify by code To edit or enter the identification operator number if you have the information Delete To delete an entry 1 Press the Menu T9 key Select Settings 2 Select GSM Services 3 Select Network 4 Select either For...

Page 104: ...some of the phone features e g activating deac 1 Press the Menu T9 key Select Settings 2 Select GSM Services 3 Select Call barring 4 Select Outgoing calls to bar All outgoing calls International calls or International calls excluding your Home network Incoming calls to bar All incoming calls or all incoming calls while Roaming only Cancel all to cancel all barring conditions or Change password 5 S...

Page 105: ...M card is required to use this feature please contact your service provider for more information on the WIM card It allows certificates see definition above and tickets to be pro vided to and from selling companies when undergoing a paid transaction To enter the WIM manager menu Select one of the list items WIM code PIN code available on the WIM card to change create or delete a file change unbloc...

Page 106: ... and shows the transaction Date Clear Text and Infor mation 4 Press OK to validate and save the ticket Tickets are tracks of transactions as they are emitted by the phone and not by the selling company They can not be used as a proof in case of legal problem 1 Press the Menu T9 key Select Settings 2 Select Security 3 Select WIM Manager 4 Select Tickets 5 The list of available tickets is displayed ...

Page 107: ...rnet Protocol LCD Liquid Crystal Display MMI Man Machine Interface MMS Multimedia Messaging Service PIN PIN2 Personal Identification Number Supplied by your network service provider PPP Point to Point Protocol PUK PUK2 PIN Unblocking Key Used to unlock PIN and PIN2 Supplied by your network service provider QQVGA Quarter Quarter Video Graphics Array Roaming Rm The ability to use your telephone on n...

Page 108: ...played check registration and area coverage with your service network provider and check that the SIM is correctly inserted Call barring option is on Deactivate it see page 106 Call cost limit is reached see page 44 Stored telephone numbers cannot be recalled Fixed Dialled Number or Call Barring features are activated Deactivate feature see page 106 The mobile is on but nothing is displayed Displa...

Page 109: ...d or You changed the call barring service status The entered password seems to be wrong or incorrect Check your request You made a request for a service that seems to be unavailable Check your subscription You tried to activate a GSM service You are requested to check your subscription regarding the related service rights of use access Connection failed Connection with the server cannot be establi...

Page 110: ...locked A wrong PUK code has been entered 10 times The phone is now permanently blocked PIN blocked A wrong PIN code has been entered 3 times PIN2 blocked A wrong PIN2 code has been entered 3 times PUK2 blocked A wrong PUK2 code has been entered 10 times The SIM services protected by the PIN2 code have now been permanently disabled Reaching allowed credit The cost limit is about to be reached The c...

Page 111: ...rantee does not cover a non compliance with directions for use b installation or removal charges where the product is installed in a vehicle c defects or failures caused by accident misuse improper installation or improper repair by a non approved repairer alteration or modification neglect failure to use the phone for normal purposes Acts of God exposure to water use in adverse environmental cond...

Page 112: ...play 13 95 Downloaded melody 73 76 Downloading Infrared port 71 E Editing a phonebook card 47 Editing a SIM name card 47 Editing a text model 27 Edition mode 23 e mail Composing an e mail 38 e mail profiles 39 Inbox 37 Outbox 40 Preparing your phone 39 Reading 37 Ending a call 13 Entering text 23 Erasing a video 64 67 Error messages 109 Export 51 Exporting an event task 17 External screen 9 13 Ext...

Page 113: ...screen 71 Settings Active flip 98 Any key answer 97 Auto features 98 Backlight 96 Broadcast 29 Connection manager 99 Contrast 96 Default settings 99 External screen 95 GSM Services 100 Idle screen 95 Keypad 97 Language selection 97 Main screen 95 My picture 96 Phone settings 97 98 Security 104 105 Security features 104 Softkey functions 97 Time and date 99 Tones 94 95 Voice Mail 30 Wap 88 Welcome ...

Page 114: ...94 94 W Wap 88 Bango address 91 Bookmarks 90 Go to site 91 Home page 89 IP address 88 New address 91 Personalising 90 Preferred bearer 90 Profile details 88 Profiles 88 Saved pages 91 Settings 88 90 92 Site history 91 Wap profiles 90 Welcome screen 69 WIM card 105 WIM Manager 106 Writing text Edition mode 23 Z Zoom 52 55 61 64 ...

Page 115: ......

Page 116: ......

Reviews: