background image

19

MAN-PNLPC-001

  MC200 Series Industrial Panel Computers

Once you have the Panel Computer installed and the peripheral devices con-
nected, you are ready to power up the computer.  Press the POWER ON push
button located on the rear panel of the computer (as described on page 18).

Consult the PCA1675 Embedded Processor Board Manual, part number MAN-
P1675-001 to set up your Industrial Panel Computer’s BIOS.

COM2 Serial Port Setup

The default setting is RS-232. For RS-422 or RS-485 communications, install
jumpers as shown on page 15.  For more information, see the PCA1675 Em-
bedded Process Board Manual, part number MAN-P1675-001.

BIOS Setup

6  COMMUNICATIONS SETUP

Summary of Contents for MC 200

Page 1: ...PANEL COMPUTERS Manual Part Number MAN PNLPC 001 ...

Page 2: ... Trademarks This publication may contain references to products produced and or offered by other companies The product and company names may be trademarked and are the sole property of their respective owners MEAU and or AVG Automation disclaims any proprietary interest in the marks and names of others Manual P N MAN PNLPC 001 Designed and Manufactured specifically for Mitsubishi Electric Automati...

Page 3: ...0 4 and 12 1 Industrial Panel Computers Models MC220 and MC240 Outline Dimensions 10 10 4 and 12 1 Industrial Panel Computers Models MC220 and MC240 Cutout Dimensions 11 15 Industrial Panel Computer Model MC250 Outline Dimensions 12 15 Industrial Panel Computer Model MC250 Cutout Dimensions 13 CHAPTER 5 EXTERNAL COMPONENTS Connectors 14 CHAPTER 6 COMMUNICATIONS SETUP BIOS Setup 19 COM2 Serial Port...
Page 4: ...ii MC200 Series Industrial Panel Computers MAN PNLPC 001 CONTENTS This page intentionally left blank ...

Page 5: ...ervice power requirements operating and storage temperatures available memory serial communications specs dimensions weight etc Installation 4 Shows the mounting and cutout dimensions for the panel models Provides location and description of the available connectors and expansion card slots Provides location and description of switches push buttons display brightness potentiometer and LEDs Discuss...

Page 6: ...ll featured computer able to withstand harsh environments Its rugged design high performance and easy access for upgrade or maintenance make the MC200 ideal for applications requiring the highest reliability as with all Mitsubishi electronic components Operating systems are included as part of every package Optional operating systems and application software can be installed upon request providing...

Page 7: ...ed MC240 12 1 inch XP e embedded MC250 15 inch XP e embedded Software Windows XP e embedded Technical Support If you are having difficulty with a particular aspect of installation or setup technical support is available at 1 800 950 7781 Auto Attendant Option 4 or visit our website at www meauic com What you need to get started Technical Support ...

Page 8: ...4 MC200 Series Industrial Panel Computers MAN PNLPC 001 1 INTRODUCTION This page intentionally left blank ...

Page 9: ...C200 Series Industrial Panel Computers Models MC220 10 4 Windows XP e Industrial Panel Computer MC240 12 1 Windows XP e Industrial Panel Computer MC250 15 0 Windows XP e Industrial Panel Computer 2 MODELS AND EQUIPMENT ...

Page 10: ...isk on Chip Flash Memory MC601 128MB Disk on Chip Flash Memory MC602 256MB Disk on Chip Flash Memory MC603 40GB HDD MC610 256MB MEM MC615 512MB MEM MC616 Standard Keyboard MC620 Keyboard with Trackball MC621 Multimedia I R board MC622 19 R M Industrial Membrane Keyboard MC623 2 Button Mouse MC624 Modem PCI 56K V 90 MC630 2 way Video Splitter Repeater MC635 Shielded Video Cable 6 MC640 Shielded Vid...

Page 11: ...MC703 Windows XP Pro MC704 Windows XP Server MC705 MS DOS MC706 LINUX Server MC707 LINUX W S MC708 Windows NT e Embedded MC710 Windows XP e Embedded MC711 Windows CE 3 0 Embedded MC712 VX Works MC713 Microsoft Access MC750 Microsoft Office MC751 Microsoft Excel MC752 Procomm MC760 PC Anywhere MC761 Norton Anti Virus MC762 MacAfee Anti Virus MC763 2 MODELS AND EQUIPMENT ...

Page 12: ... View Angle U D 150 R L 120 Screen Pixels MC220 MC240 SVGA 800 x 600 MC250 XGA 1024 x 768 Display Brightness MC220 230 nits MC240 MC250 250 nits Backlight Bulb Life MC220 20 000 hours MC240 40 000 hours MC250 35 000 hours manufacturer s expected half life rate VGA Output XGA Output 60 ft maximum MECHANICAL SPECIFICATIONS Housing Material Stud Mounted Metal Bezel MEAU Black Connectors COM1 and COM2...

Page 13: ...omputer s Serial Ports support one RS 232 COM1 and one RS 232 RS 422 RS 485 COM2 connector If RS 422 or RS 485 is required refer to the PCA1675 Embedded Processor Board Manual MAN P1675 001 The Parallel Port supports SPP EPP ECP The USB Port supports up to 2 ports 1 1 Note that the Panel Computer is a 115 230 VAC powered unit See the section on External Components beginning on page 14 for further ...

Page 14: ...1 Mounting The Panel Computer is a panel mount unit The following diagrams show the outline and cutout dimensions necessary to mount the panel using the studs 10 4 and 12 1 Industrial Panel Computers Models MC220 and MC240 Outline Dimensions 4 INSTALLATION ...

Page 15: ...11 MAN PNLPC 001 MC200 Series Industrial Panel Computers 10 4 and 12 1 Industrial Panel Computers Models MC220 and MC240 Cutout Dimensions 4 INSTALLATION ...

Page 16: ...12 MC200 Series Industrial Panel Computers MAN PNLPC 001 15 Industrial Panel Computer Model MC250 Outline Dimensions 4 INSTALLATION ...

Page 17: ...13 MAN PNLPC 001 MC200 Series Industrial Panel Computers 15 Industrial Panel Computer Model MC250 Cutout Dimensions 4 INSTALLATION ...

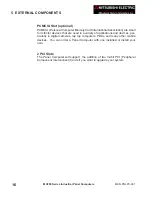
Page 18: ...rs are the following con nectors Two USB Universal Serial Bus Connectors There are two USB connectors located on the side of the unit Many devices now use this type of connector i e scanner printer mouse etc You can also use the USB to connect to an external Floppy Disk Drive or external CD ROM Drive One or both ports may be used Side Panel ...

Page 19: ... TX Ethernet standards LPT1 Parallel Port LPT1 is a 25 pin male D Sub connector that is used to connect to a printer VIDEO A 15 pin D sub female connector for attaching a VGA monitor to the Panel Computer The video signal sent to an external VGA monitor will duplicate the video resolution and image on the flat panel display COM1 COM2 COM1 and COM2 serial ports are 9 pin male D Sub connectors COM1 ...

Page 20: ...are used in a variety of applications and devices par ticularly in digital cameras lap top computers PDAs and many other mobile devices You can order a Panel Computer with one installed or install your own 2 PCI Slots The Panel Computer will support the addition of two 32 bit PCI Peripheral Component Interconnect Cards if you want to upgrade your system 5 EXTERNAL COMPONENTS ...

Page 21: ...l Computers 5 EXTERNAL COMPONENTS On the other side of the Panel Computer you will find the Power Connector and a Power Voltage Switch Use the power voltage switch to select 115 or 230 V AC Also shown is the location of the optional fan Side Panel ...

Page 22: ...he display brightness on the 10 4 and 15 mod els not available on the 12 1 model Use a small flat blade screwdriver to adjust the DIMMER pot and to access the POWER ON and RESET push but tons LEDs There are also 5 LEDs located on the bottom rear panel They are labeled PWR to indicate power is applied to unit HDD to indicate the hard disk drive is active 10Mb 100Mb and ACTIVE all indicate Ethernet ...

Page 23: ...ar panel of the computer as described on page 18 Consult the PCA1675 Embedded Processor Board Manual part number MAN P1675 001 to set up your Industrial Panel Computer s BIOS COM2 Serial Port Setup The default setting is RS 232 For RS 422 or RS 485 communications install jumpers as shown on page 15 For more information see the PCA1675 Em bedded Process Board Manual part number MAN P1675 001 BIOS S...

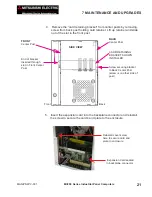
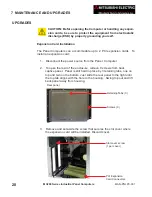
Page 24: ...o on the bottom Just slide the rear panel to the right until the top tab aligns with the hole in the housing Swing top out and lift back panel away from housing 3 Remove and set aside the screw that secures the slot cover where the expansion card will be installed Discard cover 7 MAINTENANCE AND UPGRADES Slot cover screw 1 per cover PCI Expansion Card Connectors UPGRADES CAUTION Before opening the...

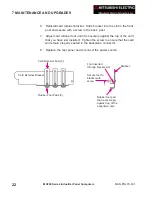
Page 25: ...RETAINING BRACKET SHOWN INSTALLED FRONT Center Post End of bracket inserted through slot in Front Center Post SIDE VIEW BACK Center Post 5 Insert the expansion card into the backplane connector and reinstall the screw to secure the card s end plate to the enclosure Expansion Card seated in backplane connector Reinstall cover screw here to secure card end plate to enclosure Screw securing bracket t...

Page 26: ...ntil it is securely against the top of the card that you have just installed Tighten the screw to ensure that the card will remain properly seated in the backplane connector 8 Replace the rear panel and reconnect the power source Bracket Foot inserted through bracket slot Rubber foot pad that rests snugly against top of the expansion card Secure foot to bracket with screw Card Retainer Bracket Rub...

Page 27: ... a grounding strap around your wrist to reduce the effects of electrostatic discharge ESD 2 Turn off the computer and any attached devices 3 Use a small vacuum cleaner to remove any dust from the slots and holes on the computer 4 Moisten a soft cleaning cloth with water and liquid dishwashing detergent DO NOT SOAK the cloth in the solution you must not let the solution drip inside the computer 5 U...

Page 28: ...aulics E Bromine wet N Butyl Cellosolve E Butyl Ether G Chloroform G Clorox E Coffee E Cupric Sulfate E Cyclohexanone N Cyclohexanol E Downy E Diethyl Ether G Dioctyl Phthalate G Ethyl Acetate E Ethanol E Ethylene Chloride G Fantastic E Formula 409 E Grape Juice E Heptane E Hexane E Hydrogen Peroxide N Isopropyl Alcohol E Ketchup E Lemon Juice E MEK F Methylene Chloride N Mineral Acids dilute E Mi...

Page 29: ..._____________________________________________________________ ______________________________________________________________________________________________ __________________________________________________________________________________________ __________________________________________________________________________________________ _____________________________________________________________...

Page 30: ...___________________________________ ____________________________________________________________________________________________ _____________________________________________________________________________________ ___________________________________________________________________________________ _________________________________________________________________________________________ ___________...

Reviews: