3-63
Teaching pendant (T/B)
3 Controller
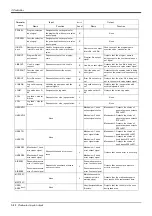
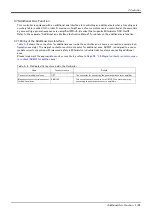
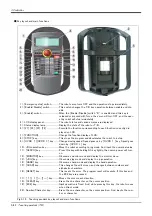
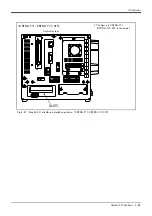
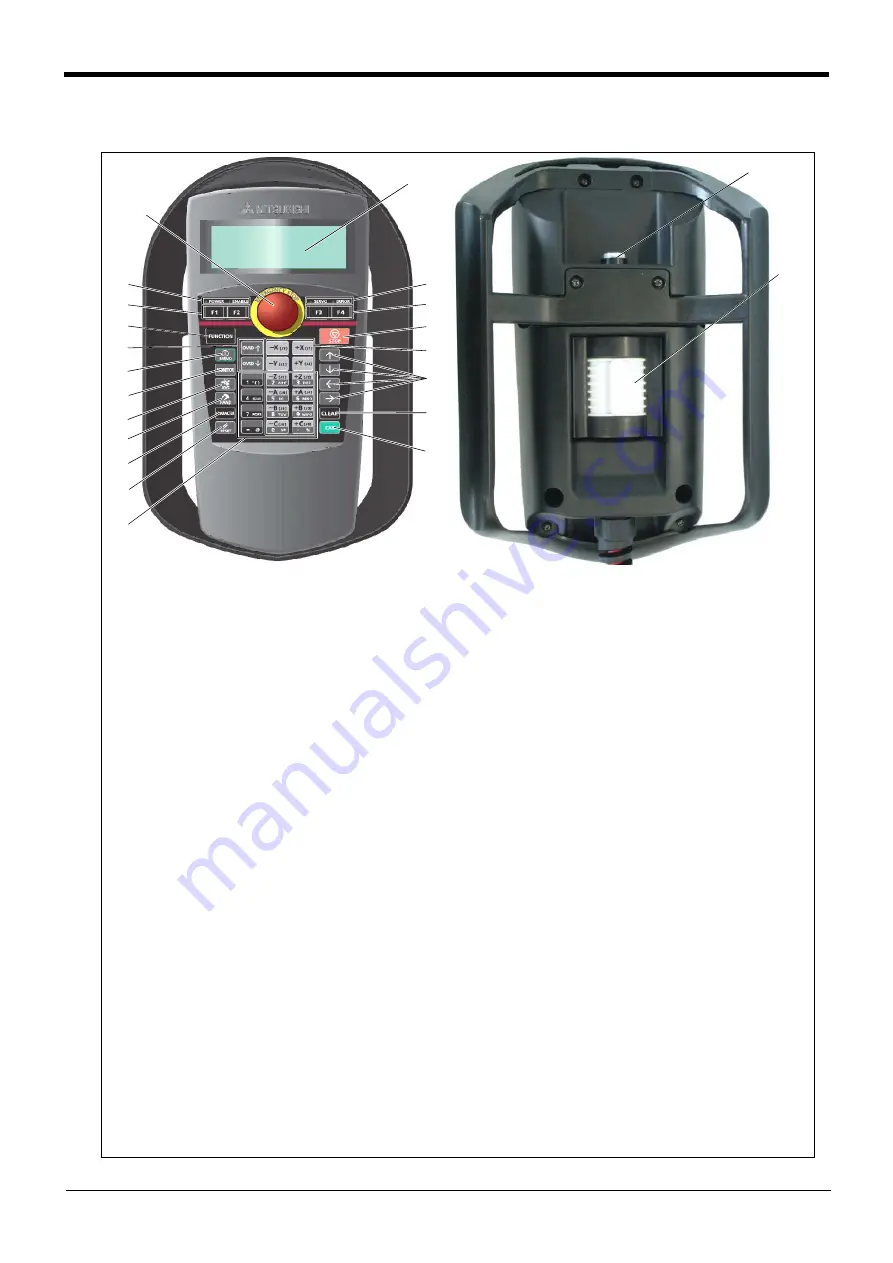
■ Key layout and main functions
Fig.3-19 : Teaching pendant key layout and main functions
⑪
⑭
⑬
⑫
⑨
⑤
⑥
⑦
⑮
⑯
⑳
⑤
⑥
⑧
⑱
⑲
⑩
⑰
①
④
③
②
1) : [Emergency stop] switch............... The robot servo turns OFF and the operation stops immediately.
2) : [Enable/Disable] switch................. This switch changes the T/B key operation between enable and dis
-
able.
3) : [Enable] switch .................................. When the [Enable/Disable] switch "2)" is enabled, and this key is
released or pressed with force, the servo will turn OFF, and the oper
-
ating robot will stop immediately.
4) : LCD display panel............................. The robot status and various menus are displayed.
5) : Status display lamp.......................... Display the state of the robot or T/B.
6) : [F1], [F2], [F3], [F4] ........................ Execute the function corresponding to each function currently dis
-
played on LCD.
7) : [FUNCTION] ....................................... Change the function display of LCD.
8) : [STOP] key ......................................... This stops the program and decelerates the robot to a stop.
9) : [OVRD ↑ ][OVRD ↓ ] key.......... Change moving speed. Speed goes up by [OVRD ↑ ] key. Speed goes
down by [OVRD ↓ ] key
10) : JOG operation key ........................ Move the robot according to jog mode. And, input the numerical value.
11) : [SERVO] key.................................... Press this key with holding AA key lightly, then servo power will turn
on.
12) : [MONITOR] key .............................. It becomes monitor mode and display the monitor menu.
13) : [JOG] key.......................................... It becomes jog mode and display the jog operation.
14) : [HAND] key....................................... It becomes hand mode and display the hand operation.
15) : [CHAR] key....................................... This changes the edit screen, and changes between numbers and
alphabetic characters.
16) : [RESET] key..................................... This resets the error. The program reset will execute, if this key and
the EXE key are pressed.
17) : [ ↑ ][ ↓ ][ ← ][ → ] key............ Moves the cursor each direction .
18) : [CLEAR] key .................................... Erase the one character on the cursor position .
19) : [EXE] key........................................... Input operation is fixed. And, while pressing this key, the robot moves
when direct mode.
20) : Number/Character key................ Erase the one character on the cursor position . And, inputs the num
-
ber or character

