background image

2


JEP0-IL9555


  Safety precautions 


Before installation, operation, maintenance, and inspection, please be sure to read this instruction manual and 
all other attached documents thoroughly in order to work safely with the equipment. Please ensure that you fully 
understand the equipment, safety information, and precautions that need to be taken before working with the 
equipment. Safety precautions are classified as “Caution.” 


Caution 

The case where a dangerous situation can arise and there is the possibility that moderate   
or minor injuries can occur, or property damage can take place if the equipment is handled 
incorrectly. 


Furthermore,  even  with  items  described  as 

 Caution,  there  is  the  possibility  of  serious  consequences 

depending on the situation. All of the described contents are important. Therefore, be sure to comply with them. 


Caution


1.


Installation and Wiring work 


Caution 

Ensure  that  the  equipment  is  mounted  and  connected  correctly.  Otherwise,  there  are  risks  of  failure,  burning,  or 

maloperation. 

Securely tighten the terminal connection screws. Otherwise, there are risks of failure and burning. 
For tightening torque of screws, refer to the following Table. 

Material 

Nominal 

dia. 

Standard value of 

torque 

Allowable range 

Place of use 

Steel 

M3.5 

1.10N

11.2kgf

cm


0.932

1.27N

9.5

12.9kgf

cm


Terminal block 

Steel 

M4 

1.65N

16.8kgf

cm


1.39

1.89N

14.2

19.3kgf

cm


Drawer  fixing  screw  of  unit-drawer  type 
(RD type) 

Steel 

M6 

5.49N

56kgf

cm


4.71

6.37N

48

65kgf

cm


Fixing screw for mounting 

Steel 

M10 

26.5N

270kgf

cm


22.6

30.4N

230

310kgf

cm


MPD-3C bottom screw 

Brass 

M4 

0.961N

9.8kgf

cm


0.824

1.11N

8.4

11.3kgf

cm


MZT primary terminal (k, ℓ) 
MPD-3T terminal 

The equipment must be correctly grounded using the designated grounding terminals where they exist. Failure to do so 
may lead to the risk of electric shock, equipment failure, malfunction or failure to operate. 

Ensure that the equipment is connected correctly in accordance with the details (e.g.: polarity or phase sequence) shown 
on the connection terminals. Otherwise, there is the risk of failure, burning, malfunction, or maloperation. 

All power supplies and transformers to the equipment must be of suitable capacity and rated load to avoid the risk of 
malfunction and maloperation. 

Be sure to return all terminal covers, protection covers to their original positions once any work is complete. If they remain 
uncovered there is a risk of electrical shock. 

The appropriate connectors must be used to ensure compatibility with the connector terminals to avoid the risks of failure 
or fire. 

When inserting subunit into the case, please ensure that there is no gap between front side of the subunit and the case. 
In addition, tighten lower screw surely. If the subunit is inserted inadequately, there are risks of malfunction or generation 
of heat.


2.


Operating and Setting 

The equipment must be used within the following range limits. Otherwise, there is a risk of reducing the performance and life of 
the product. 

Variation range of auxiliary power supply voltage 

Within –15 to +10% of the rated voltage 

Frequency variation   


Within ±5% of the rated frequency 

Ambient temperature  


–20 to +60


(under the state where dew condensation or freezing does not occur) 

Relative humidity 


30 to 80% on daily average 

Altitude 


2000m or lower 

The state where abnormal vibration, shock, inclination, magnetic field(

) are not applied 

The state where it is not exposed to harmful smoke/gas, saline gas, water droplet or vapor, excessive dust or fine powder, 
explosive gas or fine powder, wind & rain 

(

) If there is a large amount of current on main circuit surrounding the relay, the operation indicator may be magnetized and 

turned from black to orange color. In that case, please shield back of the relay by iron plate. 


Summary of Contents for MELPRO MGR-A3t-R

Page 1: ...1 JEP0 IL9555 Request Ensure that this Instruction Manual is delivered to the end users and the maintenance manager ...

Page 2: ...t Failure to do so may lead to the risk of electric shock equipment failure malfunction or failure to operate Ensure that the equipment is connected correctly in accordance with the details e g polarity or phase sequence shown on the connection terminals Otherwise there is the risk of failure burning malfunction or maloperation All power supplies and transformers to the equipment must be of suitab...

Page 3: ...el Otherwise there are risks of electric shock injury failure malfunction and maloperation Handling and maintenance of the equipment must only be carried out after gaining a thorough understanding of the instruction manual Otherwise there is the risk of electric shock injury failure malfunction or maloperation When replacing the equipment use a product of same model rating and specifications Other...

Page 4: ... special damages and secondary damages whether foreseeable or not compensation for accidents and compensation for damages to products other than MITSUBISHI ELECTRIC CORPORATION products and other tasks 4 Applications of products 1 The user is requested to confirm the standards the regulations and the restrictions which should be applied in case of utilizing this product and another one in combinat...

Page 5: ...ecommended to replace 2 Product supply including repair parts is not available after production is discontinued 6 Changes in product specification The specification given in the catalogue manuals or technical documents are subject to change without prior notice 7 Scope of service The technical service fee such as engineer dispatching fee is excluded in the price of our products Please contact to o...

Page 6: ... 60Hz SW1 OFF Output contact Self hold SW2 ON Auto reset SW2 OFF Display Self monitoring The RUN indicator green color is lighted in normal condition Operation indicator The indicator turns from black into orange color when the protection element is put into operation Manual resetting type Numerical display 1 Lo means LOCK setting the protection element is locked 2 In is the display for instantane...

Page 7: ...ated auxiliary power supply I0 0 Criteria No malfunction and no abnormal indication Forward backward Right left Up down 10 5 10 2 5 5 30 16 7 0 4 2 600 Shock Maximum acceleration 300m s2 Direction 3 directions in forward backward right left and up down Criteria No abnormality when applying two shocks in each direction Insulation resistance Test circuit Between all circuits and earth E terminal bet...

Page 8: ... Making Closing DC110V 15A L R 0ms DC220V 10A L R 0ms AC110V 10A cosφ 0 1 Breaking Opening DC110V 0 3A L R 7ms AC110V 5A cosφ 0 1 AC220V 1A cosφ 0 1 Breaking Opening AC110V 60A The 2Ω power factor 0 5 loads in parallel to the contacts Note For details refer to JIS C 4601 1993 ...

Page 9: ...ows the result of self monitoring It lights up in normal condition Setting switches for operation value and time Set the setting values The black part is equal to maximum value but the numerical display is turned off Don t leave the switches with halfway state Numerical display LED Following item is displayed by indicator select switch setting I0 measurement Pickup Setting value Fault record Clear...

Page 10: ... is auto reset the display shows FU 4 Fault record function Display of fault records When a fault occurs the relay outputs the operating signal and at the same time the input value of zero sequence current is recorded When the indicator select switch is set to the position of fault record the records are displayed starting from the latest record to the oldest one at approximately 2 second interval...

Page 11: ... ℓt terminal of ZCT 1 Connect line 2 Current limiter is to be specified according to the rating of CB s trip coil 3 If S1 terminal and a built in reactor are used there is no need of wiring for S0 terminal 4 This figure shows that MOC A3T R overcurrent relay is combined 5 Do not short circuit kt and ℓt terminal of ZCT 6 If the power supply of S1 S2 is derived from the load side of CB the pallet sw...

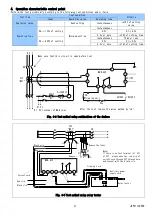
Page 12: ... 0 4A T 0 2s Branch feeder I0 Equivalent or smaller to power receiving point T Instantaneous 70ms or less For details please consult with an electric power company 2 Using condition settings For all using condition setting switches factory settings are set to a default of OFF 1 Frequency SW1 50Hz ON 60Hz OFF 2 Output contact SW2 MGR A3V R only Self hold ON Auto reset OFF 1 Connect line 2 This figu...

Page 13: ...R type relay the output contact is auto reset type If you want to use the alarm circuit as self hold type please build a circuit as shown in Fig 3 7 7 Connection to ZCT Only one ZCT can be connected to one MGR A3V relay If two or more ZCTs are connected in parallel correct detection may not be possible Caution on withstand voltage test 1 After the relay is mounted into the panel when the test is p...

Page 14: ... operate in the case of large charging current This method is recommended in the regulations of JEAC 8011 If the charging current is large use a DGR 2 Within the protection range But the GR does not operate Only the DGR on the distribution substation operates Charging current reciprocates through ZCT So the GR does not operate If the charging current is large use a DGR 3 Same as No 2 Same as No 2 ...

Page 15: ... not operate Charging current does not pass through ZCT So the GR does not operate Same as No 4 Capacitance and charging current System voltage Form Cross section area mm2 6600V cross linked polyethylene cable CV CE EM CE CVT CET EM CET JIS C 3606 Capacitance μF km Charging current A km 6 6 kV 3 wire 3 wire bundle earth 8 0 63 0 905 14 0 72 1 034 22 0 81 1 163 38 0 96 1 379 60 1 11 1 594 100 1 35 ...

Page 16: ...r defined characteristic control point before in service operation and then check accuracy of the relay After that execute the test at the user defined control point and use this data as a later reference Perform the test in combination with ZCT MZT type Otherwise direct input to the relay may cause burning out 2 Withstand voltage test a Please disconnect the relay from ZCT If a voltage higher tha...

Page 17: ... 8 Test method using combinations of the devices Fig 3 9 Test method using relay tester ZCT MZT k kt ℓt ℓ K L DS CB Tripping coil P1 P2 500Ω 0 1000Ω AC110V AC100V or DC100V 52a Make sure that this circuit is open before test After the test remove the wires marked by P1 P2 terminal of MGR relay R1 R0 R S T A E MGR A3V Z1 Z2 P1 P2 ED a c b ZCT MZT P1 P2 a c b E MGR A3V Z1 Z2 Note If there is no test...

Page 18: ...nal layout 9 9 9 9 9 9 14 E P1 c a Z1 B1 P2 b Z2 B2 9 9 9 9 9 9 14 S1 T1 P1 S2 O1 Z1 B1 S0 T2 E P2 O2 Z2 B2 MGR A3V R MGR A3T R Do not connect to the terminals or the relay may not operate properly Fig 3 10 Terminal layout ...

Page 19: ...up the upper side of the cover from the inner surface Then remove from the protrusion of the body Installing the cover As shown in Fig 3 12 mount the holes on the upper side of the cover to the protrusion of the body Then press down lightly on the lower side of the cover and mount to the protrusion of the body in the same way as above When replacing the cover during operation be careful not to tou...

Page 20: ...ion to the relay The degree of degradation will be variable depending on the purpose aging usage environment and unevenness on the performance of each part Our company designs its products so that the recommended renewal period is 15 years or more However there may be some possibilities to occur any failures before reaching 15 years due to above reasons To prevent unwanted operation or no operatio...

Page 21: ...HEAD OFFICE 7 3 MARUNOUCHI 2 CHOME CHIYODA KU TOKYO 100 8310 JAPAN First edition Mar 2021 ...

Reviews: