background image

1. Features 


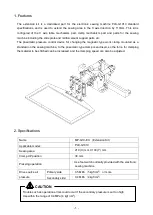
The extension kit is a dedicated part for the electronic sewing machine PLK-G1010 standard 

specifications, and is used to extend the sewing area in the X axis direction by 110mm. This kit is 

configured of the X axis table mechanism part, clamp mechanism part and parts for the sewing 

machine including the slide plate and reinforcement support parts, etc. 

The pneumatic pressure control device for changing the magnetic type work clamp, mounted as a 

standard on the sewing machine, to the pneumatic type clamp is enclosed, so the force for clamping 

the material to be stitched can be increased, and the clamping speed can also be adjusted. 


2. Specifications 


Name 


  MP-G10-EX  (Extension Kit) 

Applicable model: 


  PLK-G1010 

Sewing area 


  210 (X) mm X 100 (Y) mm 

Clamp UP position 


  30 mm 

Pressing operation 


  Use foot switch normally provided with the electronic 

sewing machine 

Drive source air 

pressure 

Primary side 

  0.5 MPa

5 kgf /cm

2

or more 

Secondary side: 

  0.4 MPa

4 kgf /cm

2


Trouble such as operation errors could occur if the secondary pressure is set too high. 

Use within the range of 0.4 MPa (4 kgf /cm

2

).


CAUTION


- 1 - 

Summary of Contents for MP-G10-EX

Page 1: ...INDUSTRIAL SEWING MACHINE Attachment MODEL MP G10 EX TECHNICAL MANUAL Extension Kit A180E610P03 ...

Page 2: ...rcumstances Always follow the instructions of both levels because they are important to personal safety CAUTION INDICATIONS No Caution indication Description 1 Precaution for sewing machine operation Indicates that removing the safety and operating the sewing machine for some other purposes with power on are prohibited Please do not operate the sewing machine without protective equipment such as a...

Page 3: ...ted as a standard on the sewing machine to the pneumatic type clamp is enclosed so the force for clamping the material to be stitched can be increased and the clamping speed can also be adjusted 2 Specifications Name MP G10 EX Extension Kit Applicable model PLK G1010 Sewing area 210 X mm X 100 Y mm Clamp UP position 30 mm Pressing operation Use foot switch normally provided with the electronic sew...

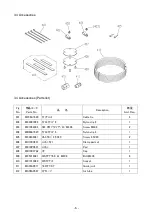
Page 4: ...3 Configuration The Fig numbers in the drawing correspond to the part numbers given in the following explanations 3 1 Clamp mechanism 2 ...

Page 5: ...セフティソケット M3X6 Safety socket bolt M3X6 2 123 MH10A4477 ストッパ Stopper 2 124 M94008070 ローラリテーナ Roller retainer 4 125 M94019017 セフティソケット M4X14 Safety socket bolt M4X14 6 126 MH10A2957 オサエコテイレース Fixed race 2 127 MH10A3957 オサエイドウレース Movable race 2 128 MH10A4957 オサエコテイレース Fixed race 1 129 MH10A3601 オサエトリツケイタ Clamp foot 1 130 M95005017 セフティソケット M5X10 Safety socket bolt M5X10 4 131 M94005022 ロッカクアナツキボタンホ...

Page 6: ...3 2 X Y Table mechanism 3 3 Pneumatic pressure control unit 4 ...

Page 7: ... not enclosed with this kit Use the standard specification PLK G1010 parts 3 3 Pneumatic pressure control unit Parts list Fig 部品コード 品 名 Description 数量 No Parts No Amt Req 301 MB61A5601 デンジベントリツケイタ Valve mounting plate 1 302 M91066004 SW PW プラマイナベネジ M4X25 Screw M4X25 4 303 ME10X0599 デンジベンクミタテ Solenoid valve assy 1 304 M90511050 ザガネ 5 Washer 5 2 305 M95003017 セフティソケット M5X8 Safety socket b...

Page 8: ...403 M91054004 SW PW プラマイナベネジ M4X8 Screw M4X8 2 404 MB60A1620 ナイロンクリップ 8 Nylon clip 8 1 405 M90409041 マルモクネジ 4 5X20 Screw 4 5X20 2 406 MH10X0691 パッキンセット Clamp pad set 1 407 ME10P0691 パッキン Pad 1 408 MB10X0742 フタ Cap 1 409 M95018021 ロッカクアナツキボルト M4X8 Bolt M4X8 4 410 M91010089 ロッカクソケット Socket 1 411 MA30A0571 ワンタッチツギテ Quick joint 1 412 MS06A0567 エアチューブ Air tube 1 6 ...

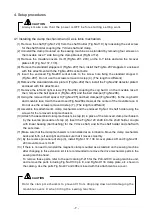
Page 9: ... race X Do not use the screws removed in step 7 The length is different 9 Assemble this attachment s clamp mechanism and the enclosed Fig No 119 shaft holder using the screws for the removed clamp mechanism 10 Attach the assembled clamp mechanism in step 9 in place of the removed clamp mechanism by the reverse procedure of step 2 Insert the Fig No 120 shaft into the shaft holder couple with linear...

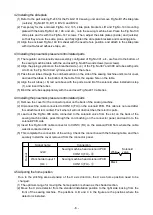
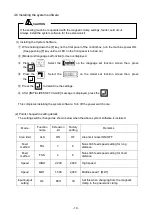
Page 10: ...olenoid valve installed in step 1 and insert the tubes 5 Bind the air tubes appropriately with the enclosed Fig No 401 Cable ties 4 4 Installing the pneumatic pressure control related parts 1 Remove the cover for the connector panel on the back of the sewing machine 2 Disconnect the cable connected to CON13 FU on the solenoid PCB This cable is not used after this attachment is mounted Fix it where...

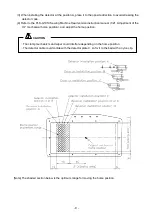
Page 11: ...sion instruction manual 7 21 Adjustment of the X Y mechanical home position and adjust the home position Note The shaded section below is the optimum range for moving the home position The clamp mechanism and wiper could interfere depending on the home position The detector cable could collide with the detector plate X so fix it to the bed with a nylon clip CAUTION 9 ...

Page 12: ...he system software Turn off the power switch once 2 Points changed in setting details The settings will be changed as shown below when the above system software is installed Mode Function name Extension kit Factory setting Remarks Area limit ALS ON OF Area limit cancel ON OFF Feed method FSL 7 8 Non stitch feed speed setting for long distance Feed method FSS 4 6 Non stitch feed speed setting for s...

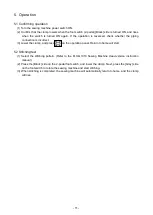
Page 13: ...incorrect 3 Lower the clamp and press on the operation panel Return to home will start 5 2 Stitching test 1 Select the stitching pattern Refer to the PLK G1010 Sewing Machine Head version instruction manual 2 Press the Black side on the 2 pedal foot switch and lower the clamp Next press the Gray side on the foot switch to rotate the sewing machine and start stitching 3 When stitching is completed ...

Page 14: ...MEMO ...

Page 15: ...MEMO ...

Page 16: ...Printed in Japan ...

Reviews: