background image

Before use

Operation

Cleaning

When in trouble

13

How to maintain your automatic ice-maker

How to maintain your automatic ice-maker

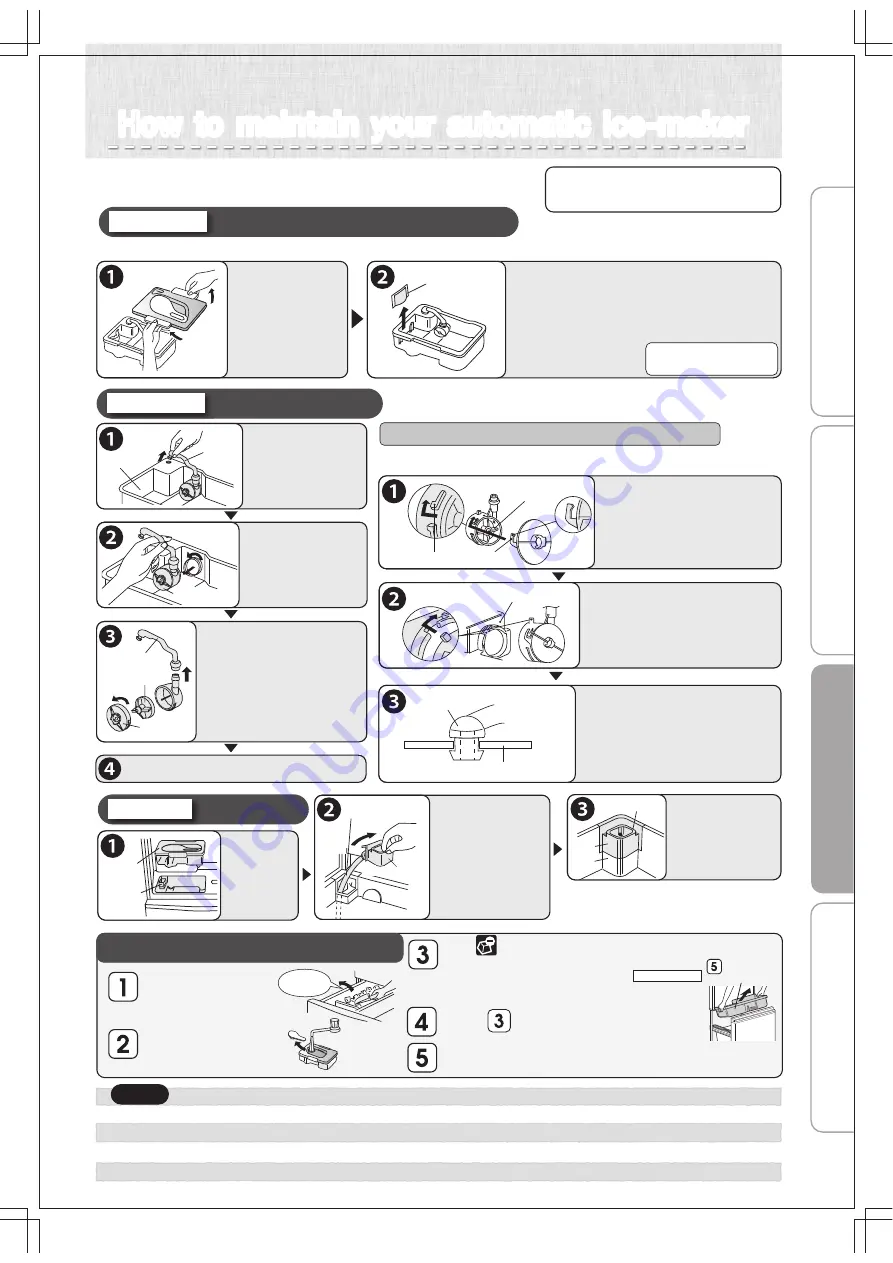
Please do periodic maintenance to prevent the occurrence of water

scale, mold, etc. Please remove water when not making ice.

Take out

ice cubes.


Do not use washing agents such as kitchen detergents, benzene or bleach to clean the water filter. It will cause ice to have an odor.
If you use a bleach to clean your water supply tank or lid, please follow product directions carefully.
Assemble the water supply pump properly and firmly. If it is not assembled properly, it may not make ice or it may make a loud sound.
Please attach the lid of water supply tank securely. If the lid is not attached properly, the lid may be out and the water supply tank will fall.

Take ice out of the

ice storage container,

close the freezer door.

Fill water supply tank

with water, put back

in original position.

Press      for about 5 seconds (at temperature adjustment

panel at inner back of freezer compartment.)

The stop ice-maker light (red) will blink for about 1 minute.

(It rinses the ice-maker tray with water from the water supply tank.)

When light stops blinking, it will return to the previous indication.

Repeat      2 or 3 times.

Remove the Freezing Case (upper) discard water and ice.

Do not throw out the noise prevention mat.

Freezing Case

(upper)

Do not use a dishwasher or dryer

because it may cause deformation.

For once-a-week

If mould forms easily with certain types of water, clean about 2 or 3 times a week.

Water supply tank / Purification filter

Take off the lid

and wash with

water.

(Temperature

tolerance

approx 60 

o

C)

Purification filter

Remove filter and wash with water.

Normally, it does not need replacing.

Please replace for the following reasons:

If something other than water was put in

and the opening got blocked.

If it is damaged.

If mould, etc. is forming.

Water supply pump

For once-a-month

Turn the pump

and take out.

Take out the pipe,

Turn the cap and remove,

Take out the impeller

and wash with water.

Water tank

Pipe

Water supply pump

Impeller

Pipe

Cap

Water supply pipe

For once-a-month

Take out

the water

supply tank.

Water supply

tank

Water supply

pipe

Take out the

water supply pipe

and wash with

running water.

Water receptacle

Water receptacle

Hose part

The water receptacle

and hose part

cannot be removed.

Return back to

original positions.

Facet A

Facet B

Water supply pipe

Make sure to insert the water

supply pipe properly so that

there’s no difference in surface

level between facet A and facet B is.

Return the water supply tank and, if does not

sit in properly, re-set the water supply pipe.

If removal or assembly are not done correctly,

a problem such as a water leakage will occur.

If it is not assembled properly, it may not make ice or it may make

a loud sound. Please check on the following.

The claw on the cap (   )

is turned to put onto the

protruding part (   ) of

the water supply pump.

Impeller

Turn

Turn

Water supply tank

Check to make sure that

the impeller is inside.

Attach the water supply

pump properly to the 

water supply tank by

turning and attaching.

Insert the pipe into the

water supply tank opening,

Connect the pipe to the

water supply pump.

Check to make sure that there are no substances

at the connection point of the two pipes.

Water supply tank

Pipe

Remove pipe 

from tank.

The impeller is made with a

magnetic material. Clean thoroughly

with water, making sure there

are no substances on it.

Cleaning the ice-making tray (rinsing)

Pointers for assembling the water supply pump

To buy another filter, please

inquire at the store where

you bought your unit.

Return parts by following the reverse procedure.

Notice

Summary of Contents for MR-CX306EM

Page 1: ...mless to the environment and do not affect the ozone layer and global warming Please read this manual carefully and follow the information contained within In particular be sure to read the safety precautions before using this refrigerator Be sure to receive your copy of the warranty from the retailer and confirm that the purchase date and retailer name are written on the warranty Store this opera...

Page 2: ...Service Centre for a technician to replace the power cord The power cord should be designed for this model If the power cord is damaged WARNING When replacing the interior refrigerator light or when taking care of the unit pull out the electrical plug Not doing so can result in an electric shock or injury For your safety please be sure to follow these instructions For your safety please be sure to...

Page 3: ... Transporting About using your refrigerator If insufficiently attached it may fall out and cause injury Make sure that glass shelves or pockets are attached properly Always follow instructions Do not do Do not encapsulate refrigerant other than our specification It may cause rupture explosion fire etc when using repairing disposal etc Do not do Do not get wet Do not wash with water or spill liquid...

Page 4: ...water can get on the unit or where there is a lot of moisture Due to insulation failure it may cause an electric shock or fire Do not get wet Allow some space around the refrigerator If the refrigerant gas leaks it can remain in the area and there is a risk that it may cause a fire or explosion Always follow instructions Turning on the power Turn on the power of the refrigerator as soon as possibl...

Page 5: ...tor Toe grille Toe grille Please insert in parallel until the cover is in place Adjustable leg Caster Start using It takes time to cool down t Put in warm food items or ice cream after the refrigerator has been adequately cooled down t Keep opening and closing of the door to a minimum and open for only a short time t In the summer it will take approx 24 hours to make the first batch of ice It may ...

Page 6: ...nk there is a risk of rupture when freezing Refrigerator Insert drinks or often cooked food in refrigerator compartment The sliding case can store meats fish dairy products processed foods etc at a lower temperature than the refrigerator compartment Using each compartment Sliding case compartment Sliding case compartment Adjustable shelf LED light Air blowing outlet Bottle pocket How to remove she...

Page 7: ...oor is left open Page 8 For the temperatures indicated the freezer and refrigerator compartments were adjusted at the Normal position with an ambient temperature of 30 o C with refrigerator doors closed and containing no food after the temperature stabilised the temperature criteria was measured toward the lower mid interior of the refrigerator Vegetables Case Sliding Case Freezing Case upper Free...

Page 8: ...ts 2 3 o C warmer than MID If it s too cold Gets 2 3 o C colder than MID If you want it colder Press when you want to stop auto ice making or restart ice making Page 10 Ice making stop switch Chilled Door opening time 1 min 2 min 3 min 4 min More than 5 min Alarm sound Pi Pi Pi Pi Piiii Piiii Pi Pi Pi Pi Piiii Piiii Piiii Pi Pi Pi Pi Piiii Piiii Piiii Piiii Piiii continuity after Pi Pi Pi Pi Pi Pi...

Page 9: ...lease increase the number of cleaning times and be sure to clean it thoroughly Page 13 Take out the water supply tank remove the tank plug and fill with water Put the tank plug on the water supply tank carry carefully without tilting it and return to its original position When carrying the water supply tank make sure that the symbol is in the closed position If the tank is tilted water will spill ...

Page 10: ... period of time the ice cubes may cling together or become smaller About the ice Ice making may take longer with frequent opening closing of the door or depending on the ambient temperature It may cause injuries Please pay attention when crushing the ice or it can get stuck in the ice storage corner CAUTION To stop ice making Press button when the ice making stop light red is off The ice making st...

Page 11: ...hen detergent polishing powder soap powder alcohol benzine thinner petroleum acid scrub brush hot water etc Plastic parts door handle cap case etc will crack and glass shelf or painted surface may damage or rust Power Plug For safety please periodically clean power plug and cords Unplug the electrical plug from the outlet and inspect Is there any damage or abnormal heat coming from the plug or cor...

Page 12: ... and take out Pull forward and take out If the glass shelf is not attached properly it will fall out which may cause injury Ensure that glass side is attached or removed carefully Always follow instructions Sliding case Pull forward Sliding case lid cannot be removed If difficult to take out please remove sliding case after removing bottle pocket Free pocket Bottle pocket Small Items pocket Lift u...

Page 13: ...ease replace for the following reasons If something other than water was put in and the opening got blocked If it is damaged If mould etc is forming Water supply pump For once a month Turn the pump and take out Take out the pipe Turn the cap and remove Take out the impeller and wash with water Water tank Pipe Watersupplypump Impeller Pipe Cap Water supply pipe For once a month Take out the water s...

Page 14: ...grees and drain the water from the evaporation tray via the drainage port on the lower rear side The evaporation tray is not visible from the outside 2 or more people should hold the hand holds on the lower inside of the front and the upper side of the rear and carry the refrigerator slowly Do not lay or load on its side it will cause damage to the compressor Water discharge outlet Front side lowe...

Page 15: ...e summer approx 50 60o C It is because there is heat radiation and dew formation preventing pipes on the side and ceiling There is no problem in this situation because this operation is necessary to keep the unit cool There is a radiating fan at the bottom the warm air may come out Heat radiation pipe Dew formation preventing pipe If this happens Please check this out Please do this This is the re...

Page 16: ...e Page 8 This is because there is a waterway that flows water evenly into the ice maker tray Please do not fill water above the full line mark on the water supply tank If ice is made with water that has a lot of mineral substances white sediment may form inside the cubes It is harmless Please ensure there is a gap around items It makes sound when the refrigerator connects with the food items If it...

Page 17: ...e 13 Please do a regular cleaning maintenance Others Dew Frost Dew on the outside or inside of the refrigerator Frost adheres to the freezer compartment Water drips on the floor There is a scratch line in transparent parts I get static noise from the TV etc The odour bothers me Food items ice Troubleshooting continue Troubleshooting continue Quickly open and close the door Cold air may leak outsid...

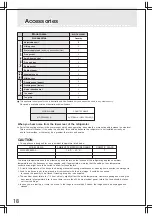
Page 18: ...ght have to be varied to allow for these factors 2 A rise in temperature of the frozen food during manual defrosting maintenance or cleaning could shorten the storage life 3 Food to be frozen is not to be placed in direct contact with food in storage It could be necessary to reduce the quantity to be frozen if freezing every day is anticipated 4 The electrical power failure for 1 2 hour will only ...

Page 19: ...Before use Operation Cleaning When in trouble 19 MEMO MEMO ...

Page 20: ...s ABN 58 001 215 792 Wellington Office Head Office 1 Parliament Street Lower Hutt PO Box 30772 Phone 04 560 9147 Fax 04 560 9133 Auckland Office Unit 1 4 Walls Road Penrose PO Box 12726 Phone 09 526 9347 Fax 09 526 9348 Christchurch Office 44 Halwyn Drive Hornby PO Box 16904 Phone 03 341 2837 Fax 03 341 2838 SOLE AGENT in New Zealand BLACK DIAMOND TECHNOLOGIES LIMITED BDT 348 Victoria Road Rydalme...

Reviews: