14
15
When in trouble
Before Use
Operation
Cleaning
When in trouble
Before Use
Operation
Cleaning
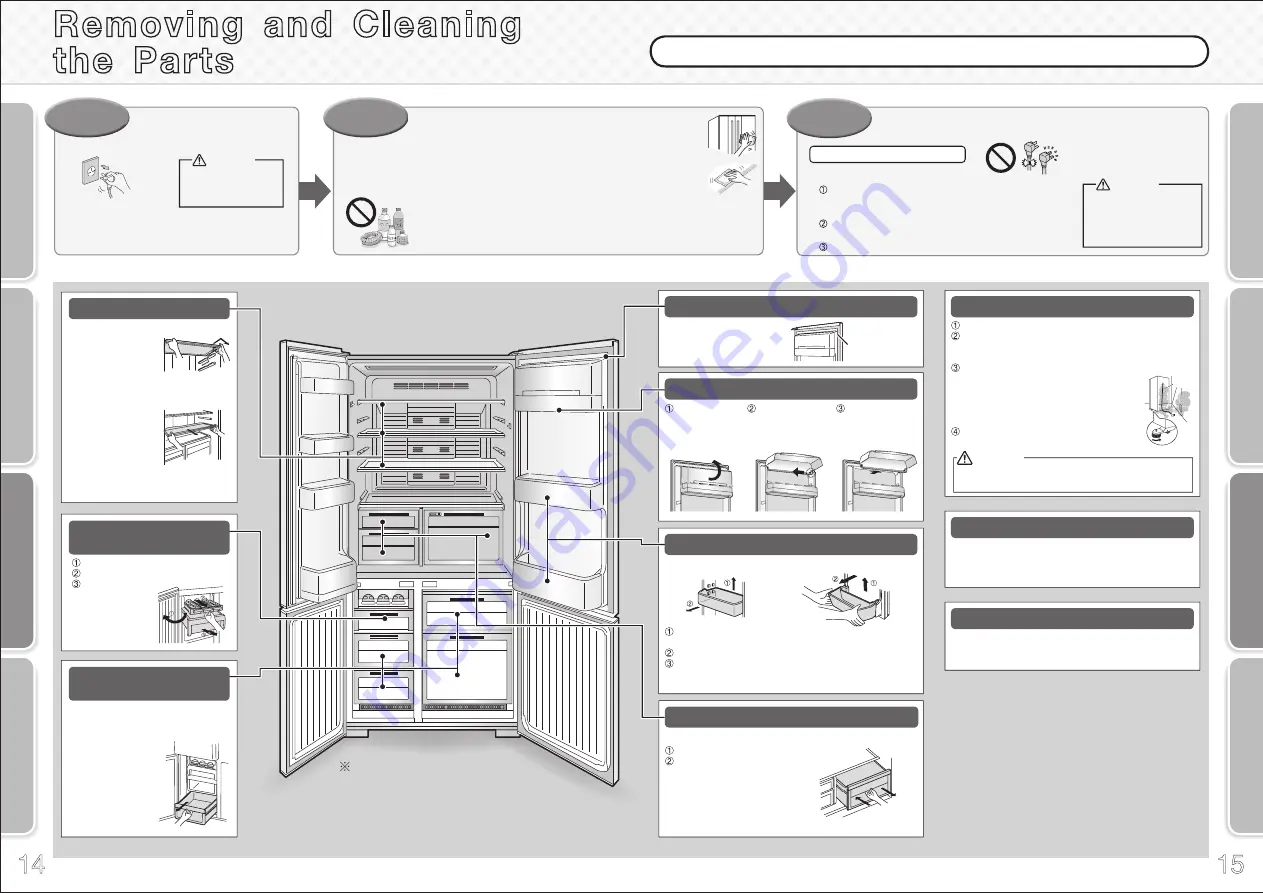
How to clean
Before cleaning
After cleaning and periodically
Step
2
Step
1
Step
3
Remove the power plug
Wait at least 10 minutes before reinserting the power plug
into the socket.
If you insert the plug immediately, the mechanism will not
function.
rinse with water.
Wipe with a soft cloth soaked in lukewarm water, or remove the parts and
!
(Wipe the control panel with a soft, dry cloth.)
For stubborn dirt, wipe using water mixed with a weak concentration of kitchen
detergent (neutral
!""
only). In particular, be sure to wipe off oily dirt because leaving it may damage
the plastic parts.
Do not use following alkaline or low alkaline kitchen detergents,
scouring powder, powdered soap,
alcohol, benzene, thinner, oil, acid, scrubbers, boiling water, or
similar substances.
Doing so may cause the plastic parts (such as the door
handles, caps and cases) to split,
or damage or rust the doors or painted surfaces.
Check the power plug and cord
For safety, clean periodically.
Unplug the power plug from the socket and check it.
Check for damage or abnormal heating on the power plug
!
and cord.
Remove any dust from the power plug and surrounding area,
and then wipe with a dry cloth.
Firmly insert the power plug into the socket.
Failure to unplug
may result in an
electric shock.
Warning
If the power plug or
cord is damaged or dust
accumulates, it may cause
an electric shock or a fire.
Warning
How to remove the upper shelf
Lift the upper shelf with
both hands to take it out.
How to remove the middle and
lower shelves
Remove the middle and lower shelves
with both hands.
Reverse the steps to put
back the shelves.
!"#$"%$&"'(&"&)("&(*+(,(-".'/00"0)('1(0"
fall off.
Tempered glass shelves
Capsule door pocket
Dirty seal is easily
damaged and can cause
refrigerated air to leak.
Door seal
Door seal
Utility case
Fully pull out the slide case.
Lift the end on your side.
Vegetable case
Lift the end on your side to pull out the
Vegetable case.
*The ceiling shelf on the upper side of
cases cannot be removed.
Utility case / Vegetable case
LEDs in the refrigerator compartments and behind
of Vegetable case.
Contact the retail store at which you purchased this refrigerator
from or MITSUBISHI ELECTRIC SERVICE CENTRE.
Replacing lamps in compartments
Wipe with a soft dry cloth.
*Do not use alcohol, benzene, steel wool or alkaline-base detergents.
They can cause the control panel to malfuction.
Control panel
Remove the support covers from the refrigerator.
Turn the adjustable supports to lift them from the floor and
move the refrigerator off the wall. Use protective materials so
as not to scratch the floor.
Wipe away all dust and soil from the rear of the refrigerator,
the wall and the floor. Wipe them clean. Air
circulation can cause dust to collect at the rear of
and on the floor under the refrigerator, creating
black soiled areas. Clean the area periodically as
it also contributes to energy saving.
Check the floor for a sign of water leaks from
the refrigerator.
The rear of the refrigerator and the floor
Do not put your hands, fingers or feet underneath the refrigerator.
Doing so can cause injury.
Caution
Open the door.
Slide out the ice tray and remove.
Draw the ice storage
case towards you
and remove.
Ice tray /
Ice storage box
Pull the case towards you. Hold
the end on your side and lift the
case.
Cases in the Freezer
compartment
Soot, dirt
and dust
Alternately lift up the left and right sides (the pockets are securely
installed).
Pull towards you.
Be sure to install the Adjustable pocket and the bottle pocket
securely and correctly.
(Or else, the pocket may fall off, causing a personal injury.)
Adjustable pocket Bottle pocket
Lift the cover by
100 degrees.
Push the cover to one
side and remove it while
pushing in the rib of the
hinge cover with your finger.
Remove the cover
towards you.
Adjustable pocket / Bottle pocket
Removing and Cleaning
the Parts
To return the parts, perform the removal procedures in reverse.
Illustration of the MR-L710EH


