16
17
When in trouble
Before Use
Operation
Cleaning
When in trouble
Before Use
Operation
Cleaning
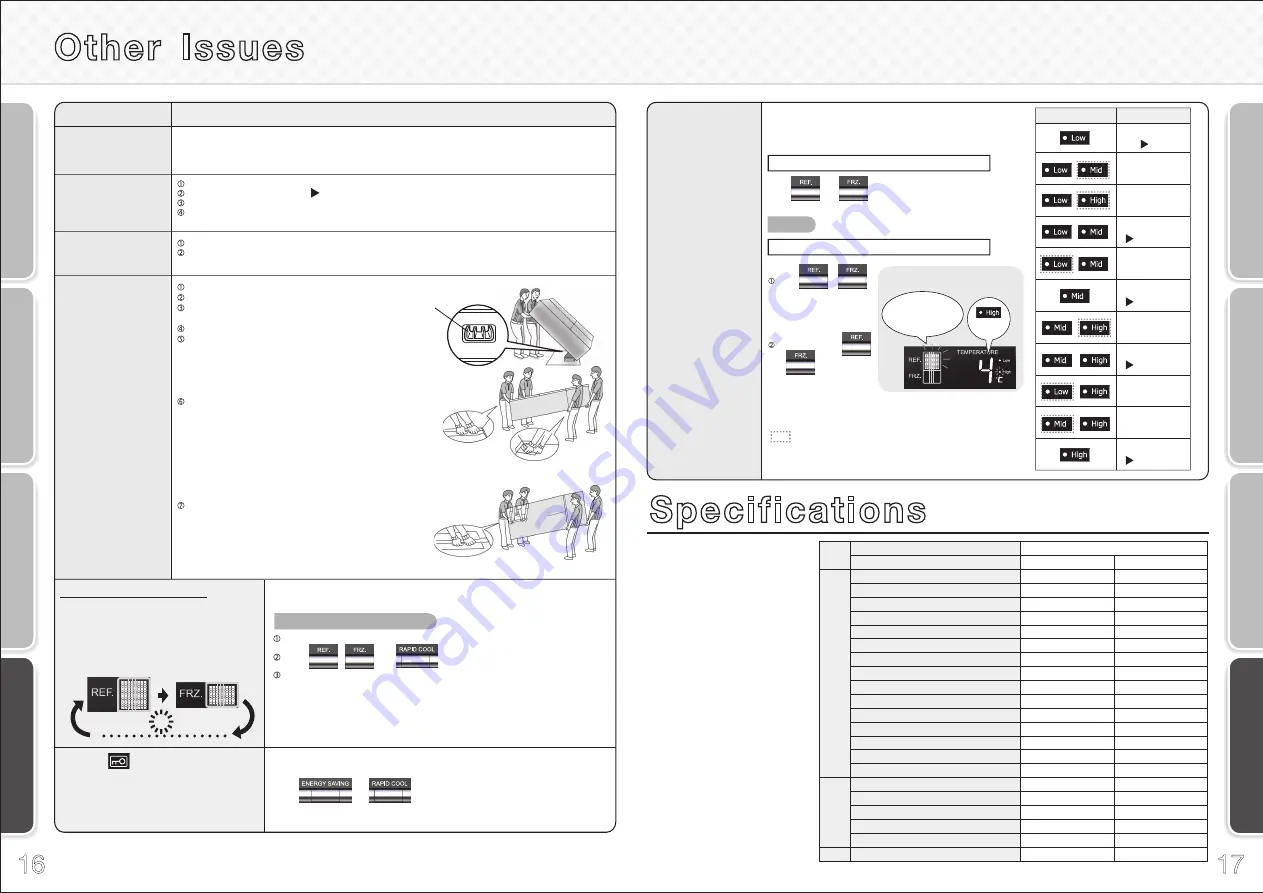
To control the
temperature more
precisely
(Temperature fine
adjustment mode)
Action
Issue
Minimize the frequency of opening the doors, and avoid adding more food.
!
Control panel settings other than the temperature settings may change. Check the settings. (Child safety lock rapid cooling,
!
etc.)
Remove support covers.
Raise the adjustable supports.
Lay protective material under the casters and rear supports to prevent floor damage.
Move the refrigerator to the forward and backward directions.
* Dragging in directions other than forward and backward may damage the floor.
Remove all stored food from inside the refrigerator.
Unplug the power plug, clean the interior of the refrigerator, and open the doors for 2 to 3 days to dry the inside.
* If the refrigerator is not dried sufficiently, it may cause mold, odors, or refrigerant (gas) leaks due to condenser corrosion.
Keep the doors of the refrigerator compartment open.
Press , and at the same time for about 5 seconds.
Make sure that there is no blinking of the display area for after a minute.
(If the display still blinks, the demonstration operation has not been canceled.)
A power outage occurs
To move the
refrigerator or change
its orientation
When not using the
refrigerator for a long
time
When the
blinks rapidly (about
5 times per second) or the alarm cannot
be turned off
To transport the
refrigerator
(when moving house, etc.)
The refrigerator does not cool in this mode. Contact the retail store where you purchased
!
the refrigerator, or cancel the demonstration operation with the procedure below.
Page 7
Press and at the same time for about 3 seconds to stop the alarm.
!
An inspection is required. Contact the retail store where you purchased the refrigerator
or a MITSUBISHI ELECTRIC SERVICE CENTRE or Customer Service representative.
Contact the retail store where you purchased the refrigerator as soon as possible.
Alternatively, contact MITSUBISHI ELECTRIC SERVICE CENTRE.
When the refrigerator or freezer compartment is selected,
you can control the temperature more precisely.
Setting the temperature fine adjustment mode
Performing the temperature fine adjustment
To cancel
The same operation as above.
Press or to
display the compartment
for which you want to
perform fine temperature
adjustment.
* The values on the right are approximate. The temperature may differ from the
values on the right, depending on factors such as the food storage condition and
how often the doors are opened.
This represents a blinking display.
To cancel the demonstration operation
Demonstration operation status
When the entire display blinks 3 times at a
certain interval even though you have not
operated any buttons
When the compartment displays and
temperature control displays on the control
panel blink in order
This appliance is designed for
use in Australia, New Zealand
only and can not be used in
any other country.
No servicing is available outside
of Australia, New Zealand.
When temperature fine adjustment mode is set, the compartment
!
display blinks about every 10 seconds.
Press and
at the same time for about 3 seconds.
(Until the buzzer sounds twice.)
Empty any water or ice from the ice tray.
Wear protective gear (gloves).
Remove the support cover and raise the
adjustable supports.
Unplug the power plug.
Lay towels under the drainage port and the
lower rear edge of the refrigerator, and position a
container or tray with a height of about 3 cm on
the towels to collect the water.
* The towels prevent floor damage, and water from
being spilled on the floor.
Tilt the refrigerator slowly to the rear by about 30
degrees, and drain the water from the evaporation
tray via the drainage port on the lower rear side.
(The evaporation tray is not visible from the
outside.)
* Because the refrigerator is heavy, the work must be
performed by at least 2 people.
* The work must not be performed by small children or
people who are not capable of doing heavy work. Ask
a specialist transportation company.
4 or more people should hold the hand-holds on the
lower inside of the front and the upper side of the
rear, and carry the refrigerator slowly.
Do not lay down the refrigerator on its side.
!
(The compressor may be damaged.)
Drainage port
Front Lower
interior
Upper part of
back side
Front Lower interior
Example: To set the refrigerator compartment
0.6
o
C lower than the Low setting
Repeatedly press
or to perform
fine adjustment of the
temperature.
"REF" blinks
twice about every
10 seconds
blinks
High setting
Page 10
Medium setting
Page 10
About 0.3
o
C higher
than “High”
About 0.3
o
C lower
than “Mid”
About 0.6
o
C higher
than “High”
Medium high setting
Page 10
About 0.3
o
C higher
than “Mid”
Low medium setting
Page 10
About 0.6
o
C lower
than “Low”
About 0.3
o
C lower
than “Low”
Low setting
Page 10
Note 1:
Refrigerator or freezer
compartment
Other Issues
Specifications
Units
Accesories
Model
MR-L650EH
MR-L710EH
Refrigerator Compartment
1
1
1
1
1
1
-
-
1
1
1
1
-
1
1
1
1
2
1
1
2
1
2
1
1
1
-
1
1
1
1
1
-
1
1
1
1
1
2
1
1
2
Tempered glass shelf (small)
Tempered glass shelf (large)
Utility case (small)
Utility case (large)
Vegetable case
Adjustable pocket
Door pocket (small)
Adjustable pocket (small)
Door pocket
Bottle pocket (small)
Capsule door pocket
Door pocket (large)
Adjustable pocket (large)
Egg shelf
Bottle pocket (large)
Ice tray
Ice storage box
Freezing case (small)
Freezing case (middle)
Freezing case (large)
Leg cover (Right and Left)
Freezer
Compartment


