


4
[Detailed setting]
[4] -1. CHANGE LANGUAGE setting
The language that appears on the dot display can be selected.
•
Press the [
MENU] button to change the language.
1
English (GB),
2
German (D),
3
Spanish (E),
4
Russian
(RU),
5
Italian (I),
6
French (F),
7
Swedish
[4] -2. Function limit
(1) Operation function limit setting (operation lock)
•
To switch the setting, press the [
ON/OFF] button.
1
no1 : Operation lock setting is made on all buttons other than
the [
ON/OFF] button.
2
no2 : Operation lock setting is made on all buttons.
3
OFF (Initial setting value) : Operation lock setting is not made.
* To make the operation lock setting valid on the normal screen, it
is necessary to press buttons (Press and hold down the
[CIR.WATER] and [
ON/OFF] buttons at the same time for
two seconds.) on the normal screen after the above setting is
made.
(2) Operation mode skip setting
After setting is changed, the operation mode can be changed
within the changed range.
•
To switch the following settings, press the [
ON/OFF]
button.
1
Heating mode
: Sets the use or non-use of the
Heating mode.
2
Heating ECO mode
: Sets the use or non-use of the
Heating ECO mode.
3
Hot Water mode
: Sets the use or non-use of the Hot
Water mode.
4
Anti-freeze mode
: Sets the use or non-use of the
Anti-freeze mode.
5
Cooling mode
: Sets the use or non-use of the
Cooling mode.
6
OFF (Initial setting value) : Operation mode skip is not
executed.
* When the setting, other than OFF, is made, the skip settings of
the Heating, Heating ECO, Hot Water, Anti-freeze, and Cooling
modes are executed at the same time.
* A mode that is not available on the unit to connect cannot be
used even if the setting is “AVAILABLE”.
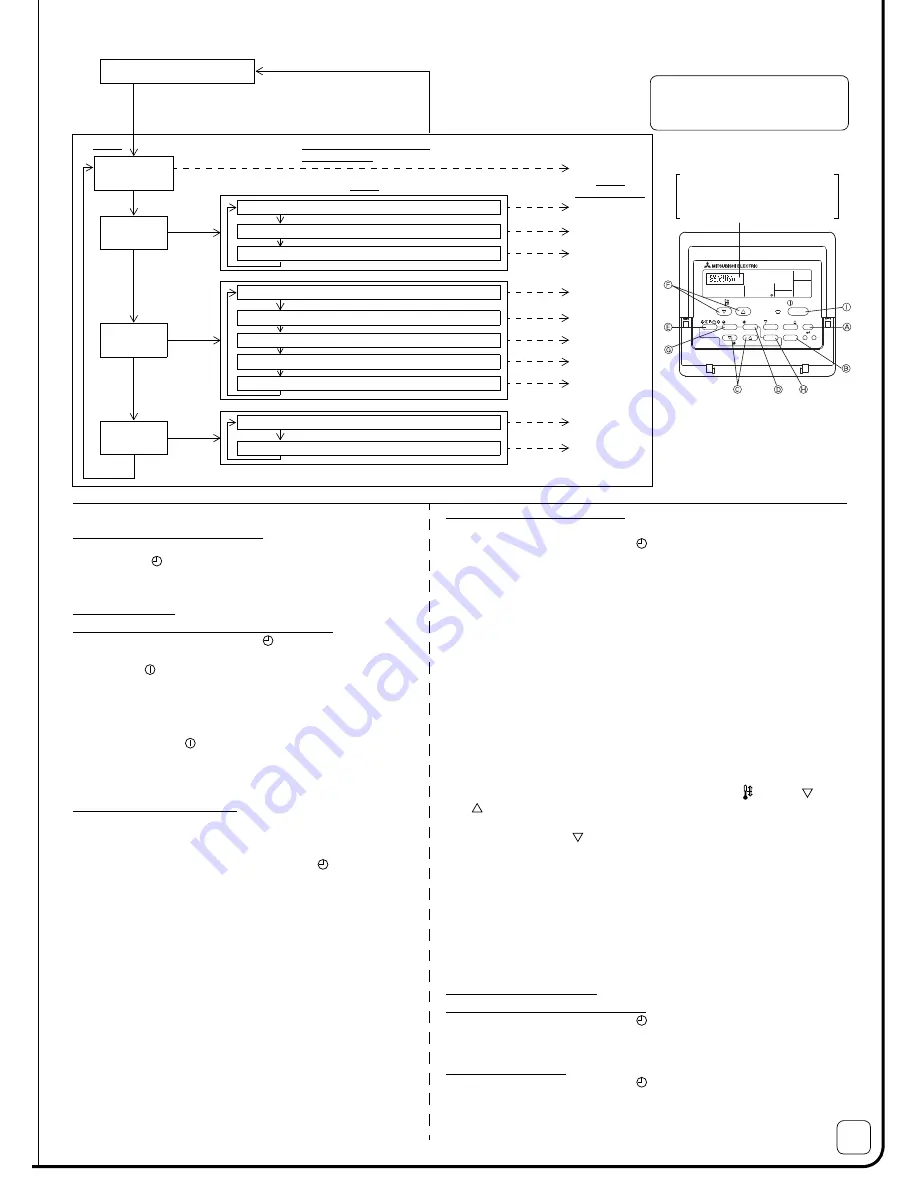
[Function selection flowchart]
[1] Stop the unit to start remote controller function selection mode.
o
[2] Select from item1.
o
[3] Select from item2.
o
[4] Make the setting. (Details are specified in item3)
o
[5] Setting completed.
o
[6] Change the display to the normal one. (End)
(Hold down the
E
button and press the
D
button for two
seconds.)
* The display cannot be changed during the unit function
selection, the test run and the self diagnosis.
(Hold down the
E
button and press
the
D
button for two seconds.)
* The remote controller records the
setting that is made in this way.
Press the
G
button.
See [4]-1
Item 3
(Setting content)
Item 1
Remote Controller Function
Selection Mode
Item 2
Normal display (Display when the
air condition is not running)
Change Language
(“CHANGE
LANGUAGE”)
Function limit
(“FUNCTION
SELECTION”)
Display change
(“DISP MODE
SETTING”)
NOTE
Timer operation stops when the display
for remote controller function selection is
changed to the normal one.
Press the
G
button.
Press the
E
button.
Dot display
Press the
D
button.
Press the
D
button.
Press the
D
button.
Press the
G
button.
Mode selection
(“MODE
SELECTION”)
Press the
E
button.
Press the
E
button.
Press the
G
button.
Press the
G
button.
See [4]-2. (1)
See [4]-2. (2)
See [4]-2. (3)
See [4]-3. (1)
See [4]-3. (2)
See [4]-3. (3)
See [4]-3. (4)
See [4]-3. (5)
See [4]-4. (1)
See [4]-4. (2)
Operation function limit setting (“LOCKING FUNCTION”)
Temperature range limit setting (“LIMIT TEMP FUNCTION”)
Operation mode skip setting (“SELECT MODE”)
Temperature display °C/°F setting (“TEMP MODE °C/°F”)
Water temperature display setting (“WATER TEMP DISP SELECT”)
Use of clock setting (“CLOCK”)
Timer function setting (“WEEKLY TIMER”)
Contact number setting for error situation (“CALL.”)
Remote controller main/sub setting (“CONTROLLER MAIN/SUB”)
Temp off set setting (“TEMP OFF SET FUNCTION”)
Press the
G
button.
Press the
G
button.
The language that is selected in
CHANGE LANGUAGE mode
appears on this display. English
is set in this manual.
PAR-W21MAA
ON/OFF
CIR.WATER
INITIAL SETTING
TEMP.
MENU
BACK
DAY
CHECK
TEST
MONITOR/SET
CLOCK
CLEAR
ON/OFF
Press the
E
button.
(3) Temperature range limit setting
After this setting is made, the temperature can be changed within the set range.
•
To switch the setting, press the [
ON/OFF] button.
1
LIMIT TEMP HEATING MODE:
The temperature range can be changed on heating mode.
This mode cannot be used with FLOW TEMP. CONTROLLER.
2
LIMIT TEMP HOT WATER MODE:
The temperature range can be changed on hot water mode.
Heating mode can be used with FLOW TEMP. CONTROLLER.
3
LIMIT TEMP ANTI-FREEZE MODE:
The temperature range can be changed on anti-freeze mode.
4
LIMIT TEMP COOLING MODE:
The temperature range can be changed on cooling mode.
5
OFF (Initial setting):
The temperature range limit is not active.
* When the setting, other than OFF, is made, the temperature range limit
setting on hot water, anti-freeze and cooling mode is made at the same
time. However, the range cannot be limited when the set temperature range
has not changed.
•
To increase or decrease the temperature, press the [
TEMP. (
) or
(
)] button.
•
To switch the upper limit setting and the lower limit setting, press the
[INITIAL SETTING (
)] button. The selected setting will flash and the
temperature can be set.
•
Settable range
Heating/Hot Water mode : Lower limit: 20 ~ 90 °C
(68 ~ 194°F)
Upper limit: 90 ~ 20 °C (194 ~ 68°F)
Anti-freeze mode
: Lower limit: 5 ~ 45 °C
(41 ~ 113°F)
Upper limit: 45 ~ 5 °C (113 ~ 41°F)
Cooling mode
: Lower limit: 5 ~ 30 °C
(41 ~ 87°F)
Upper limit: 30 ~ 5 °C
(87 ~ 41°F)
* The settable range varies depending on the unit to connect.
[4] -3. Mode selection setting
(1) Remote controller main/sub setting
•
To switch the setting, press the [
ON/OFF] button.
1
Main : The controller will be the main controller.
2
Sub : The controller will be the sub controller.
(2) Use of clock setting
•
To switch the setting, press the [
ON/OFF] button.
1
ON
: The clock function can be used.
2
OFF : The clock function cannot be used.


